Use Classlist to manage course participants, send emails, review accommodations, track progress, and organize enrollment in one place. Your Classlist is a directory of names, emails and group settings which provides you with quick access to a full list of the participants in your course.
 |
Note: For general information about the Classlist tool, refer to About Classlist.
|
Before you begin
Confirm that you can access Classlist in your course. If you don’t see an option described in this topic (for example, Print or Export), your administrator may not have enabled it for your role. Contact your administrator for access.
Send Brightspace emails to your Classlist
You can email learners directly from the Classlist tool. You have the option to send messages to:
- An individual learner
- Multiple learners
- All learners
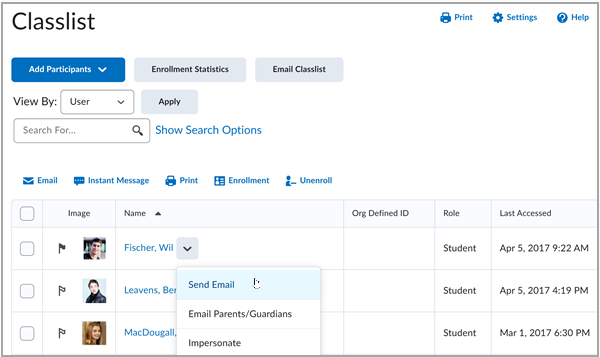
To send an email from the Classlist tool
- From your course navbar, click Classlist.
- To email an individual student:
- From the context menu of the learner that you want to contact, click Send Email.
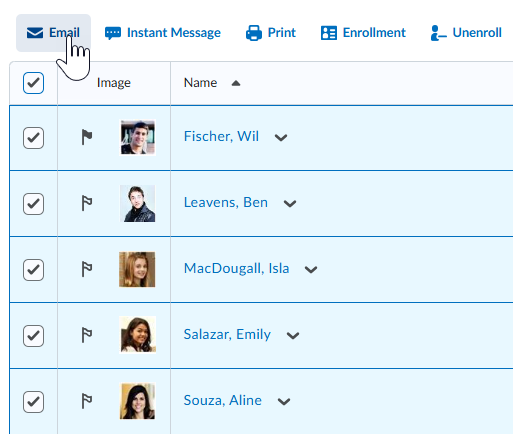
- To email multiple students:
- Select the check boxes to the left of every learner that you want to email, then click Email.

- To email all learners in your course:
- Click the Select All checkbox at the top of your Classlist table, then click Email.
- To only email learners with accommodations, set your search filter to only display learners with accommodations:
- On the Email Classlist page, click Show Search Options.
- Select the Users with Accommodations check box.
- In the Search for text box, click the search icon.
- Click Send Email.
- Compose your message and add any attachments (if applicable).
- Click Send.
Your email is sent to learners.
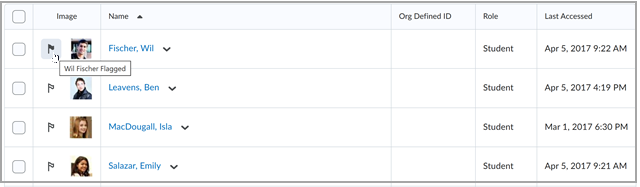
Flag a user in a Classlist
You can flag specific users from the Classlist. This enables you to search for flagged users using Search Options.
To flag a user in a Classlist
- On the navbar, click Classlist.
- In the Image column, click the flag icon next to the image of the user you want to flag.
- To search for and sort the Classlist by flagged or unflagged users only, do the following:

- Click Show Search Options and click to enable the checkbox under Flagged.
- Select Flagged or Unflagged from the dropdown menu.
- Click Search to update the Classlist.
Your Classlist is filtered by flagged or unflagged users.
Add an existing user to the Classlist
Add a user that already exists in Brightspace to your Classlist.
|
Note: To add an existing user to your course through Classlist, you must have permission to change enrollment and to enroll users into the selected role. If you don’t see Add Participants or can’t enroll the user into a role, contact your administrator. |
To add an existing user to your Classlist
- Navigate to Classlist.
- Click Add Participants and select Add existing users.
- From the Add Existing Users page, do the following:
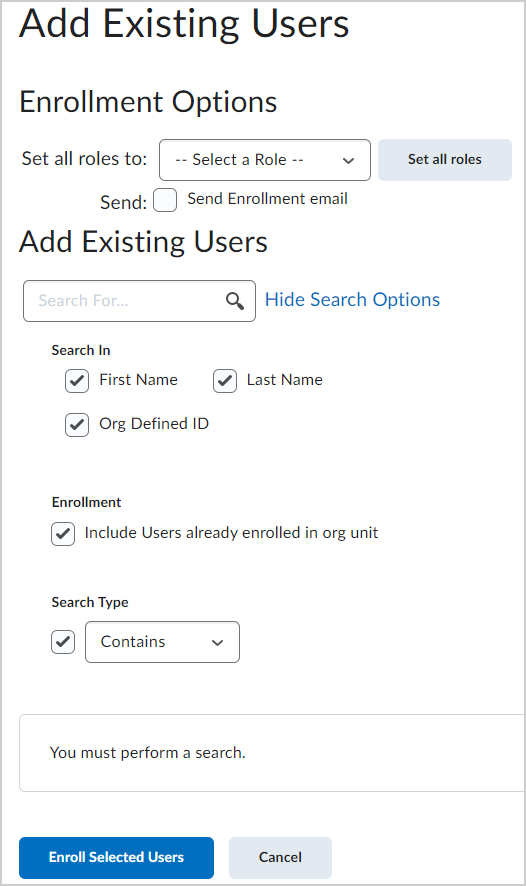
- Under Enrollment Options, from the Set all roles to drop-down list, select the role you want to assign the user you are adding to the Classlist.
- To send the user an enrollment email, select the Send Enrollment email check box.
- Under Add Existing Users, in the Search field, enter the name of the user you want to add.
- Click Show Search Options and specify the following options:
- Search In - Select the First Name, Last Name, and Org Defined ID check boxes.
- Enrollment - To set the search filter to filter out users already enrolled in the course, deselect the Include Users already enrolled in org unit check box.
- Search Type - select Starts With, Exact Match, or Contains. Selecting Starts With or Exact Match narrows your search and improves the speed at which your search results are displayed.
- In the search results list, select the check box alongside the name of the user you want to add, and then select the appropriate role for the user.
- Click Enroll Selected Users.
- Click Done.
The selected existing users are added to your course Classlist.
Enroll a new user
You can also create and add a new user to your course Classlist.
|
Note: To add an existing user to your course through Classlist, you must have permission to change enrollment and to enroll users into the selected role. If you don’t see Add Participants or can’t enroll the user into a role, contact your administrator. |
To enroll a new user
- Navigate to Classlist.
- From the Add Participants drop-down menu, select Create and enroll a new user.
- From the Create and Enroll a New User page, enter in all user details.
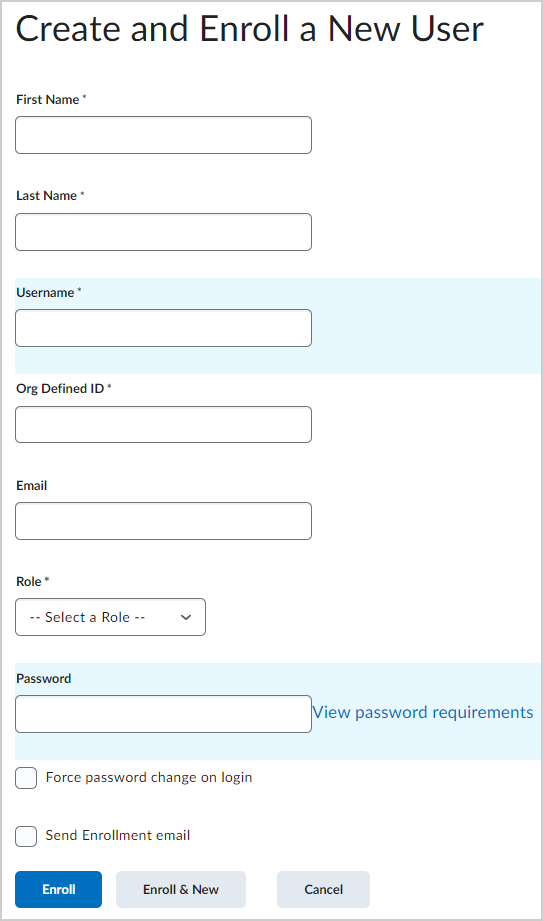
- If you want to send the user an enrollment email, select the Send Enrollment email check box.
- Click Enroll.
A new user is created and enrolled into your Classlist.
Video: How to enroll a new user
Unenroll users
You can unenroll (delete) users who are no longer enrolled in your course through the Classlist tool.
|
Note: To add an existing user to your course through Classlist, you must have permission to change enrollment and to enroll users into the selected role. If you don’t see Add Participants or can’t enroll the user into a role, contact your administrator. |
To unenroll users
- From the course navbar, click Classlist.
- Select the users you want to unenroll and click Unenroll.
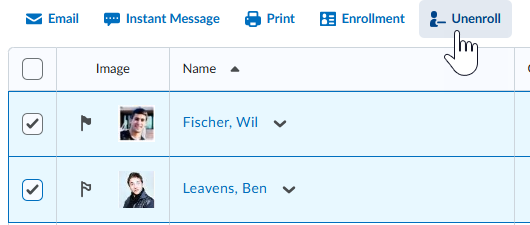
- Click Yes to confirm.
The selected users are unenrolled from your course Classlist.
 |
Important: If you have added users to a child section or group, they are not unenrolled from child sections or groups when they are unenrolled from a parent course offering. For more information, refer to About Groups and Sections.
|
View user accommodations
You can view users' accommodations from the Classlist tool.
|
Note: To view another user’s accommodations from Classlist, you must have permission to view accommodations. If you don’t see accommodations for a learner, your organization may require additional permissions depending on where you access accommodations (for example, through Classlist or Quizzes). Contact your administrator for access. |
To view user accommodations
- Navigate to Classlist.
- Click on the context menu of the learner whose quiz accommodations you want to view, and then click View Accommodations.
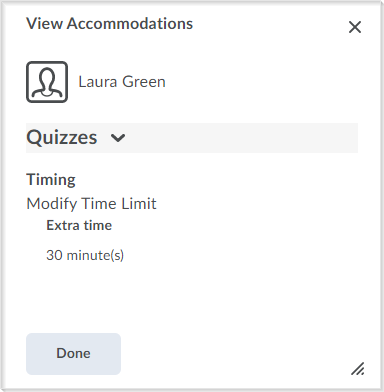
- Click Done to close.
Edit user accommodations
Add new learner accommodations or edit existing accommodations from the Classlist tool.
|
Note:
- To view another user’s accommodations from Classlist, you must have permission to view accommodations. If you don’t see accommodations for a learner, your organization may require additional permissions depending on where you access accommodations (for example, through Classlist or Quizzes). Contact your administrator for access.
- Accommodations apply to all quizzes in the course for the selected learner, including quizzes with past attempts. To ensure consistency, apply accommodations at the start of the course, before any quizzes are attempted.
|
To edit user accommodations
- Navigate to Classlist.
- Click on the context menu of the learner whose quiz accommodations you want to view, and then click Edit Accommodations.
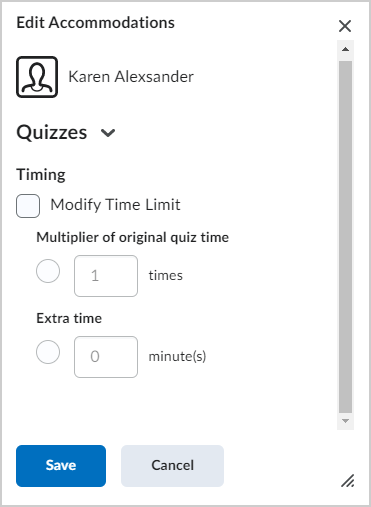
- Under Timing, do the following:
- Select Modify Time Limit and choose to either increase the original quiz time by a factor, or add extra time in minutes.
- Click Save.
Accommodations are updated and saved for the selected user.
Impersonate a user
You can impersonate another user from the Classlist tool. For example, you can impersonate a user when submitting a quiz on their behalf.
|
Note:
- To impersonate a user from Classlist, your administrator must grant you permission to impersonate the user’s role. If you don’t see Impersonate, your organization may have restricted it through privacy settings. Contact your administrator for more details.
- While impersonating another user, you are restricted from using the Google Workspace integration or viewing the Google Workspace Widget.
|
To impersonate a user
- Navigate to Classlist.
- From the context menu of the user you want to impersonate, click Impersonate.
- Click Yes to confirm.
You have assumed the role of the selected user, including their role permissions.
To stop impersonating a user
- Click your profile picture and click the X next to the user's name.
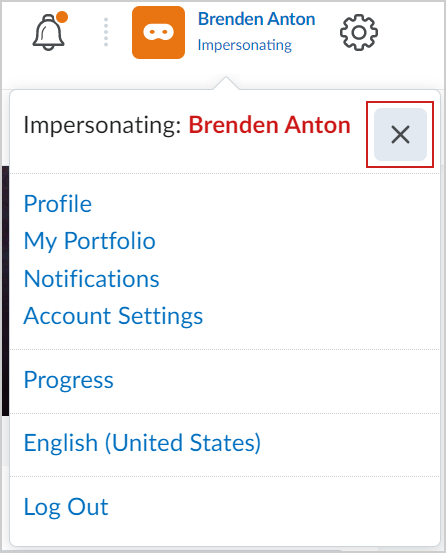
You are no longer impersonating the selected user.
Video: Impersonate a user
View progress from the Classlist
You can access the Class Progress tool from your Classlist. The Class Progress tool helps you review a learner's grades, learning objectives, as well as their participation in course activities such as discussions.
|
Note: Your view of the Class Progress tool may differ depending on whether you access the Class Progress tool from the org level or the org unit level, as well as depending on your roles and permissions. Contact your administrator for more details. |
To check user progress
- Navigate to Classlist.
- From the context menu of the user you want to view, click View progress.
Note: If the user has any quiz-specific accommodations, the accommodations icon appears alongside the Quizzes progress indicator.
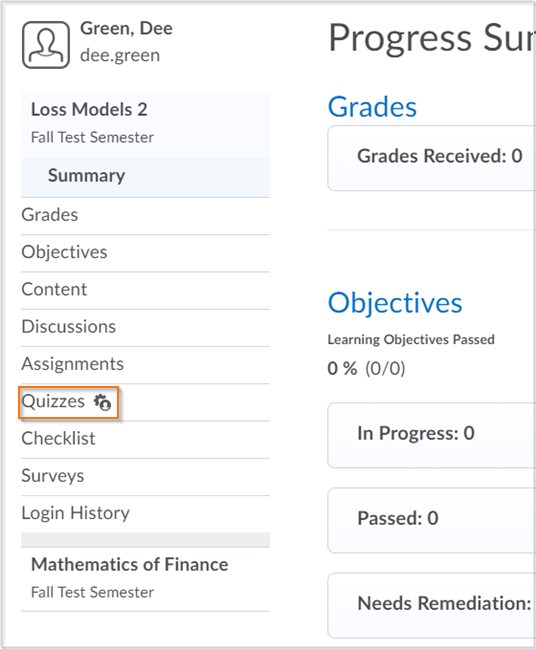
- To view progress on a specific progress indicator, click the indicator on the left pane. The report details display.
- Click the expandable and collapsible links to expand or collapse the report details.
Organize your Classlist with tabs
Use tabs on your Classlist to show all roles, one role, or a combination of roles. The tabs you choose to display are visible to learners when they view your Classlist. If there is a role that you do not want learners to see in the Classlist, you can choose to not have it appear there.
|
Note: To organize your Classlist with tabs, you must have access to manage Classlist tab settings. If you don’t see Settings or can’t change tab display options, you must be granted the required role permissions to organize your Classlist with tabs. Contact your administrator for details. |
To display tabs on your Classlist
- Navigate to Classlist.
- On the Classlist page, click Settings.
- From the drop-down list in the Display column, select Yes or No for the tab you want to show or hide on your Classlist page.
- Click Save.
Your Classlist displays with tabs based upon your saved settings.
Add or remove auditors
|
Note: To add or remove auditors from Classlist, your administrator must enable auditor management for your role. If you don’t see the auditor option, contact your administrator for access. |
You can add parents as auditors from the Classlist. Parents added as auditors of their child can view their child's information in the Class Progress tool for a specific course offering. Auditors can also view:
- The Grades tool
- Quizzes activity
- Discussions activity
- Content viewing activity
- Assignments activity
- Login history
- Checklist completion
- Competencies achievement
|
Note: You must be granted the required role permissions to add parents as auditors of a learner. Contact your administrator for details. |
To add an auditor
- Navigate to Classlist.
- On the Classlist page, from the context menu of the user you want to assign auditors to, click Manage User Auditors.
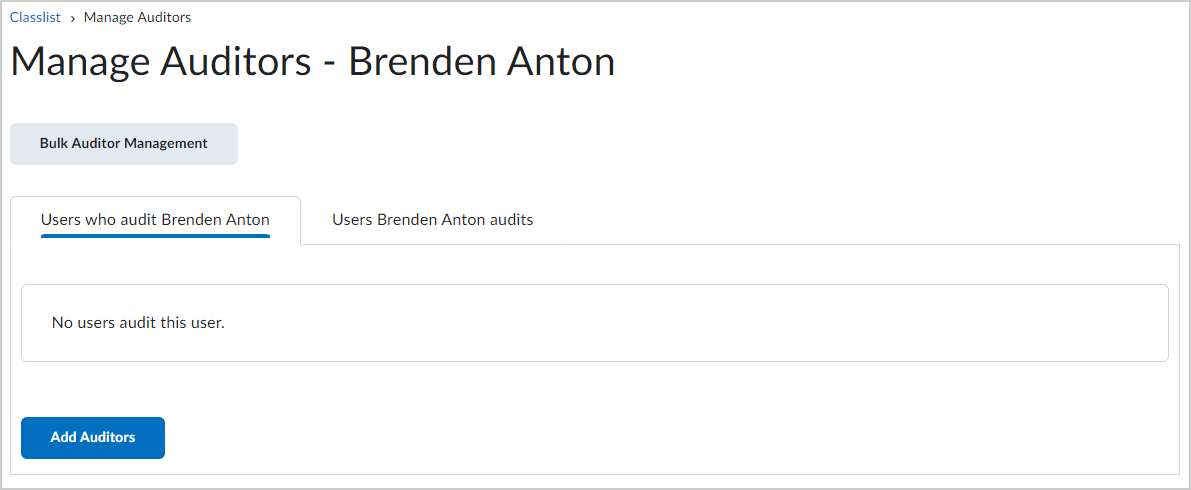
- To add or remove auditors, click Add Auditors.
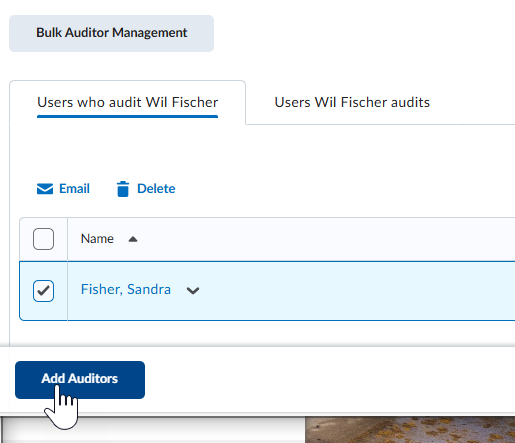
- Click Add and then click Add again to confirm.
The selected user is added as an auditor of the specified learner. To remove an auditor, click the context menu next to the auditor's name and click Delete.
|
Note: You can also make the selected user an auditor of another user by clicking the Users [user name] audits tab and clicking Add Users to Audit. |
To add or delete multiple auditors with a CSV file
- From the Manage Auditors page, click Bulk Auditor Management.

- Follow the instructions included on this page to upload a file and click Continue.
Follow the prompts to complete the process.
Print a Classlist
You can print a list of learners in your Classlist. The printout includes:
- Learner’s image
- Last name
- First name
- Org defined ID
- Role
- Last accessed date and time
- Pronouns (if the learner has chosen to display pronouns and pronouns are visible in Classlist)
- Course information, including the course name and course code, to identify the course the printout came from
|
Note: To print your Classlist, you must have permission to print Classlists. If you don’t see Print, contact your administrator for access. |
To print a Classlist
- On the course home page, click Classlist.
- To print a list containing multiple learners, select the check boxes for every learner you want to print, and then click Print. The Print Classlist dialog box appears and displays the information you are printing.
- Click Print.
To print the entire Classlist
- To access your Classlist, on the course home page, click Classlist.
- To open the print view, click Print at the top of the page. The Print Classlist page appears.
- Click Print.
To print only learners with accommodations
- To access your Classlist, on the course home page, click Classlist.
- To open the print view, click Print at the top of the page.
- To show filters, click Show Search Options.
- To filter the list, select the Users with Accommodations check box.
- To apply the filter, in the Search For box, click the search icon.
- To print, click Print. The Print Classlist dialog box appears.
- To select a printer and print, click Print.
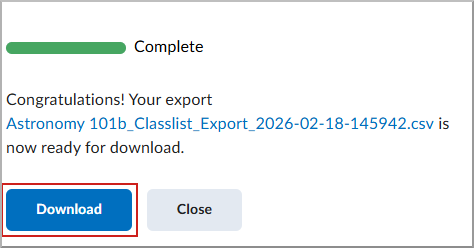
Export Classlist details to CSV
Use Export to download Classlist details to a CSV file. You can export all learners in your current Classlist view or export only selected learners. The exported file mirrors the information shown in your Classlist view (for example, the columns and any filters you’ve applied).
|
Note: If you don’t see Export, contact your administrator. Access to Export can be controlled by your organization. |
To export Classlist details to CSV
- To access your Classlist, on the course home page navbar, click Classlist.
- Do one of the following:
- To export all learners, select the Export icon at the top of page.
- To export all learners displayed on the page, select the checkbox in the header row and use the Export icon above the Classlist.
- To export selected learners, select the checkbox beside the learners you want to export and use the Export icon above the Classlist.
- To start the export, click Export.
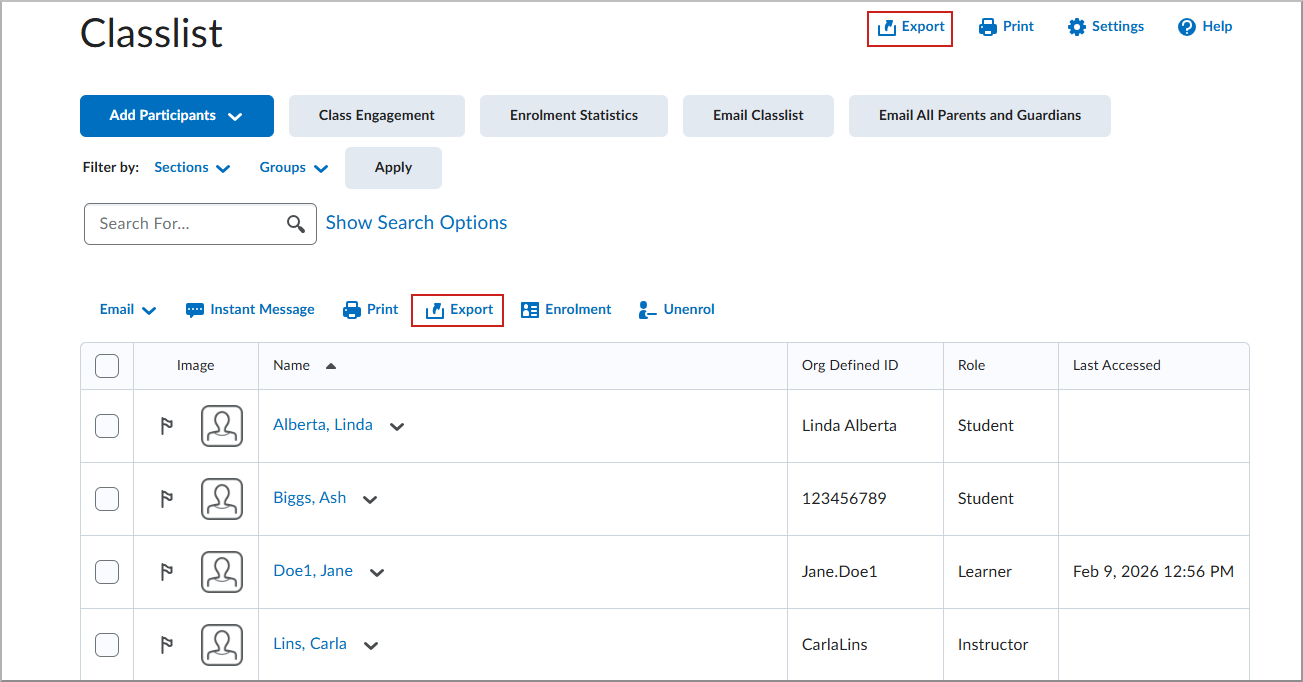
- To download the file, click Download.