Sharing your screen or content
- Click the Share Screen button
 located in your meeting controls.
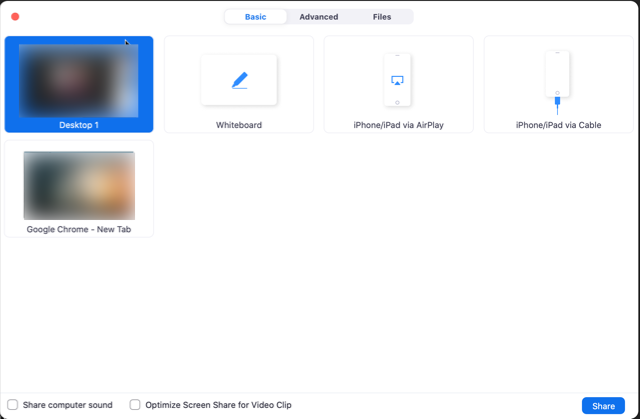
- Select one of these screen share options:
- Basic: Share your entire desktop, specific application window, whiteboard, or iPhone/iPad screen.
Note: Users can select multiple desktop programs at once, instead of sharing their entire desktop. Only the user employing this feature will need to be on version 5.4.3 or higher, while viewers can be connected with older versions. Hold the Shift key on macOS or the Ctrl key on Windows to select more than one application.
- Advanced
- Portion of Screen: Share a portion of your screen represented by a green border.

- Music or Computer Sound Only: Only share your computer's audio (your selected speaker in your audio settings).

- Content from 2nd Camera: Share a secondary camera connected to your computer; for example, a document camera or the integrated camera on your laptop.

- Files: Share a file from a third-party sharing service like Google Drive or Microsoft OneDrive. Follow the on-screen prompts to sign in to the third-party service and grant Zoom access.
Note: Alternatively, you can open the file in a web browser then share the browser window. For example, to share a Google doc, open the doc in Chrome, then share the Chrome window. The end result is the same as using the sharing options in the Files tab.
- (Optional) Enable these features:
- Check Share Computer Sound: If you check this option, any sound played by your computer will be shared in the meeting.
- Check Optimize for full screen video clip: Check this if you will be sharing a video clip in full screen mode. Do not check this otherwise, as it may cause the shared screen to be blurry.
- Click Share.
- Zoom will automatically switch to full screen to optimize the shared screen view. To exit full-screen, click Exit Full Screen in the top-right corner or press the Esc key.
- To disable automatic full screen when viewing a shared screen, disable this option in your desktop client settings: Enter full screen automatically when a participant shares screen.
- If you selected Portion of Screen, customize the screen portion by dragging or resizing the green border.
- If you selected Content from 2nd Camera, click Switch Camera in the top-left corner to switch the shared camera.
Share screen menu
When you start sharing your screen, the meeting controls will move into a menu that you can drag around your screen.

- Mute/Unmute: Mute or unmute your microphone.
- Start/Stop Video: Start or stop your in-meeting video.
- Participants/Manage Participants: View or manage the participants (if the host).
- New Share: Start a new screen share. You will be prompted to select which screen you want to share again.
- Pause Share: Pause your current shared screen.
- Annotate / Whiteboard: Display annotation tools for drawing, adding text, etc.
- More: Hover over more for additional options.
- Chat: Open the chat window.
- Invite: Invite others to join the meeting.
- Record: Start recording locally or to the cloud.
- Allow/Disable participants annotation: Allow or prevent the participants from annotating on your shared screen.
- Show/Hide Names of Annotators: Show or hide the participants' name when they are annotating on a screen share. If set to show, the participant's name will briefly display beside their annotation.

- Live on Workplace by Facebook: Share your meeting or webinar on Workplace by Facebook. Learn more about live-streaming a webinar.
- Optimize Share for Full-screen Video Clip: Start optimizing for a video clip in full screen mode.
Note: Do not enable this setting if you are not sharing a full screen video clip, as it will blur your screen share.
- End Meeting: Leave the meeting or end the meeting for all participants.
Showing Zoom windows during screen share
By default, the Zoom window is not shared while sharing your screen. Showing the Zoom window during screen share can be useful if a participant is helping you use Zoom.
- Sign in to the Zoom web portal.
- In the navigation menu, click Settings.
- In the In Meeting (Basic) section, make sure Show Zoom windows during screen share is enabled. This setting will allow the setting to appear in the desktop client.
- Sign out of the Zoom desktop client and sign back in. Alternatively, you can exit the client and re-open it.
- Click your profile picture then click Settings.
- Click the Share Screen tab and make sure Show Zoom windows during screen share is enabled.
Using dual monitors
If you are using a dual monitor set-up, you can turn on the dual monitors feature to see the screen sharing on one monitor and participants on the second.
Note: On Mac OS 10.15 Catalina, you need to allow Zoom access to screen recording to share your screen. You can do this in your System Preferences > Security & Privacy > Privacy > Screen Recording. Check the option for zoom.us.
