Add, configure, build, and deliver your Tests in Top Hat. A Test enables you to deliver exams either non-monitored or monitored in a bring-your-own-device (BYOD) environment, using Top Hat’s proprietary lock-out capabilities.
For a full description of the Top Hat Test, visit: https://tophat.com/test/ (opens in a new window)
Table of Contents
- Add and Configure Test (Non-Monitored / Monitored)
- Student View of Test Details
- Building the Test
- Assigning / Ending Tests
- Non-Monitored Test
- Monitored Test
- Test Accommodations
- Proctor Report
- Monitoring Student Status
- Violation Severity and Color Coding
- Understanding Lockouts
- Managing Tests: Delete, Duplicate, and Copy
- Delete a Test
- Duplicate and Copy to Course
- Export to PDF
- Gradebook Settings / Test Hand Back
- Gradebook Visibility Settings
- Handing Back a Test
- Accessibility and Best Practices
- Accessibility - Question Specific Notes
- Best Practices for Success
- Pre-Test Announcements (Classroom Script)
- Best Practices for Accommodations
- Frequently Asked Questions (FAQ)
Add and Configure Test (Non-Monitored / Monitored)
To add a Test to your course, select the blue "Add to course" button and select "Test" from the drop-down menu.
From the menu that appears, select the type of test you wish to create: Non-Monitored or Monitored. This can also be updated in the Test Settings after it has been created.
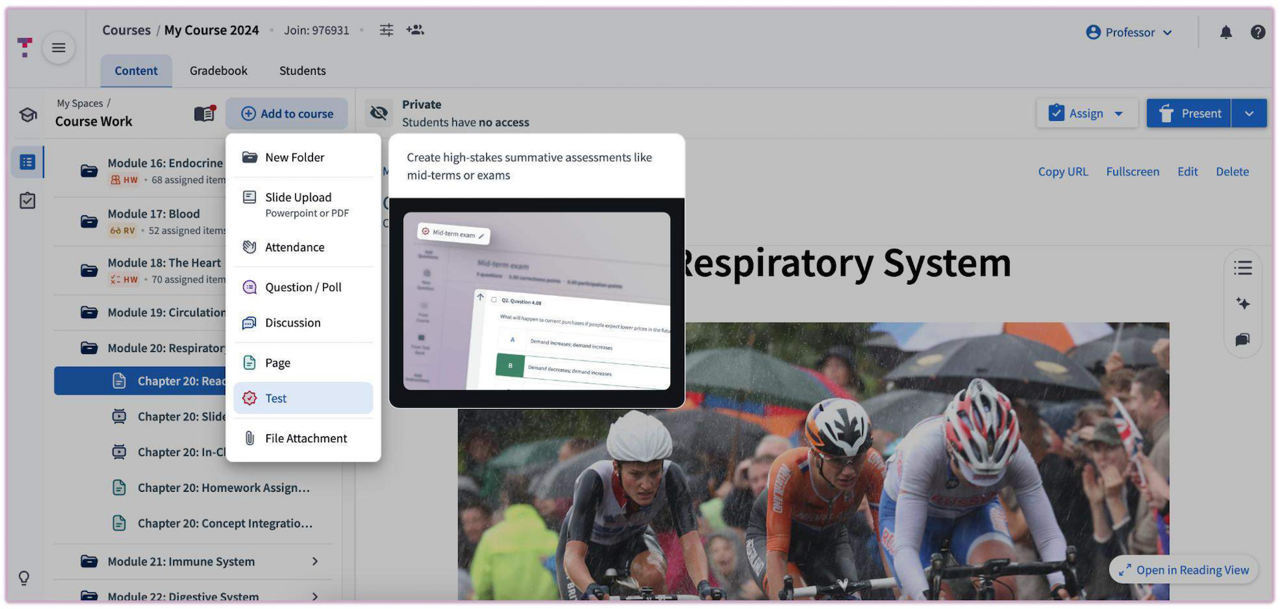 Image: Add to Course > Test
A Top Hat monitored test can be configured with various lockdown options:
- AI Extensions: Disabled by default (this setting is permanent).
- Time Duration Lockout: Student is locked out after leaving the test for a set amount of time (10, 5, 3, 1, or 0 seconds).
- Departure Lockout: Student is locked out after a set number of window departures (10, 5, 3, or 0).
- Screenshots: Enable or disable lockout for taking a screenshot.
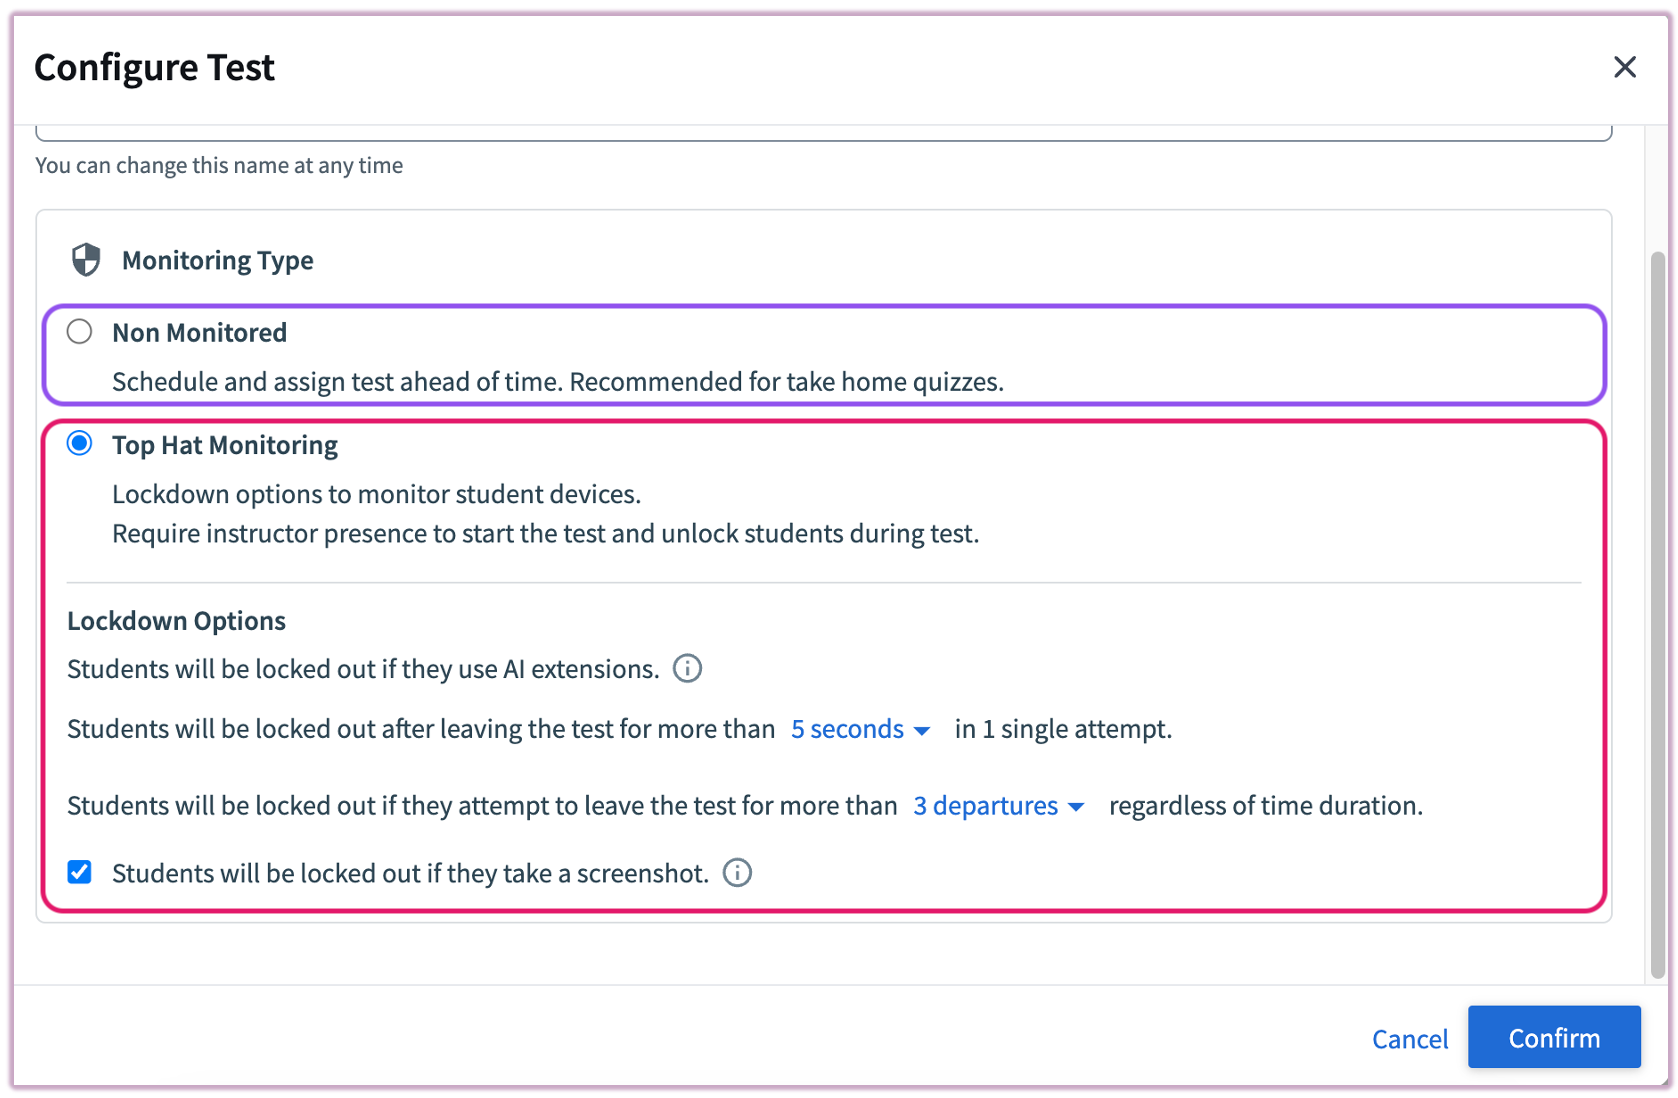 Image: Configure Test Settings
Student View of Test Details
The following image shows the student view on the mobile app (Non-Monitored and Monitored). The details are identical when viewed in a web browser.
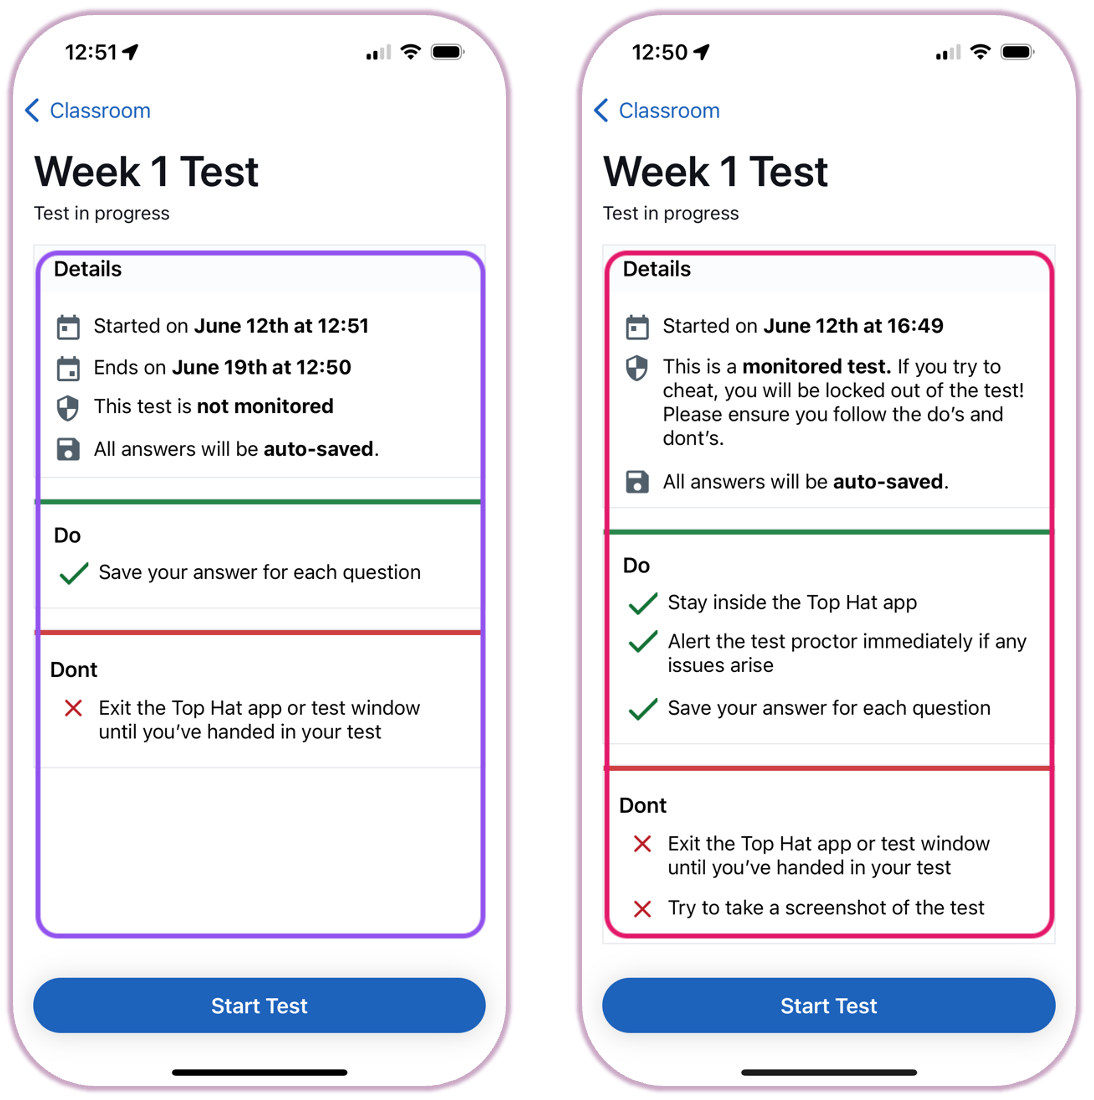 Image: Web and Mobile View of Test Start Screen
Building the Test
After confirming the type of Test you wish to create, the Test builder will appear.
From within the Test builder menu, you can:
- Rename the Test
- Randomize the order of the questions so each student will view the questions in a different order
- Add questions in three ways: Create a "New Question", "Import from Course", or add "From Test Bank"
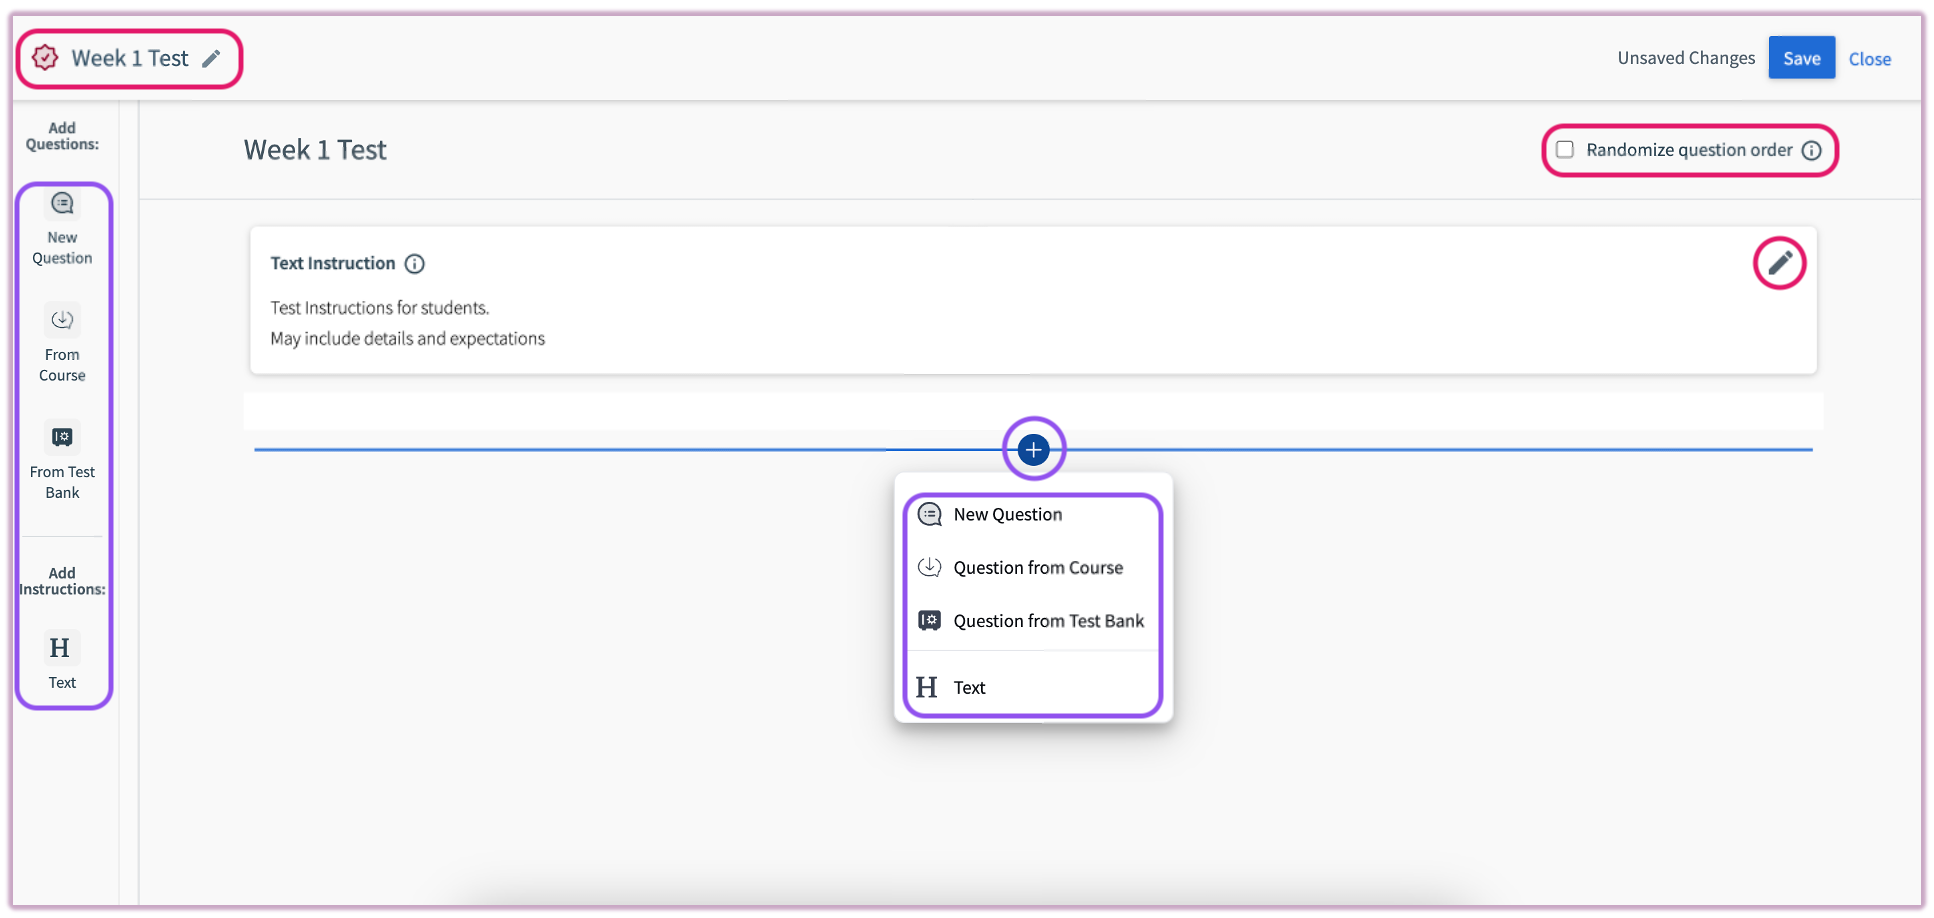 Image: New Test Building Window
New Question
Brings up the Question Builder to create your question as required.
Visit: Top Hat Questions guide for information on how to use our Question Builder for each type of Question in Top Hat.
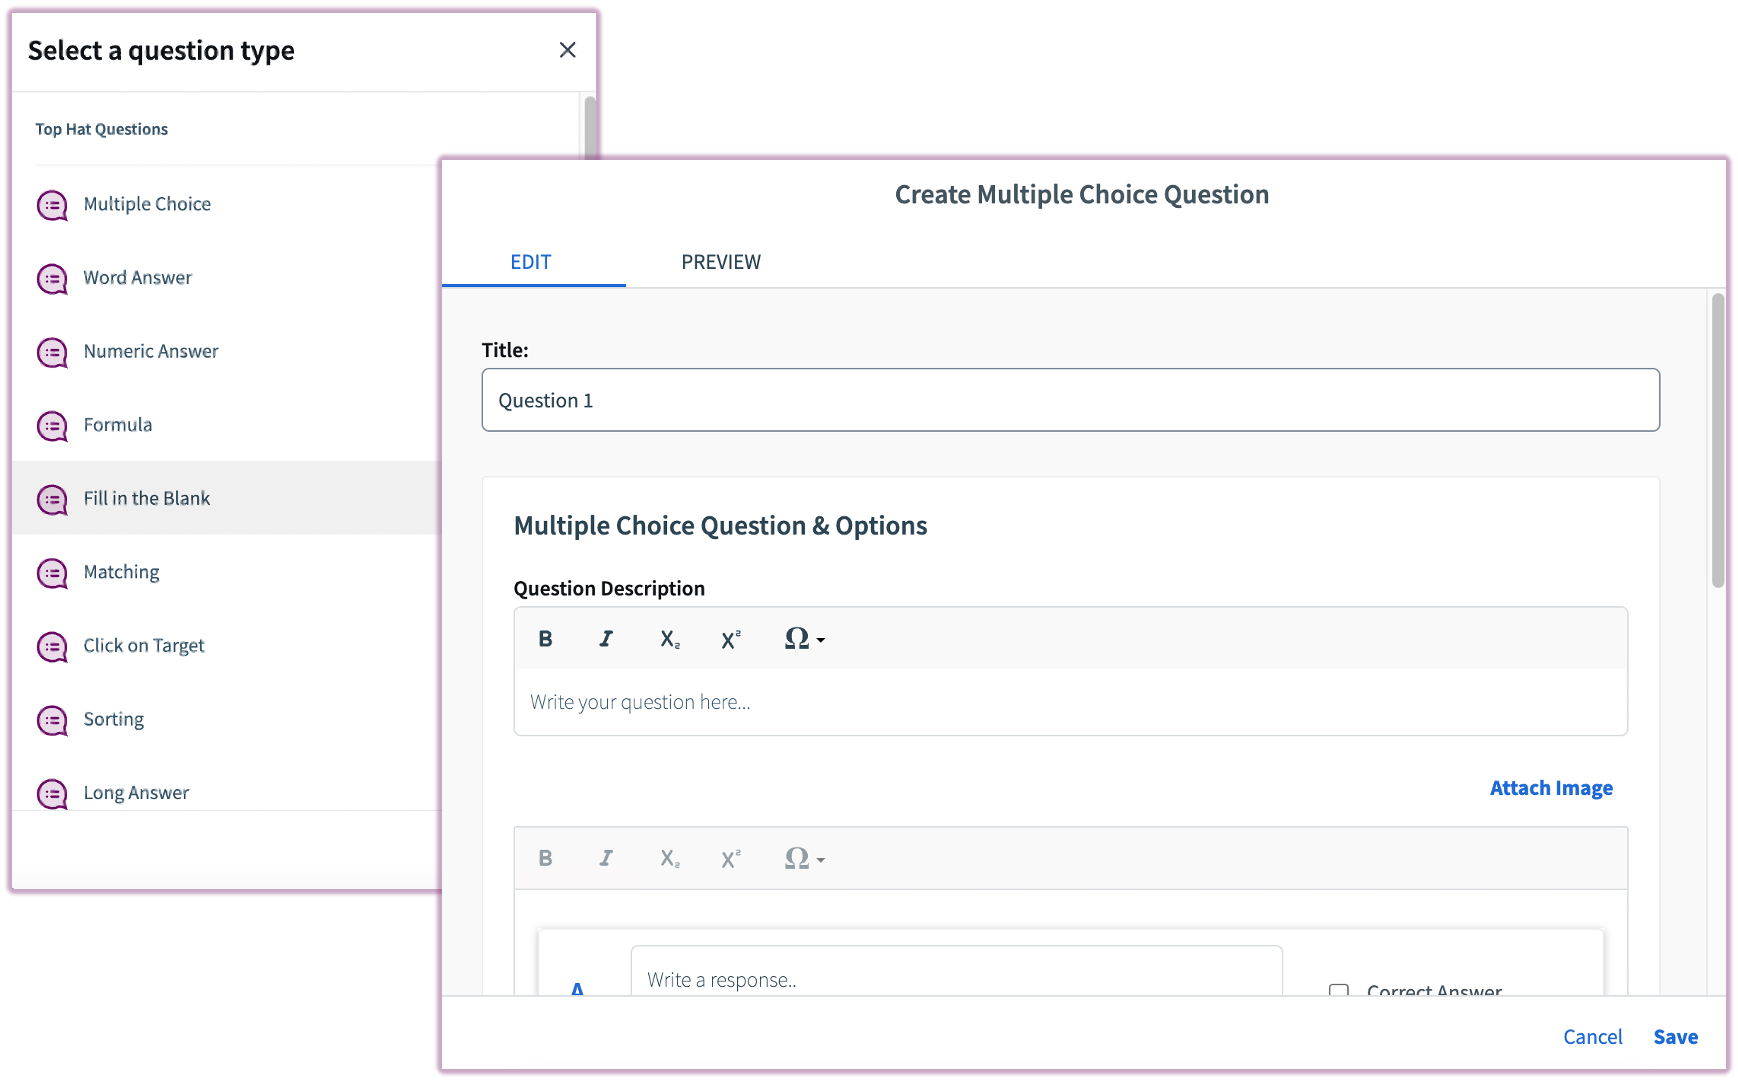 Image: New Question Menu
Question From Course
Brings up a list of questions contained within the course.
- To import a question from the course, select "Question from course" in the Test Builder menu.
- Browse for the questions you wish to add. Hover over a question to view a preview.
- Select the questions you wish to add; they will be listed on the right side of your screen.
- Review as needed and select "Import Questions" to add them to the Test.
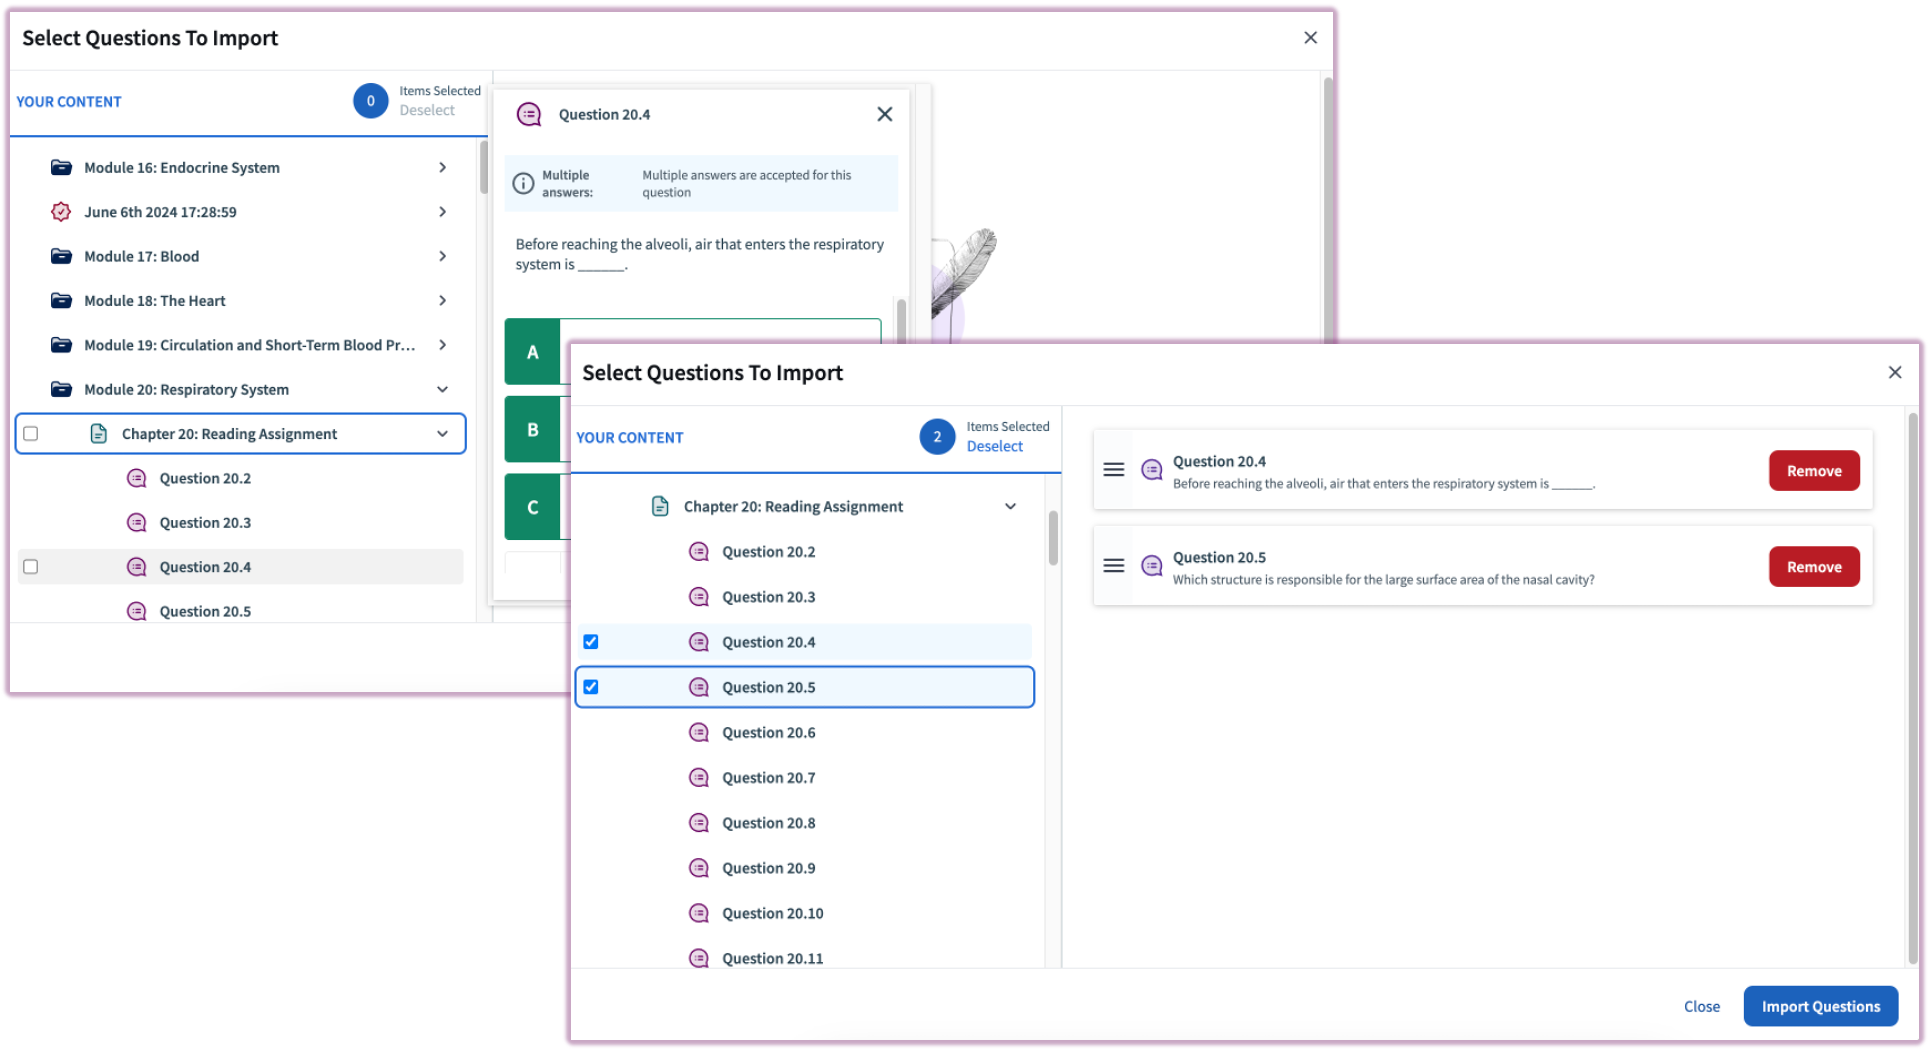 Image: Import Existing Question from Course
From Test Bank
Brings up a list of questions contained within the available Test Bank.
To add a question from a test bank, select "From Test Bank" within the test builder menu and select "+ Add All".
Question Filtering
The questions contained within a Test Bank are filterable.
For example, if you would like to add questions that are Numerical and require Sorting, select "Numeric" and "Sorting" to bring up the list of available questions meeting this criteria.
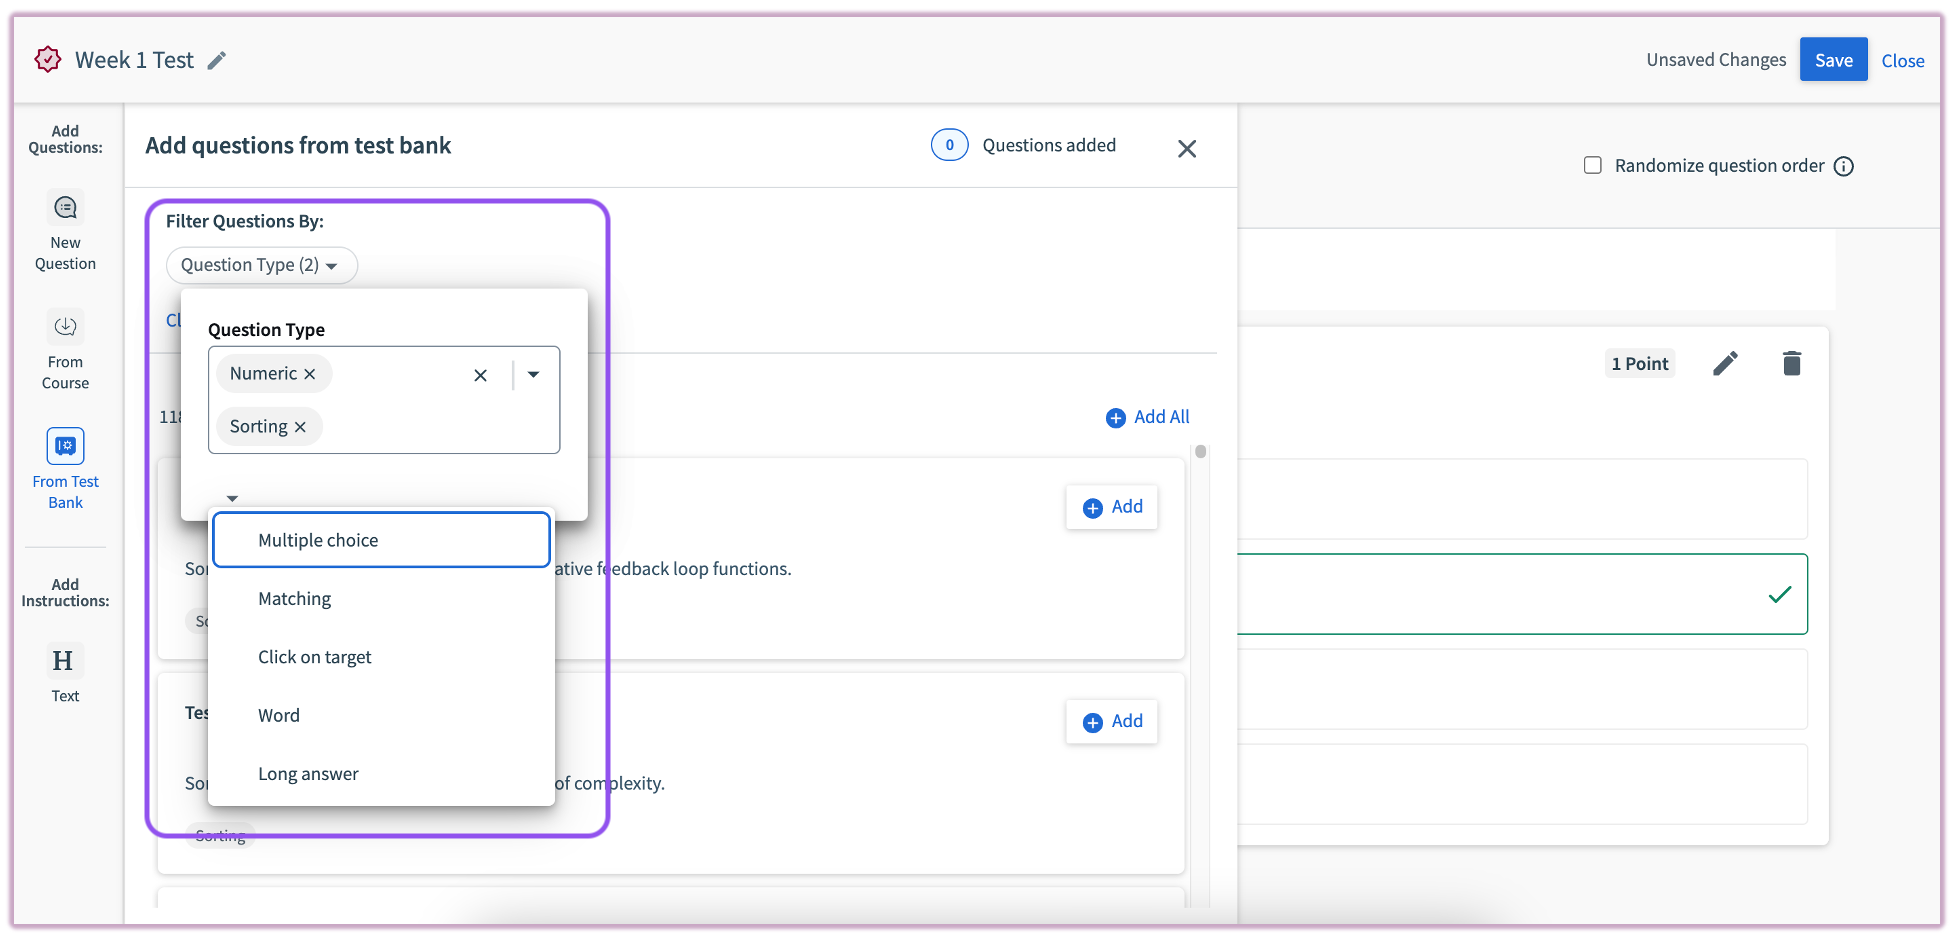 Image: Filter Questions
Once you have finished building the test, select "Save" to complete the process. The newly created test will now appear in the "Course Work" Space in the content tree and can now be assigned.
Assigning and Ending Tests
Depending on which type of Test you have created (Non-Monitored or Monitored), the assign options will be different.
The primary differences are:
- Non-Monitored Tests: Can be assigned to specific students, have a scheduled start/end time, and include time-based accommodations.
- Monitored Tests: Are manually started and ended. They provide a Proctor Report for live monitoring and will close automatically after 48 hours.
Non-Monitored Test
To assign the Test, select it and choose Assign from the upper right corner of your screen. From the menu that appears, set the following preferences:
- Who: Choose "All Students" or "Specific Students."
- Available from: Set when the test should be made available.
- Available until: Choose the end date and time.
- Time Limit: Add a Time Limit and Accommodations if required.
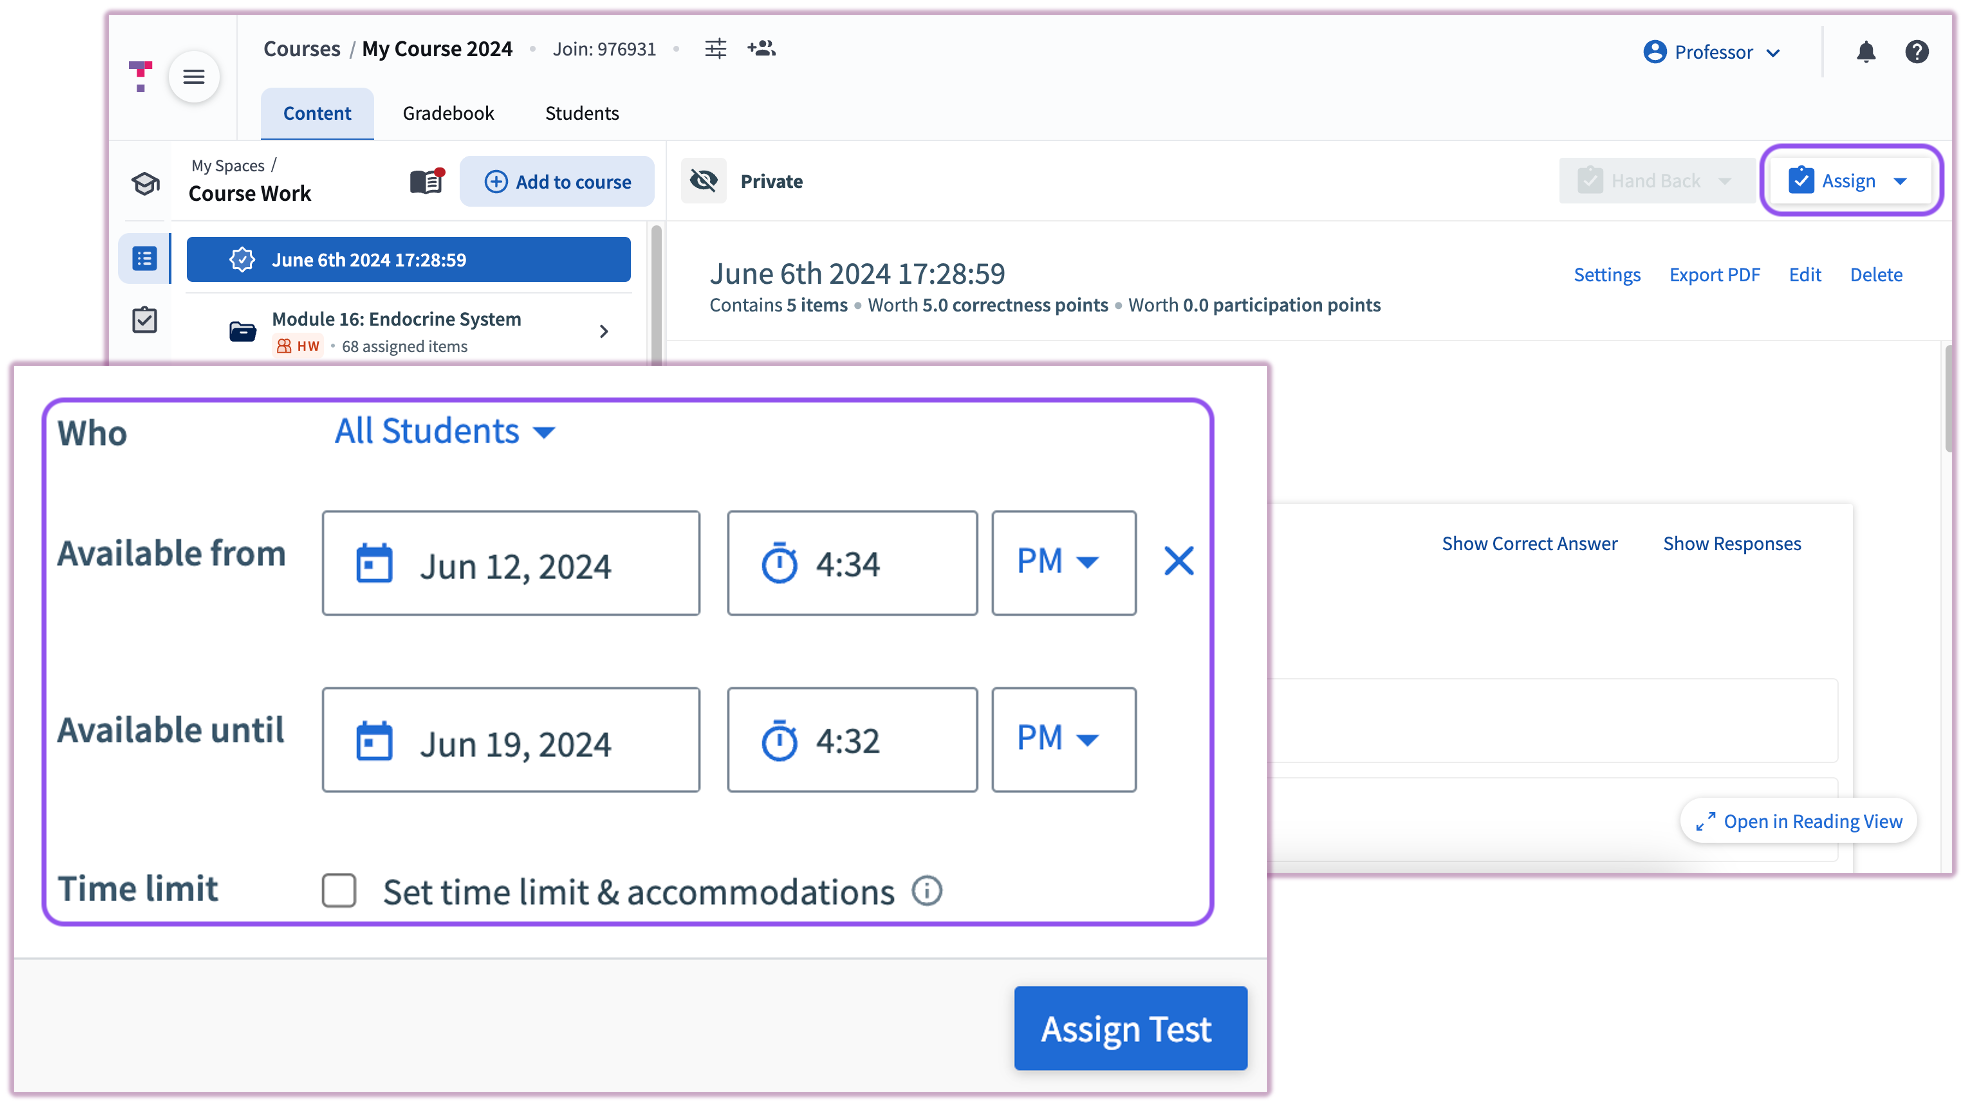 Image: Test Assign Details
Select Assign Test to complete the process.
 Image: Test Assignment Details - In Progress
Support Articles:
Detailed Guide on Assigned Content
Monitored Test
To assign the Test, select the test and choose Start Test from the upper right corner of your screen.
A Test Code will be displayed on screen. Students will be prompted to enter this code to enter the Test. The Test Code window can be used to navigate to the Proctor Report or can be simply minimized.
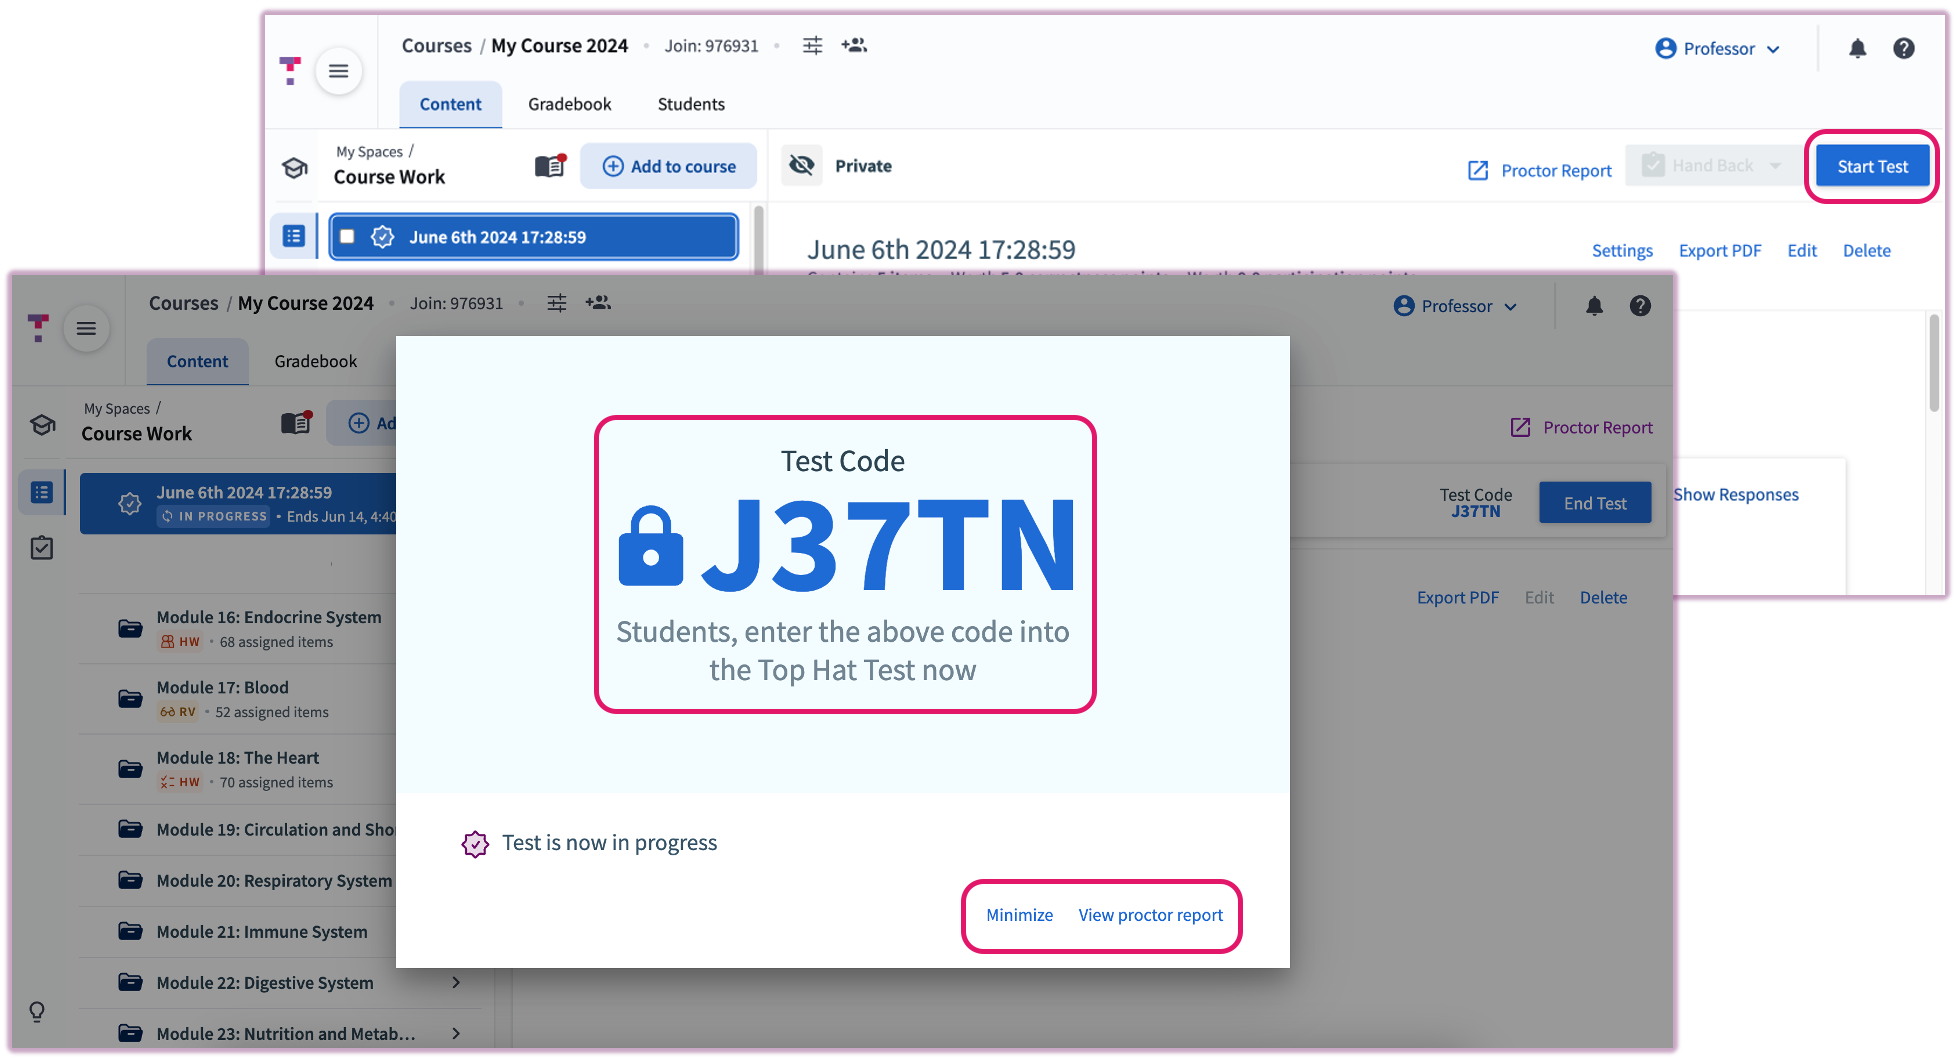 Image: Test Code needed to enter the test
To end the Test, select End Test.
Test Accommodations
Top Hat allows you to set individual time limits for students requiring accessibility accommodations. These settings ensure that once the general class time limit expires, accommodated students can continue their assessment without interruption.
To add an accommodation:
- Open the Assign menu for your test.
- Select "Add Accommodation(s)".
- Search for the student by name or email.
- Select the "Time Accommodation" (e.g., 1.5x, 2.0x, or a specific minute override).
- Click "Set Time Accommodations" to save, then finalize by selecting "Assign Test".
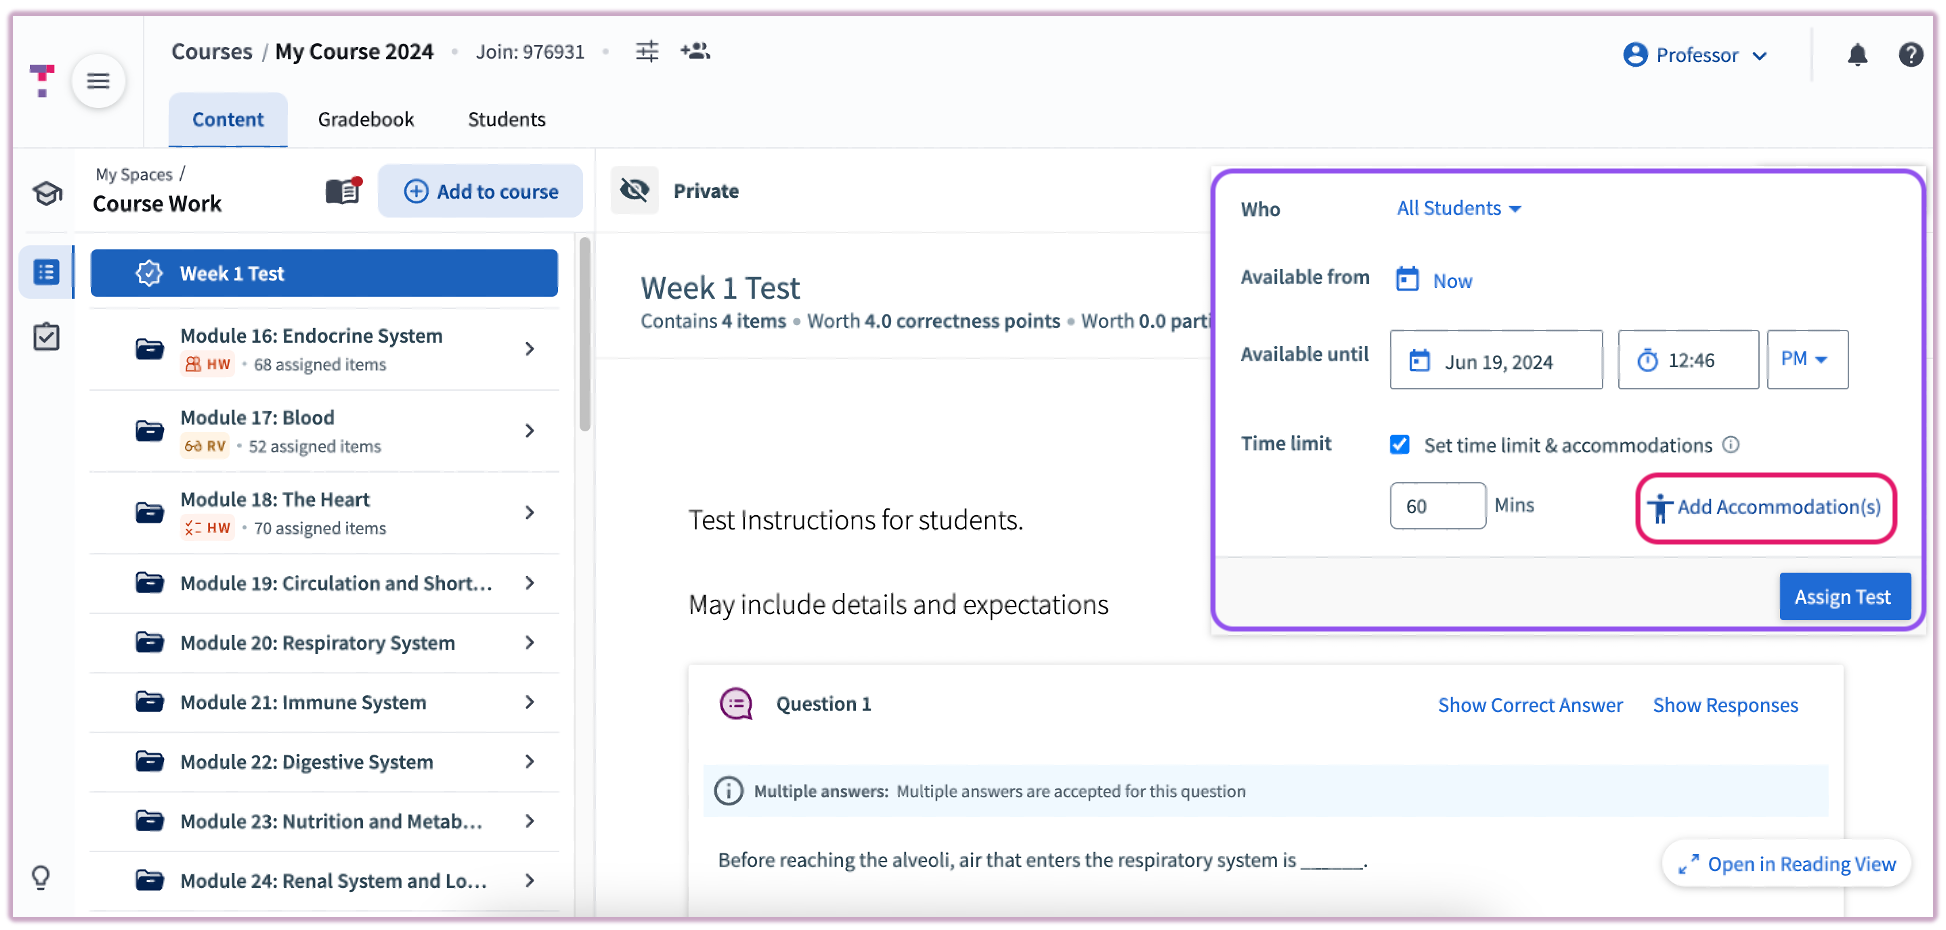 Image: Locating students for individual accommodations
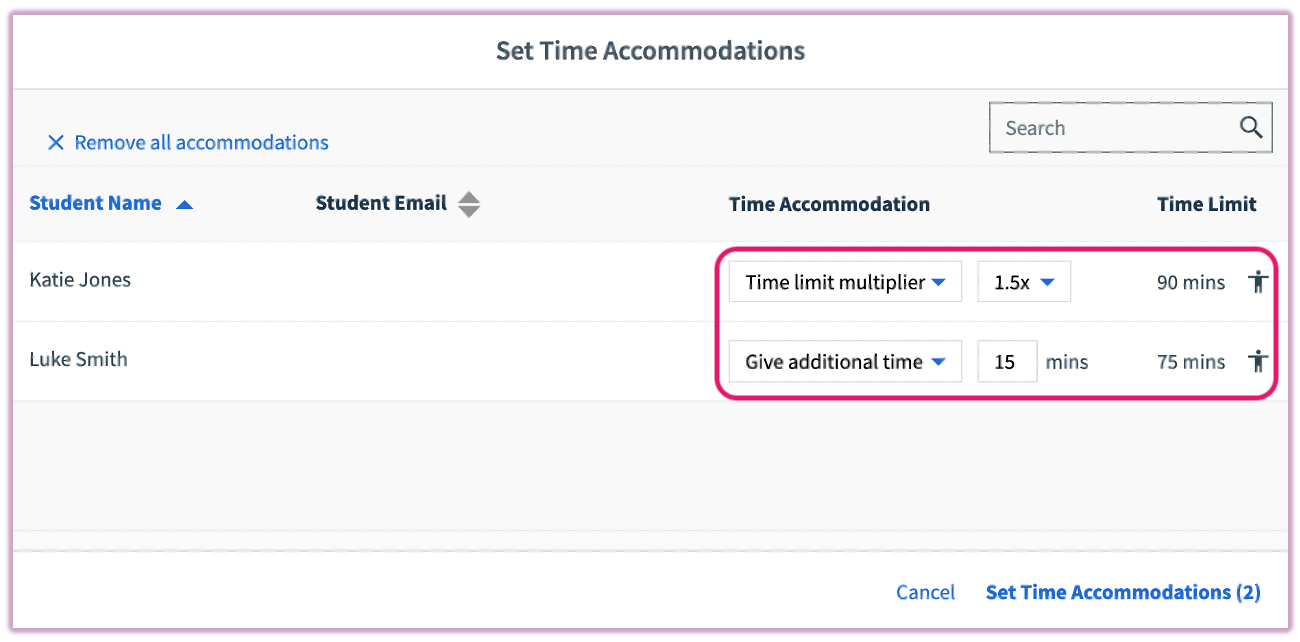 Image: Applying a time multiplier accommodation
Proctor Report
The Proctor Report is your real-time dashboard for Monitored Tests. Keeping this open in a separate tab allows you to monitor student progress and manage technical "lockouts" instantly.
Monitoring Student Status
If a student navigates away from the test or takes a screenshot (depending on your settings), they will be automatically Locked Out. A red notification will appear next to their name.
Status Definitions:
- Writing Test: The student is currently active in the test window.
- Not Started: The student is enrolled but has not yet entered the test code.
- Locked: The student has been barred from the test due to a detected irregularity.
To Unlock a Student: Click the student's name on the left sidebar of the report and select "Unlock" in the details pane to allow them to resume.
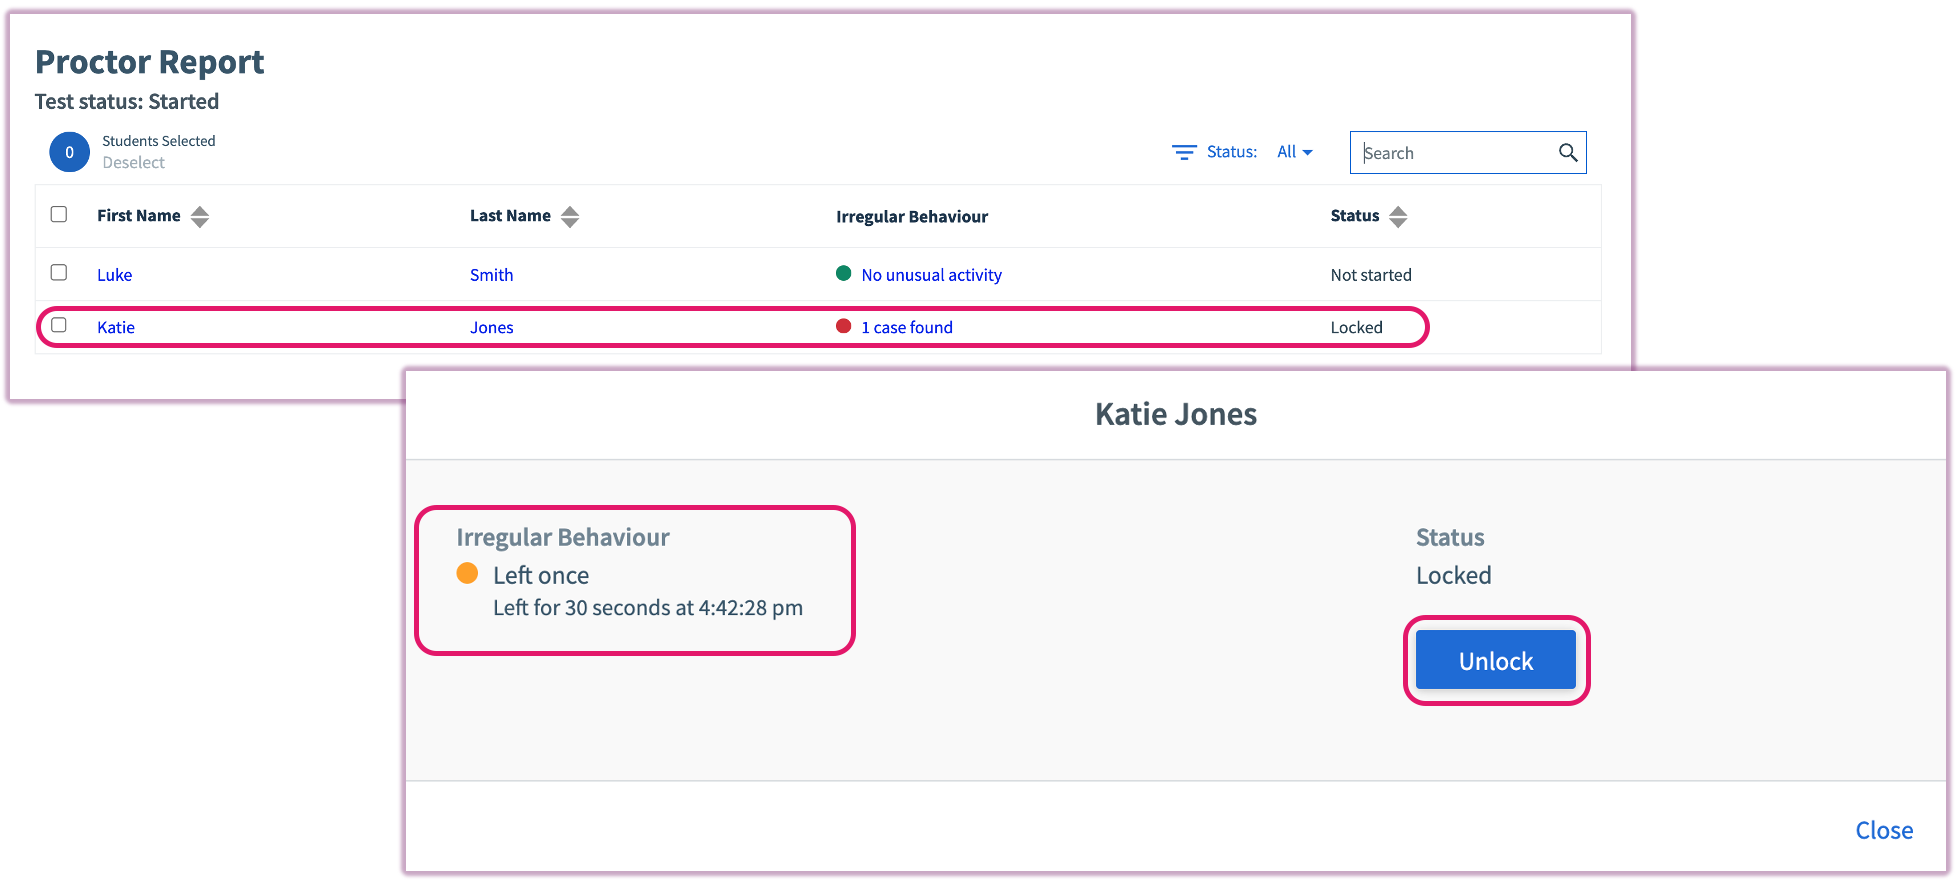 Image: Using the Proctor Report to monitor live exam activity
Violation Severity and Color Coding
The color coding in the Proctor report indicates the severity of detected irregular behavior:
Orange (Warning): Single or less severe violations
- Left once: A single instance of switching tabs.
- Left full screen once: Exited the fullscreen mode one time.
- Interacted with non-exam content: A single click outside of the exam window.
- Restarted exam: The exam page was reloaded.
Red (Error): Multiple or severe violations
- Left multiple times: Multiple instances of tab-switching.
- Left full screen multiple times: Exited fullscreen mode several times.
- Attempted to take a screenshot: An integrity concern indicating a captured image.
- Left test mode on mobile: Attempted to evade mobile proctoring.
- Interacted with non-exam content multiple times: Repeated clicks outside the exam window.
Understanding Lockouts
- Red violations always result in an automatic student lockout.
- Orange violations do not always trigger a lockout, but they can. For example, if a student leaves the exam once (Orange) but exceeds the time threshold set in your proctoring settings, they will still be locked out.
Managing Tests: Delete, Duplicate, and Copy
Top Hat allows you to easily manage your assessments by duplicating them within a course or moving them to different sections and semesters.
Delete a Test
To remove a test, select the item in your content tree and click 'Delete' at the top of the tree.
Warning: Deleting a test that has already been taken will also remove the associated grades from the Gradebook.
Duplicate and Copy to Course
You can create a copy of a test to use as a template or to move to another course:
- Select the test in the content tree.
- Click "Copy" in the right-hand preview pane.
- Choose "Copy to Top of Tree" or "Bottom of Tree" for the current course.
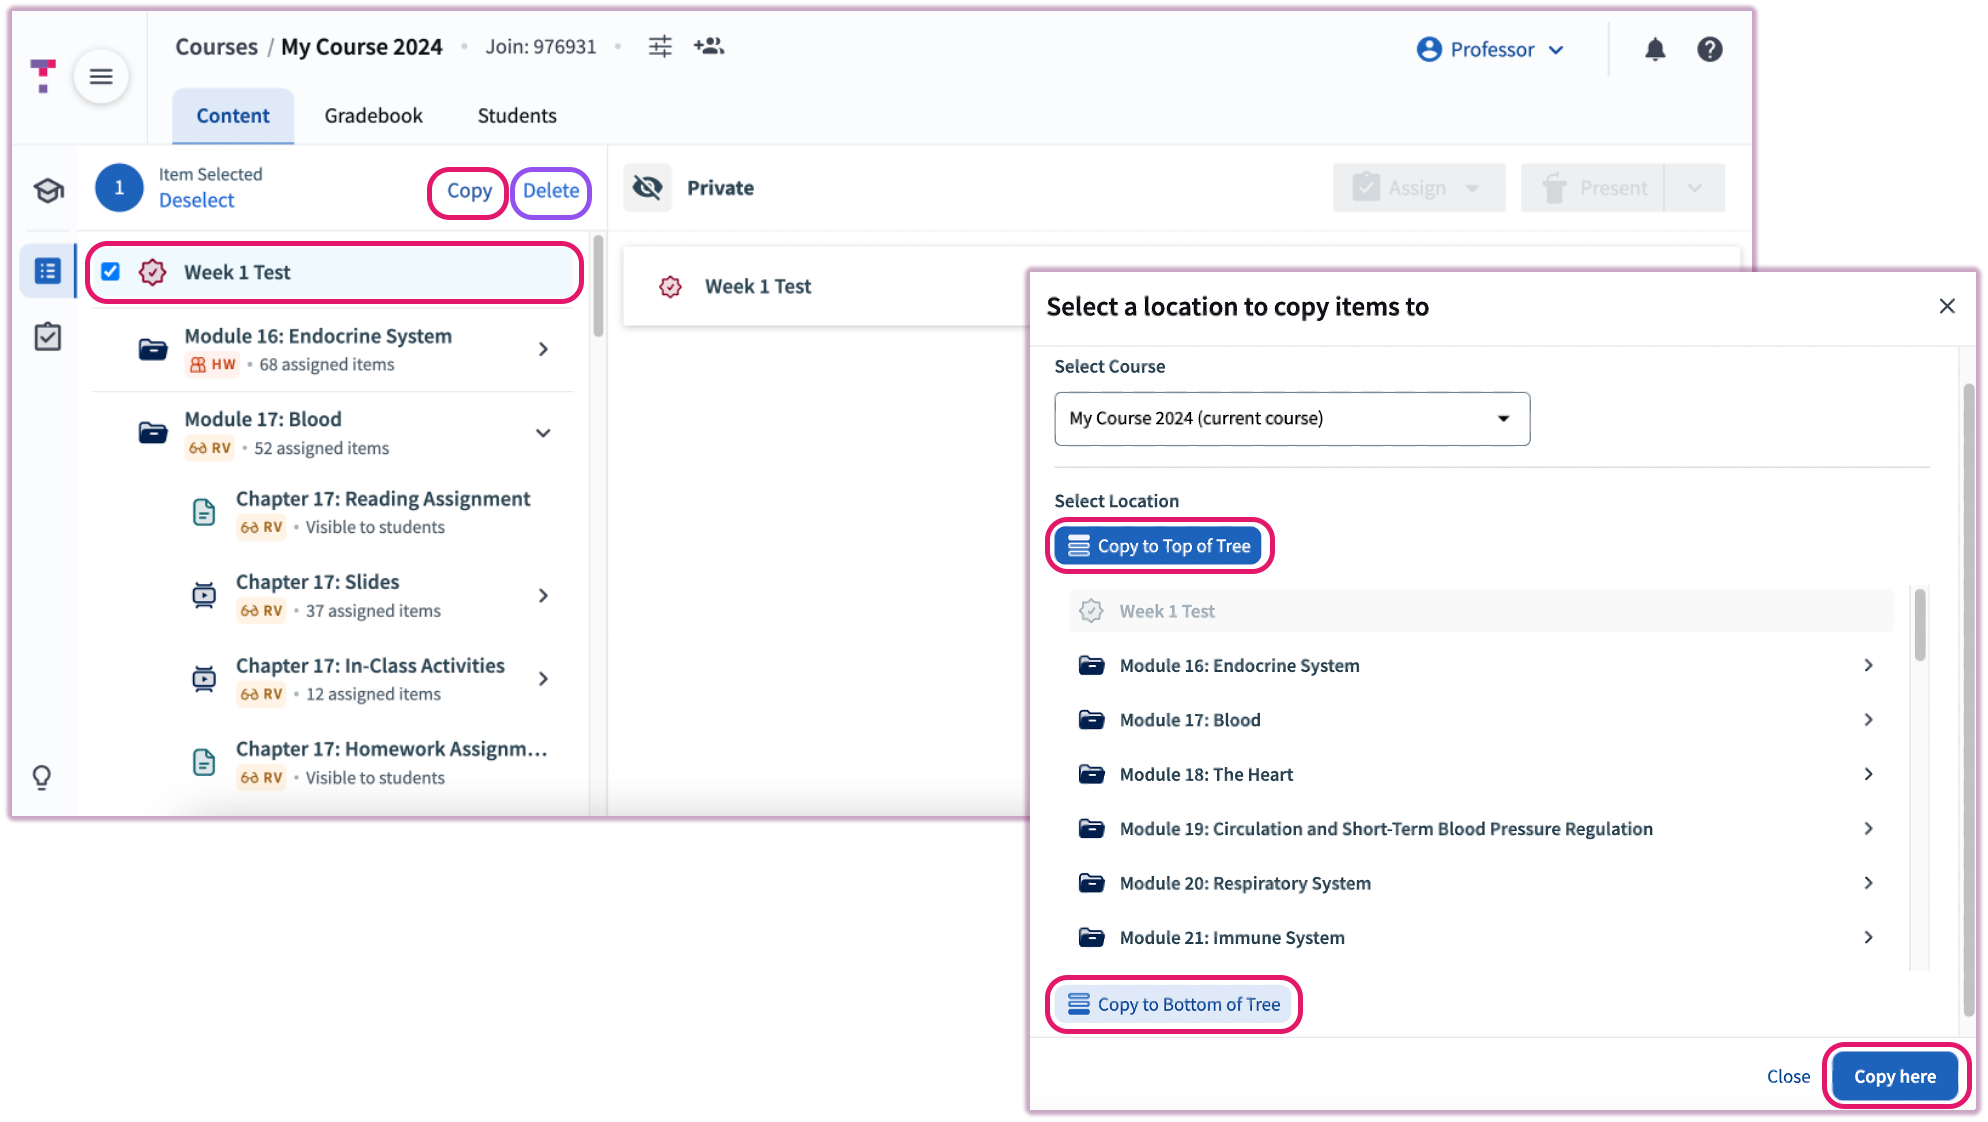 Image: Duplicating a test within the same course
To move the test to a different course, select the destination course from the dropdown menu and click "Copy Here".
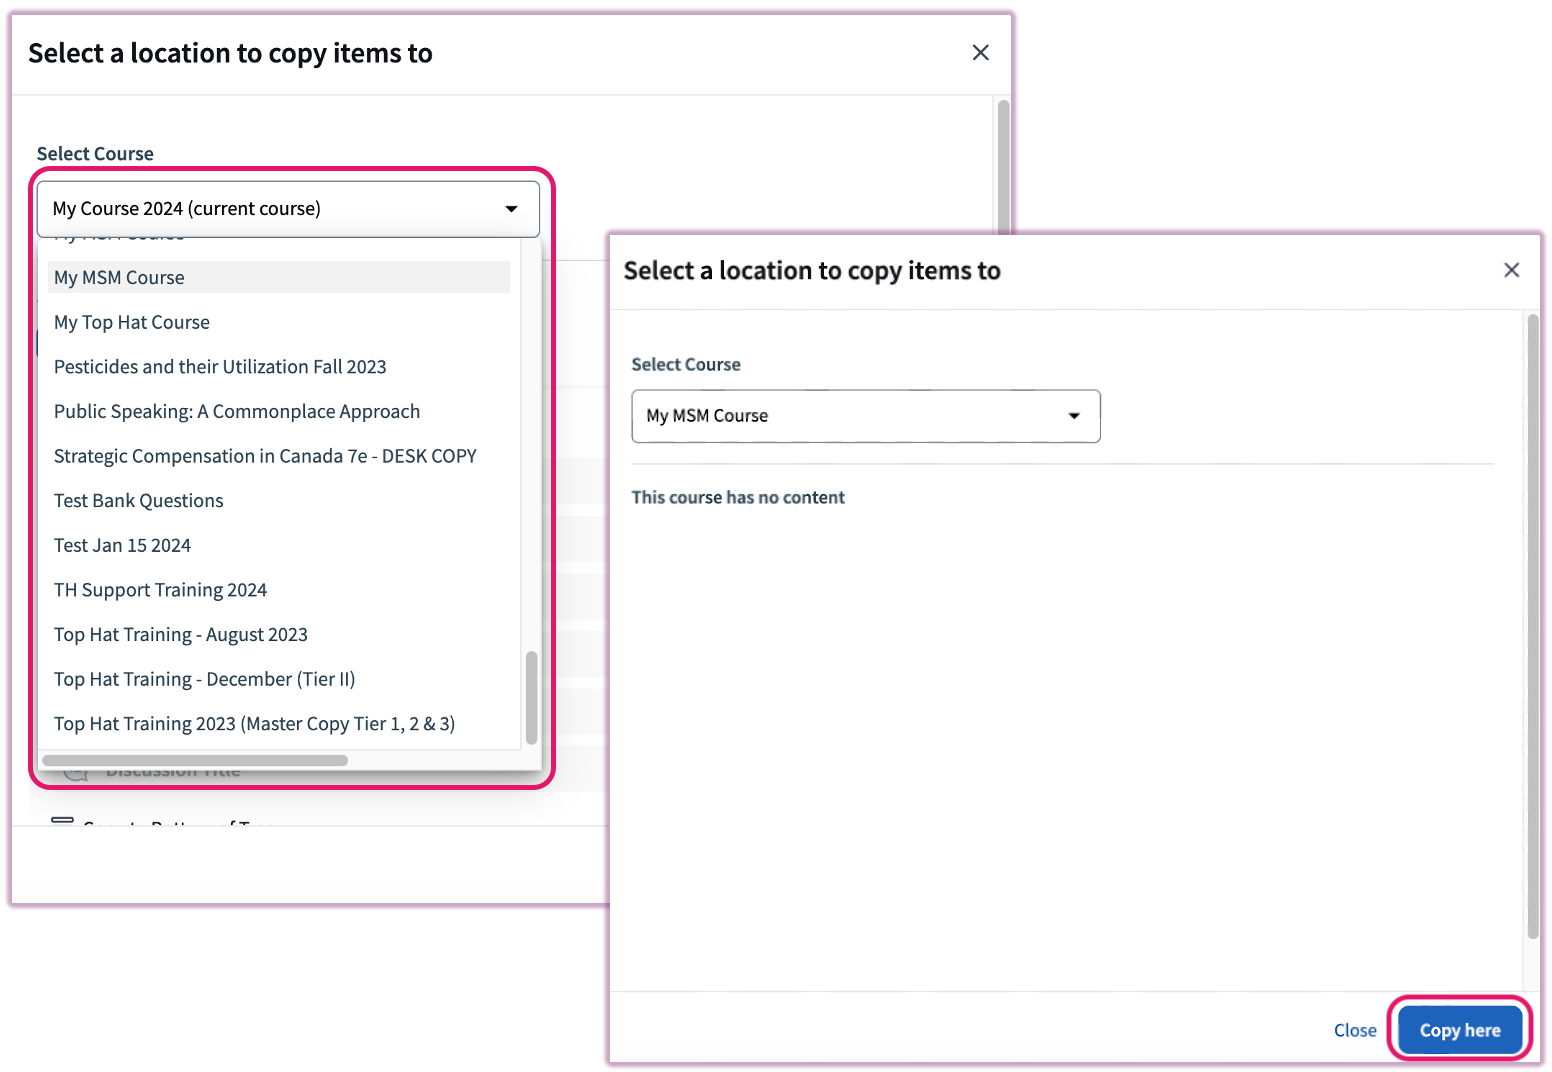 Image: Copying a test to another course
Export to PDF
For accessibility accommodations or as a physical backup for technical emergencies, you can generate a paper version of your test.
Steps: Select the test and click "Export to PDF" located in the upper right corner, just below the Assign/Start button.
Note: We recommend using Google Chrome for the most reliable PDF formatting.
Gradebook Settings & Test Hand Back
Gradebook Visibility Settings
Before releasing results, configure your Gradebook availability to control what students see. You can choose to show only the final score or allow students to see full question details and their specific answers.
To adjust these settings:
- Open Course Settings (gear icon).
- Select the Grading tab.
- Under Gradebook availability, toggle the "Top Hat Test" options based on your preference.
 Image: Accessing Course Settings
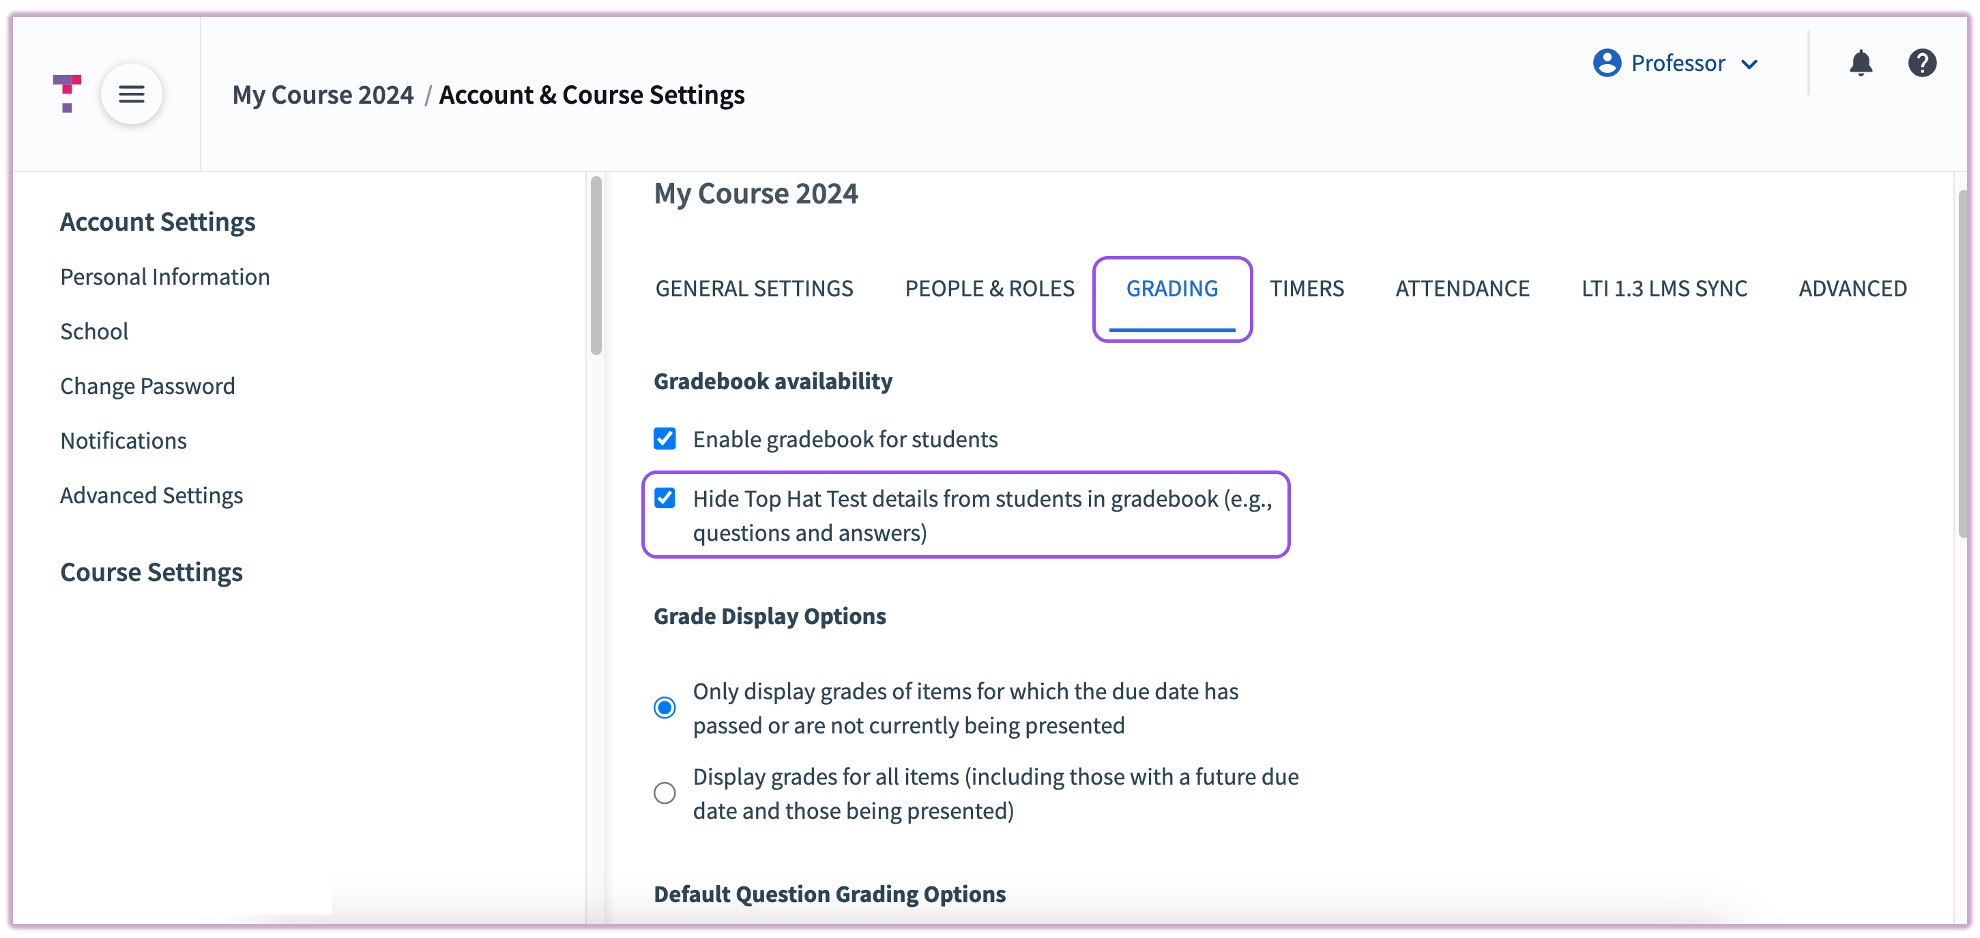 Image: Configuring Gradebook Availability
Security Tip: If you plan to use this test for future semesters, consider disabling "Test details" so students can see their grade without having a permanent digital record of the questions.
Handing Back a Test
Handing back a test allows students to review their specific submissions and learn from their mistakes. This moves the test from the "Ended" state to an active "Review" state for the student.
Steps to Hand Back:
- Select the ended test in your Course Content tree.
- Click the Hand Back button in the right-hand preview pane.
- Select All Students or Specific Students (useful for make-up exams).
- Optional: Set a Start and End time to limit the window for review.
- Click Hand Back to finalize.
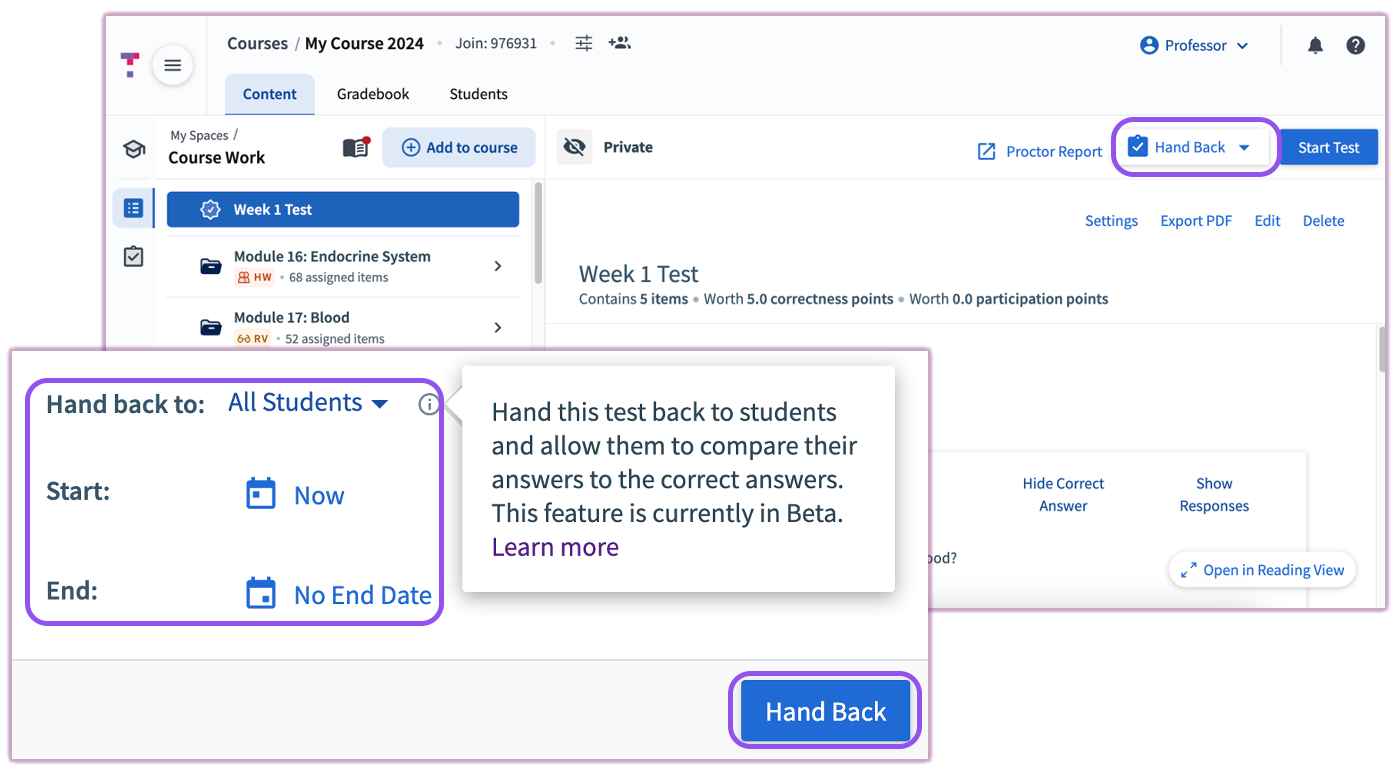 Image: Handing Back a Test for Student Review
Accessibility and Best Practices
Accessibility - Question Specific Notes
Click on Target
Because they require precise visual interaction, Click on Target questions may be inaccessible to students with visual or cognitive impairments. Recommendation: Provide an alternative version of the test or excuse these students from the specific question.
Math in Questions (LaTeX)
While Top Hat supports LaTeX for mathematical notation, LaTeX within the question field itself is currently not accessible to screen readers. Best Practice: Write your mathematical equations in the body text of the test (above the question) and refer to them in the question field. Math written in the body text is fully accessible to screen readers.
Best Practices for Success
To ensure a smooth experience during high-stakes exams, we strongly recommend the following:
- Administer a Practice Test: Run a short, low-stakes test (2–3 questions) a few days before the exam. This allows students to troubleshoot device permissions and familiarize themselves with the interface.
- Distribute the Student Start Guide: Assign the Top Hat Test Student Start Guide to your course. It contains a preparation video and a comprehension check to ensure students are ready. Access the Guide HERE.
- Chromebook Notice: Top Hat Test is not optimized for Chromebooks. Students using these devices may experience performance issues and should be encouraged to use a laptop or tablet if available.
Pre-Test Announcements (Classroom Script)
Before revealing the Test Code, make these three essential announcements:
- "Is everyone enrolled in the Top Hat course?"
Unenrolled students cannot access the test. They must either pay for a subscription immediately, call Top Hat Support for a temporary trial (+1 (888) 663-5491, ext. 1), or be provided with a paper copy.
- "If you are using a laptop, are you on Chrome or Firefox?"
These browsers provide the most stable testing environment.
- "If you are using a phone, are you in the app?"
Students cannot take the test via a mobile web browser. They must use the latest version of the Top Hat app.
Best Practices for Accommodations
For students requiring extra time or specialized environments, consider these three workflows:
- 1. Reopen Test
- End the test for the general class at the standard time. Reopen the test specifically for students with accommodations, providing them with the new test code.
- 2. Manual Lockout
- When the standard time expires, use the Proctor Report to manually lock out all students except those who require additional time.
- 3. Paper PDF Version
- Export the test to PDF (using Chrome for the best result) and provide a hard copy to the Accessibility Center. Note: You must manually enter these grades into the Top Hat Gradebook afterward.
Frequently Asked Questions (FAQ)
- Does Top Hat block students from accessing external websites?
- While Top Hat does not technically block other applications, it uses a "Lock Out" mechanism. If a student navigates away from the test window or attempts to access external resources, they are locked out of the assessment. You can unlock a student at any time via the Proctor Report.
- When and how are students locked out during a test?
- Lockouts occur based on two criteria:
- Time: If a student leaves the test page for more than a preset cumulative time.
- Frequency: If a student departs from the test page more than a specific number of times.
By default, students are locked out after 5 seconds of absence or 3 departures. These thresholds can be adjusted in your Test Settings before the session begins.
- How do I unlock a student?
- In the Proctor Report, find the student marked as "Locked." Click on their name or the reported behavior to open a sub-window, then select "Unlock" to restore their access.
- Can I access the Proctor Report while the test is running?
- Yes. It is highly recommended to keep the Proctor Report open in a separate tab while the test is in progress to monitor for lockouts and irregular behavior.
- How do I close a test?
- You must manually click "End Test" to finalize the session and hide it from students. Note that tests will automatically close after 48 hours of inactivity.
- What happens if a student's device dies or the internet cuts out?
-
- Battery: Any responses submitted (by clicking "Submit") are saved to our servers. We recommend students bring chargers and that instructors keep a few paper copies on hand as a backup.
- Internet: Top Hat loads the entire test at once, so students can continue reading and answering during intermittent outages. The auto-retry feature will continue attempting to upload responses until the connection is restored, as long as the test window remains open.
- What features or media are NOT supported in a Test?
- Top Hat Test supports text, images, and standard questions. It does not support embedded YouTube videos, discussions, response timers, hints, explanations, or audio.
- What backup measures are available?
- We recommend exporting your test to a standalone folder in your content tree (though multi-version questions cannot be exported). You should also generate a hard copy via the "Export PDF" option in the test menu to have on hand during the exam.
Support Tip: If you do not see the "Export PDF" option, please contact Top Hat Support with your Course Join Code to have this feature enabled for your account.