Body
This article explains how to create and edit a Top Hat Page, including how to format text, embed videos, insert interactive questions, add personalized examples and a lot more. Learn how to add rollover definitions, link between Pages, export questions, import content, and share direct Page URLs with students. You’ll also learn how to use Top Hat’s AI-powered assistant Ace* to refine content, generate questions, convert PDF and Word document content to Pages, and remediate common accessibility issues.
Whether you’re building a digital textbook or an interactive assignment, this guide will help you make the most of Pages in Top Hat.
*Please note that AI-powered features are not available at some partner institutions. If they are absent from your instance of Pages and you wish to use them, please contact your school’s administrator.
Table of Contents
- Create or Update a Page
- Step 1: Add a new Page
- Step 2: Rename the Page
- Step 3: Use the formatting toolbar to format the text and elements on your page
- Step 4: Add visual and interactive elements into your page
- Step 5: Add questions and discussions to your page
- Step 6: Save your work
- Formatting Toolbar
- Header Formatting
- Text Alignment & Styling
- Lists & Organization
- Insert Visual & Interactive Elements
- Rollover Definitions
- Adding Videos
- Start a YouTube video at a specific time
- Editing Videos
- Edit with AI
- Content Refinement
- Translation
- Personalized Examples
- AI-Powered Questions
- Accessibility Suggestions
- Generating Alternative Text and Long text for an Image
- PDF/Word Import
- Embedding a Zoom/Google Meets recording
- Step 1: Record your Session
- Step 2: Upload to YouTube or Vimeo
- Step 3: Embed the Video into your Page
- Linking Between Pages
- Highlight the Text
- Obtaining and Sharing Page URLs
- How to Get a Page URL
- Linking to a Page from Outside Top Hat
- Exporting Questions (From a Page to the Content Tree)
Create or Update a Page
Step 1: Add a new Page
Click the "Add to course" button and select "Page" from the drop-down menu.
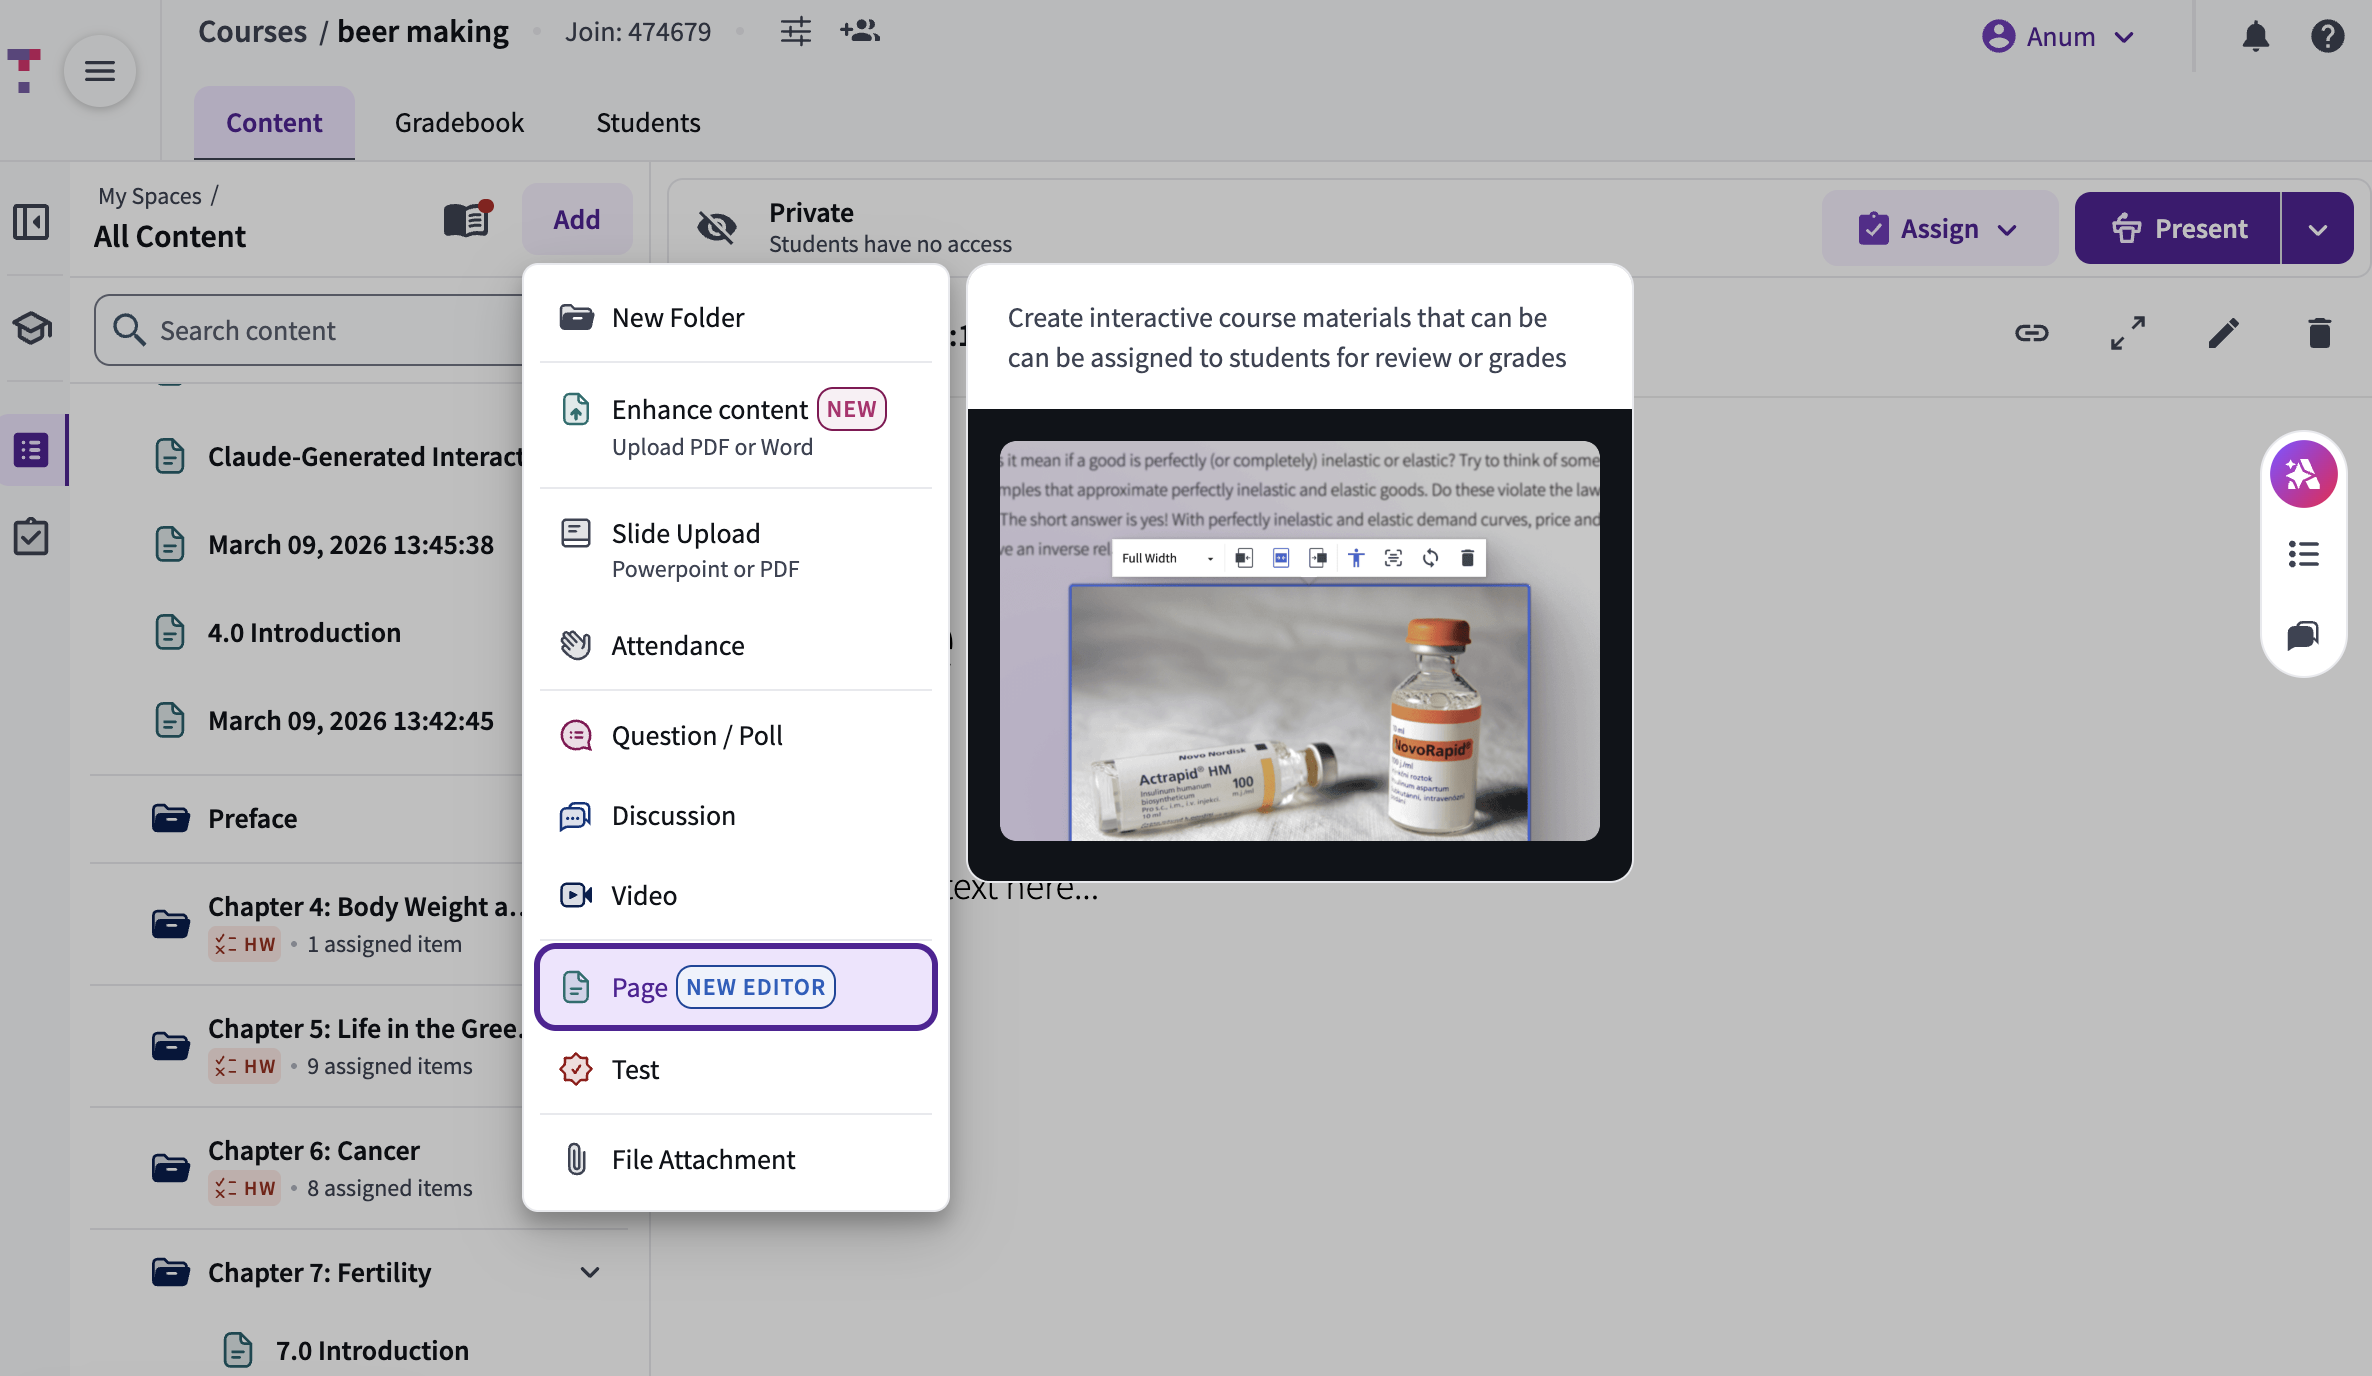
Image: Add a new page
To edit an existing page, click the "Edit" icon.
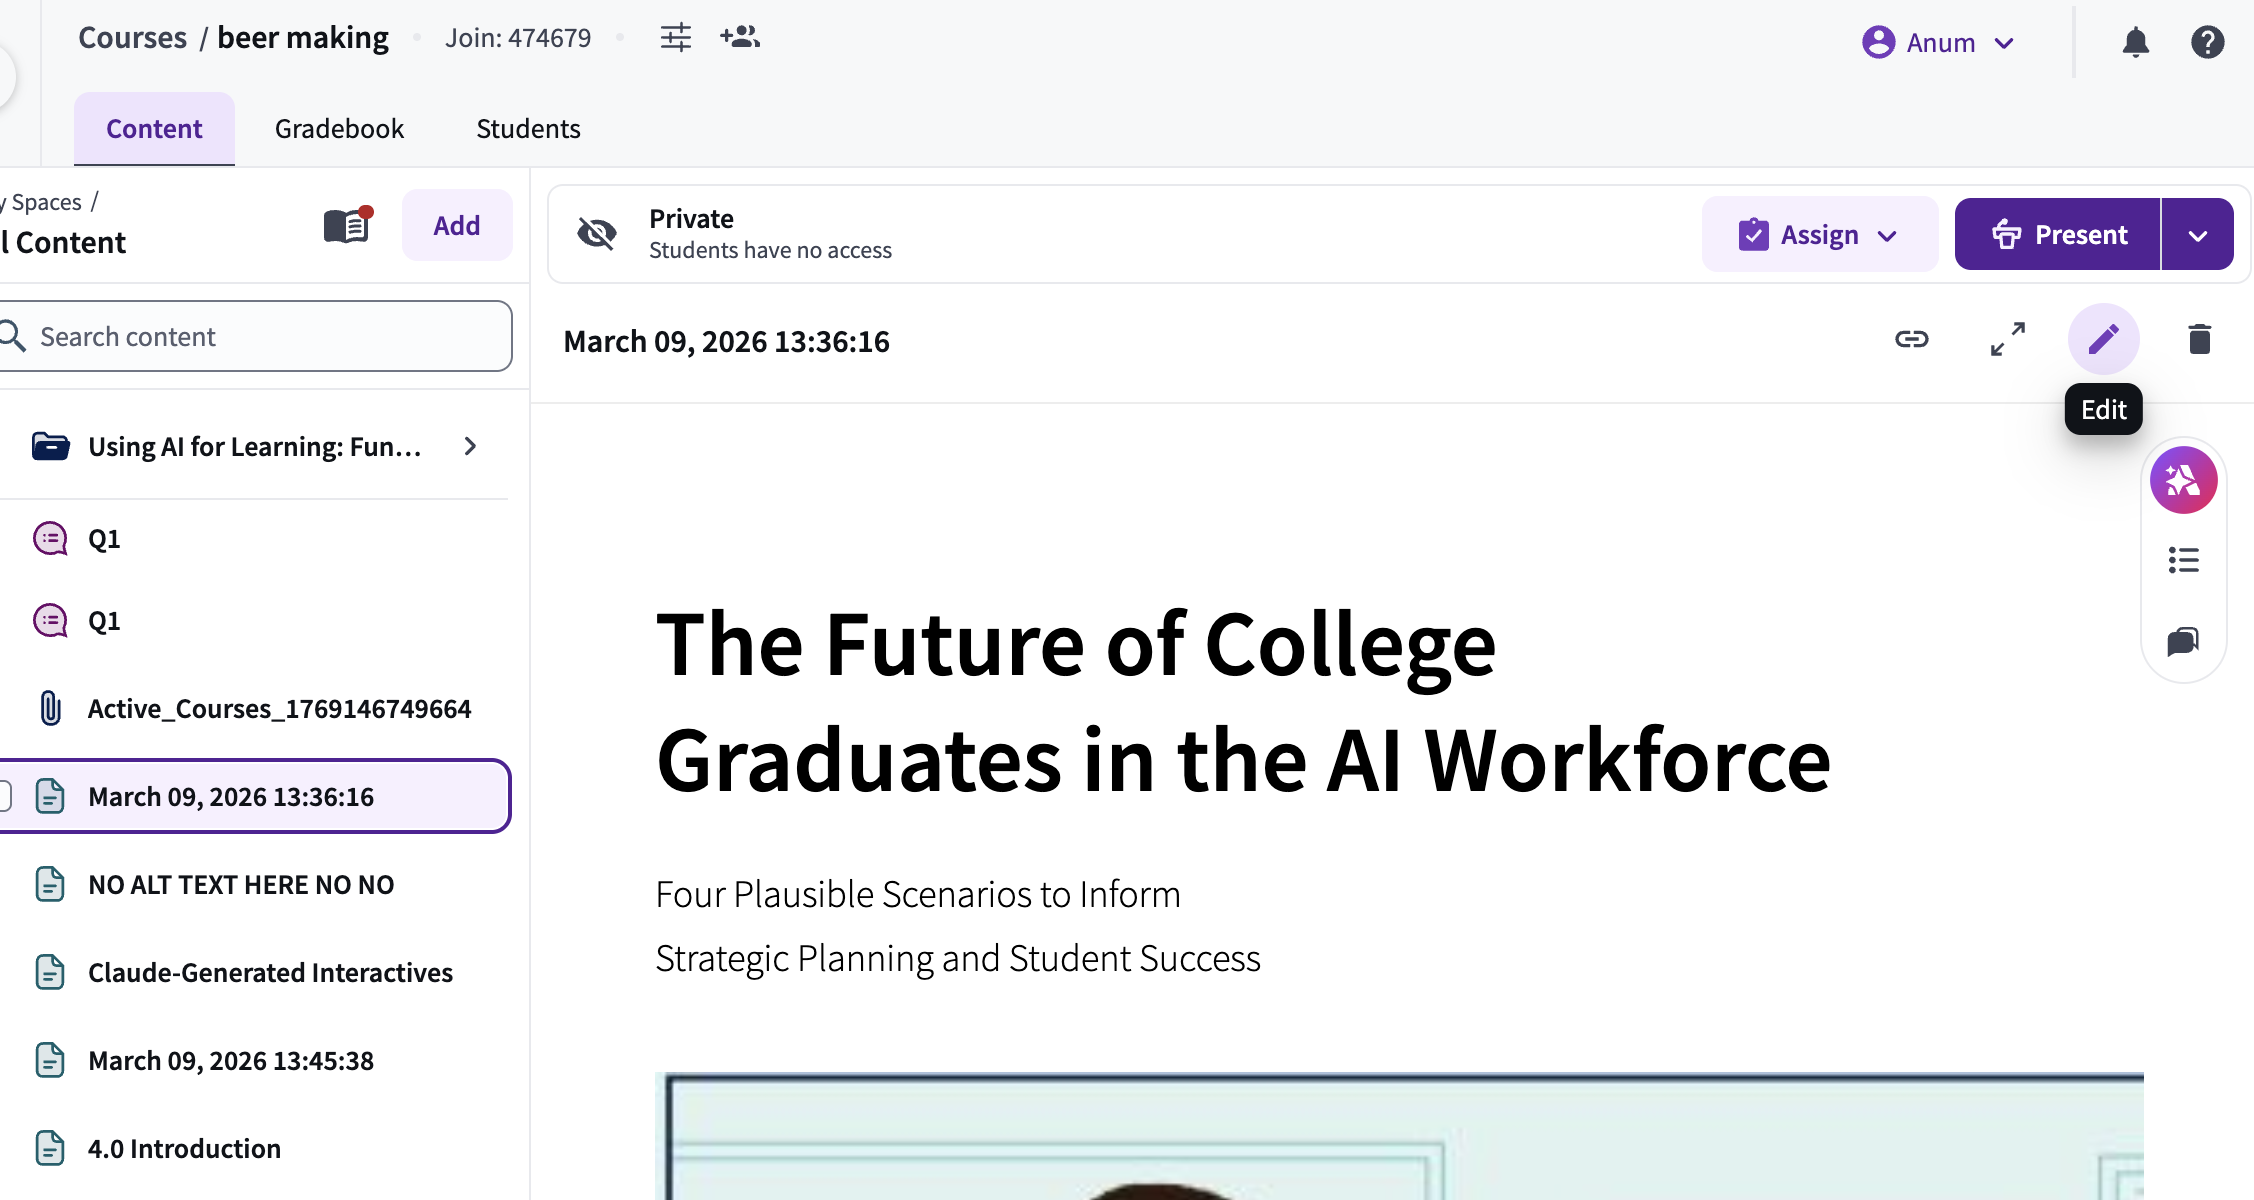
Once you do either of the above steps, you will enter the Page editor. You can begin adding text, images, and interactive content immediately.
Image: Accessing Page Editor
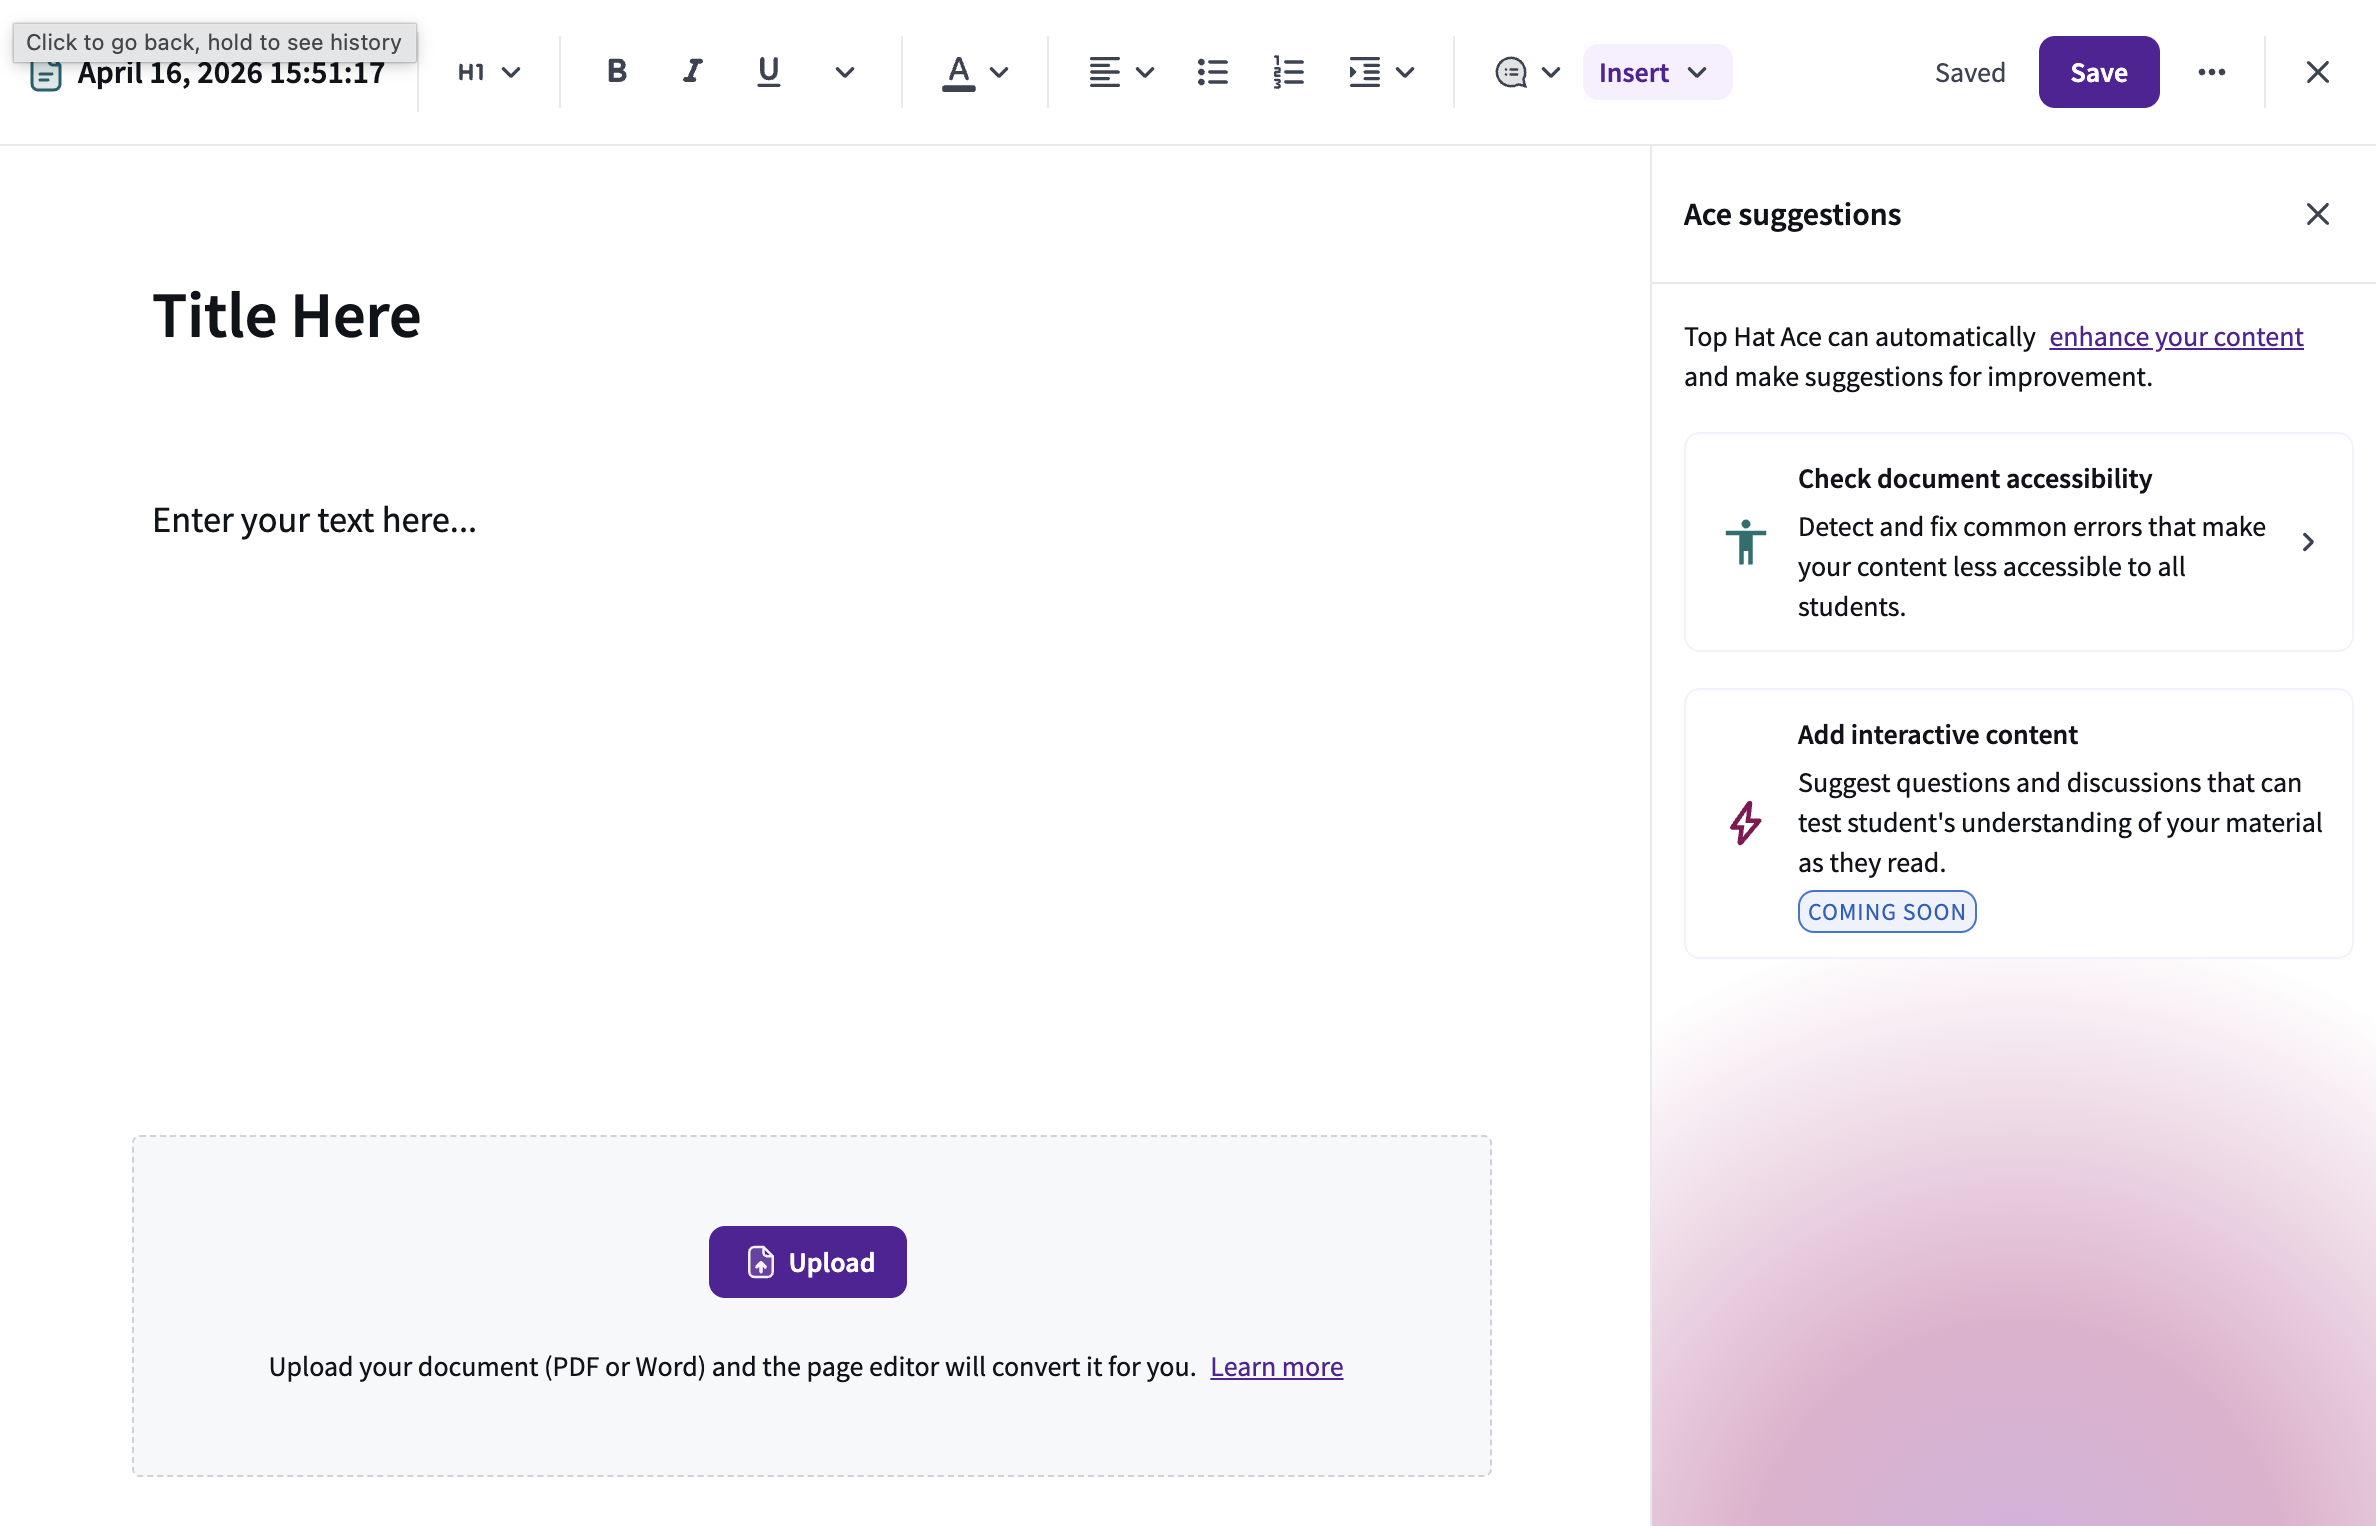
Image: Page Editor
Step 2: Rename the Page
New Pages are named with the current date and time by default. Click directly on the current time and date to edit the Page name into something more meaningful.
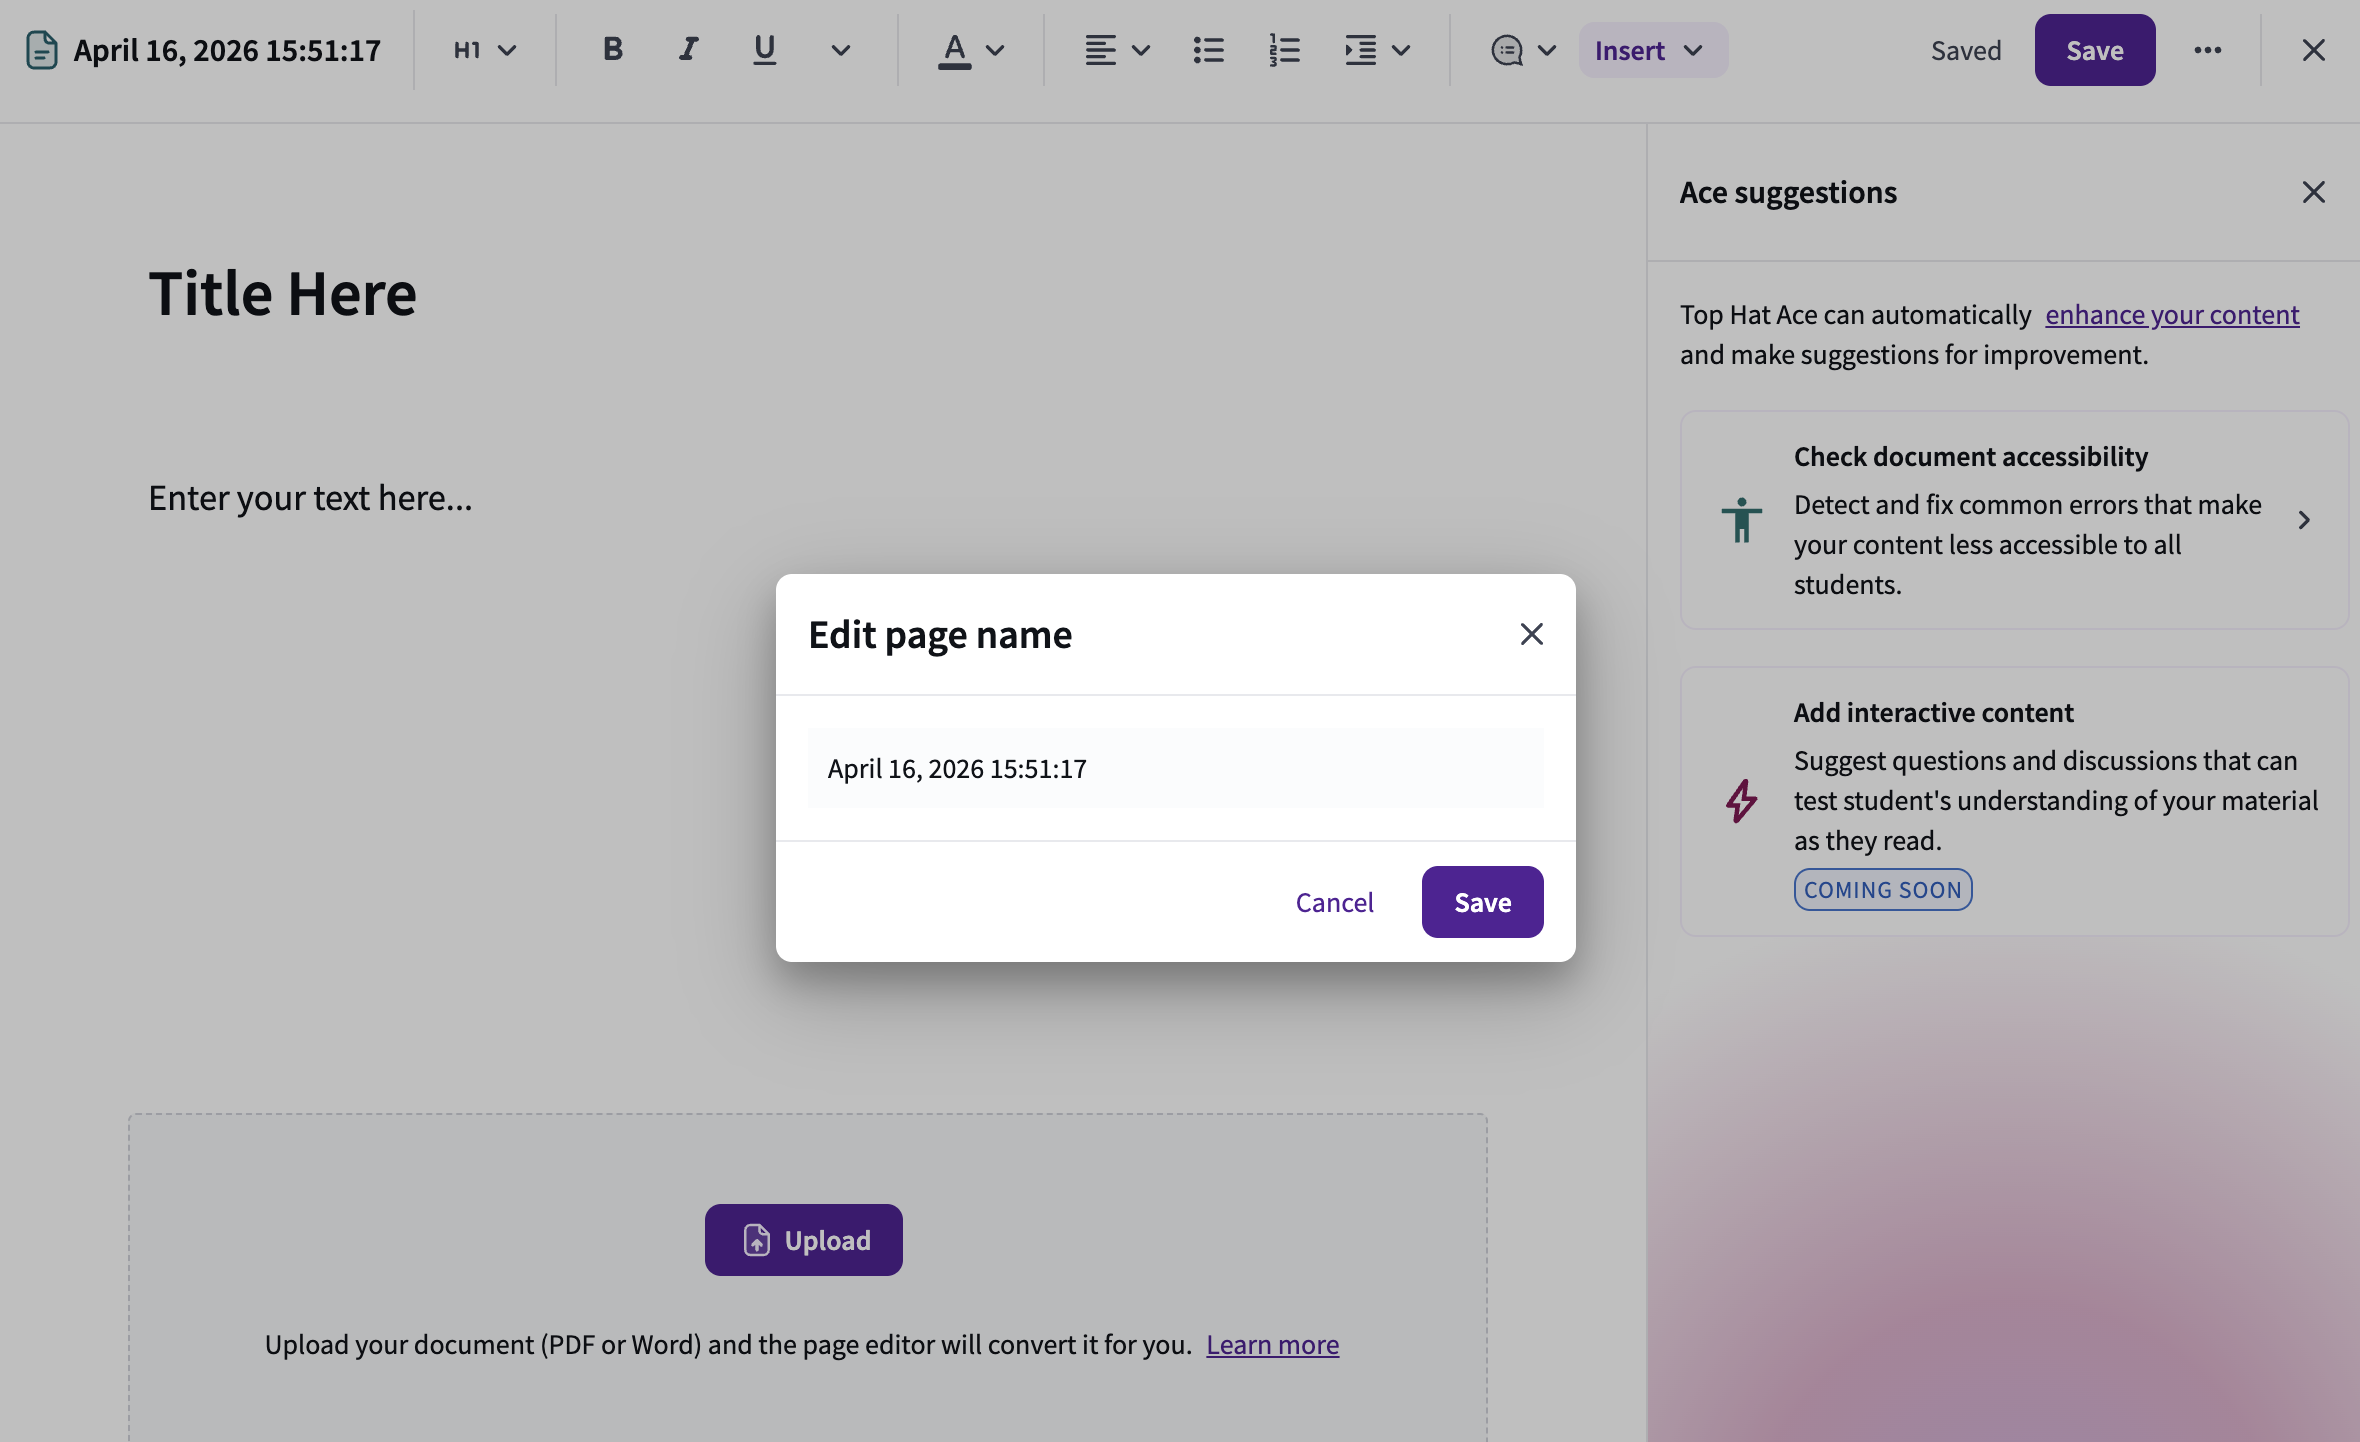
Image: Editing Page Name
Step 3: Use the formatting toolbar to format the text and elements on your page

Image: Formatting Toolbar
Learn more in the formatting toolbar section of this article.
Step 4: Add visual and interactive elements into your page
Use the Insert button in the formatting toolbar to add Images, Videos, Tables, iFrames, Code Blocks or Symbols to your Page.
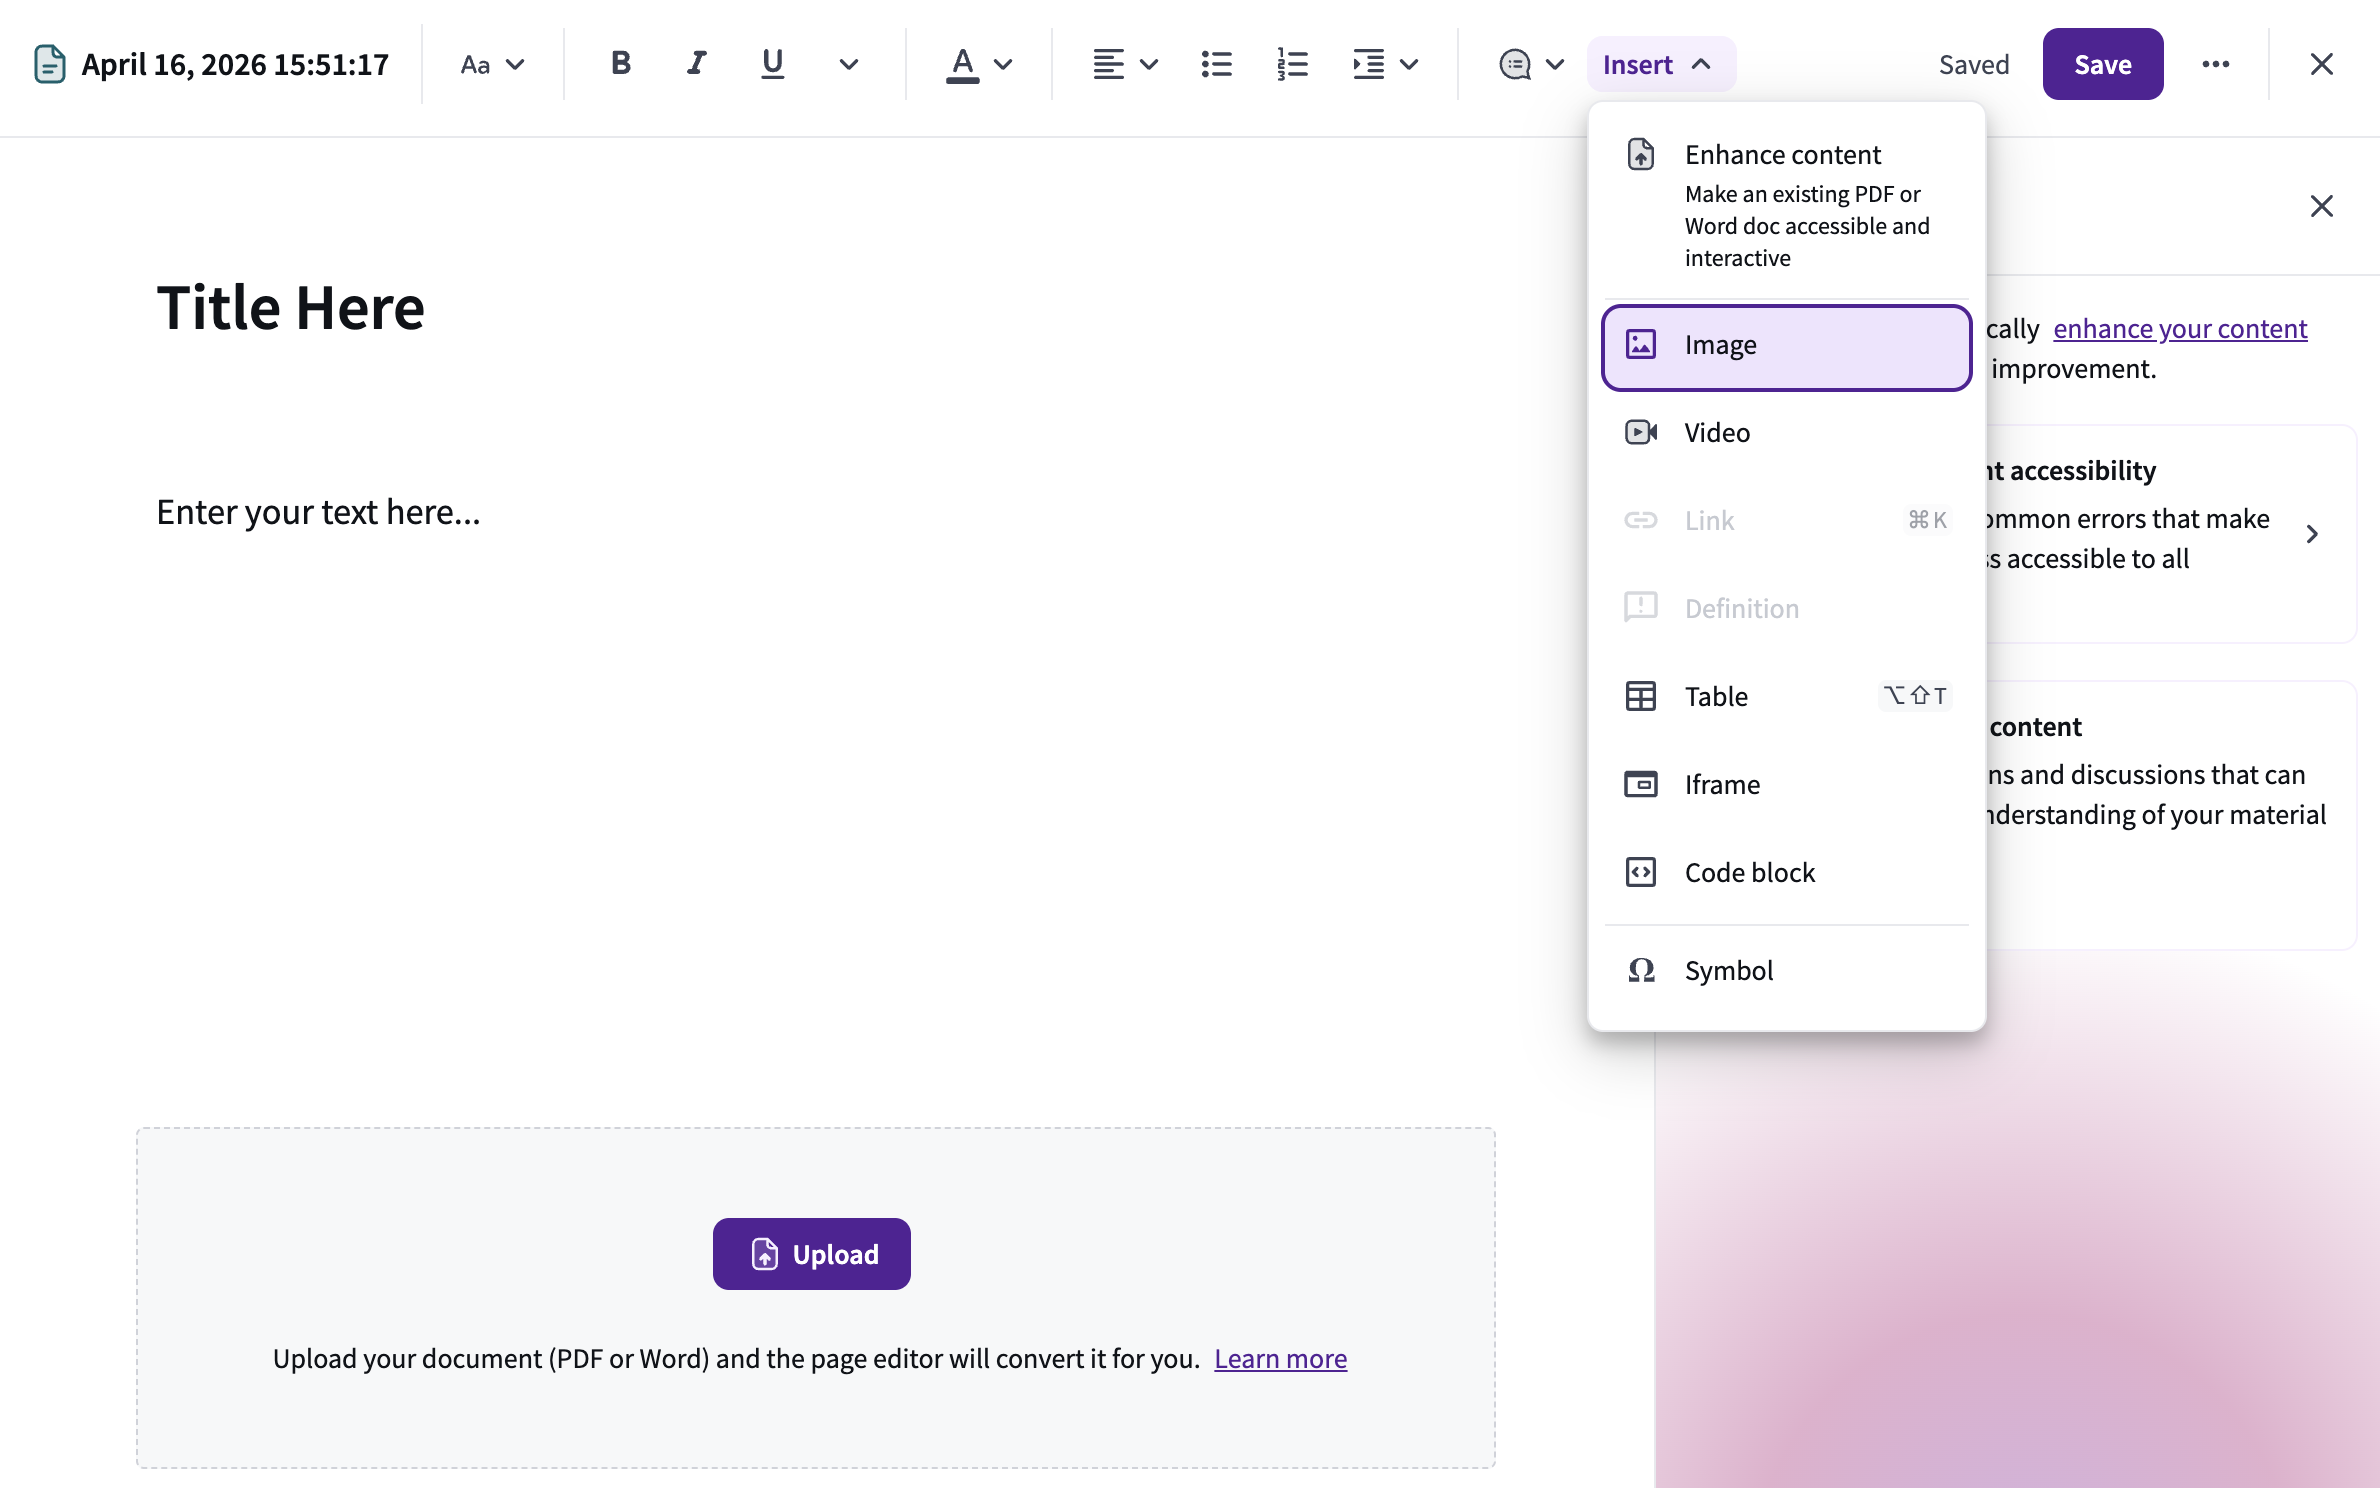
Image: Insert Image
Step 5: Add questions and discussions to your page
Use the question button in the formatting toolbar to add questions and discussions to your pages.
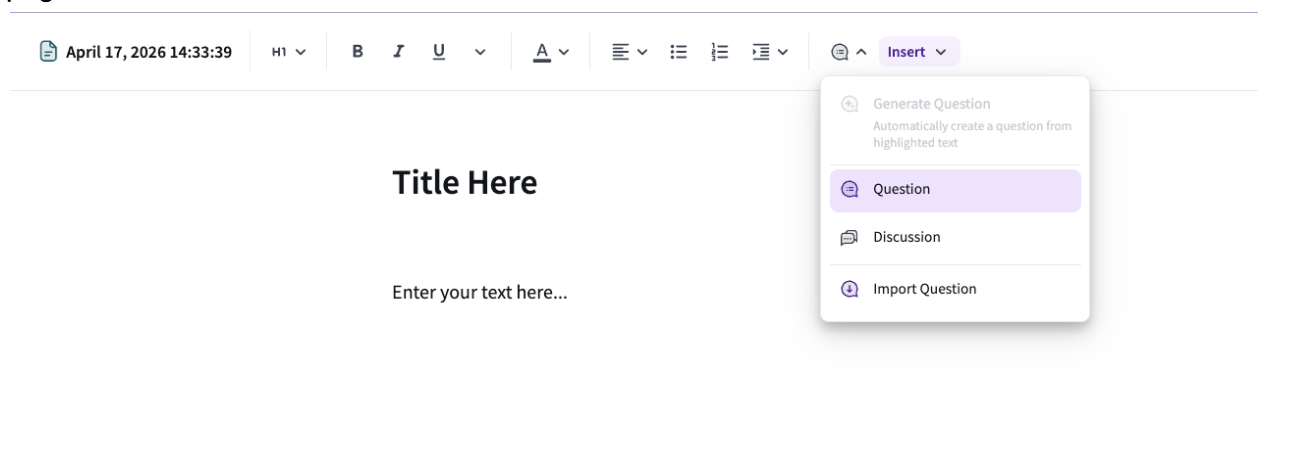
Image: Adding questions from the formatting toolbar
Step 6: Save your work
Before closing the Page, make sure your changes are saved. Top Hat will prompt you if there are unsaved edits.
Use the tools in the formatting toolbar to organize your content, improve readability, and help students navigate your Page effectively.
There are three levels of header text available: H1 (largest), H2, and H3 (smallest).
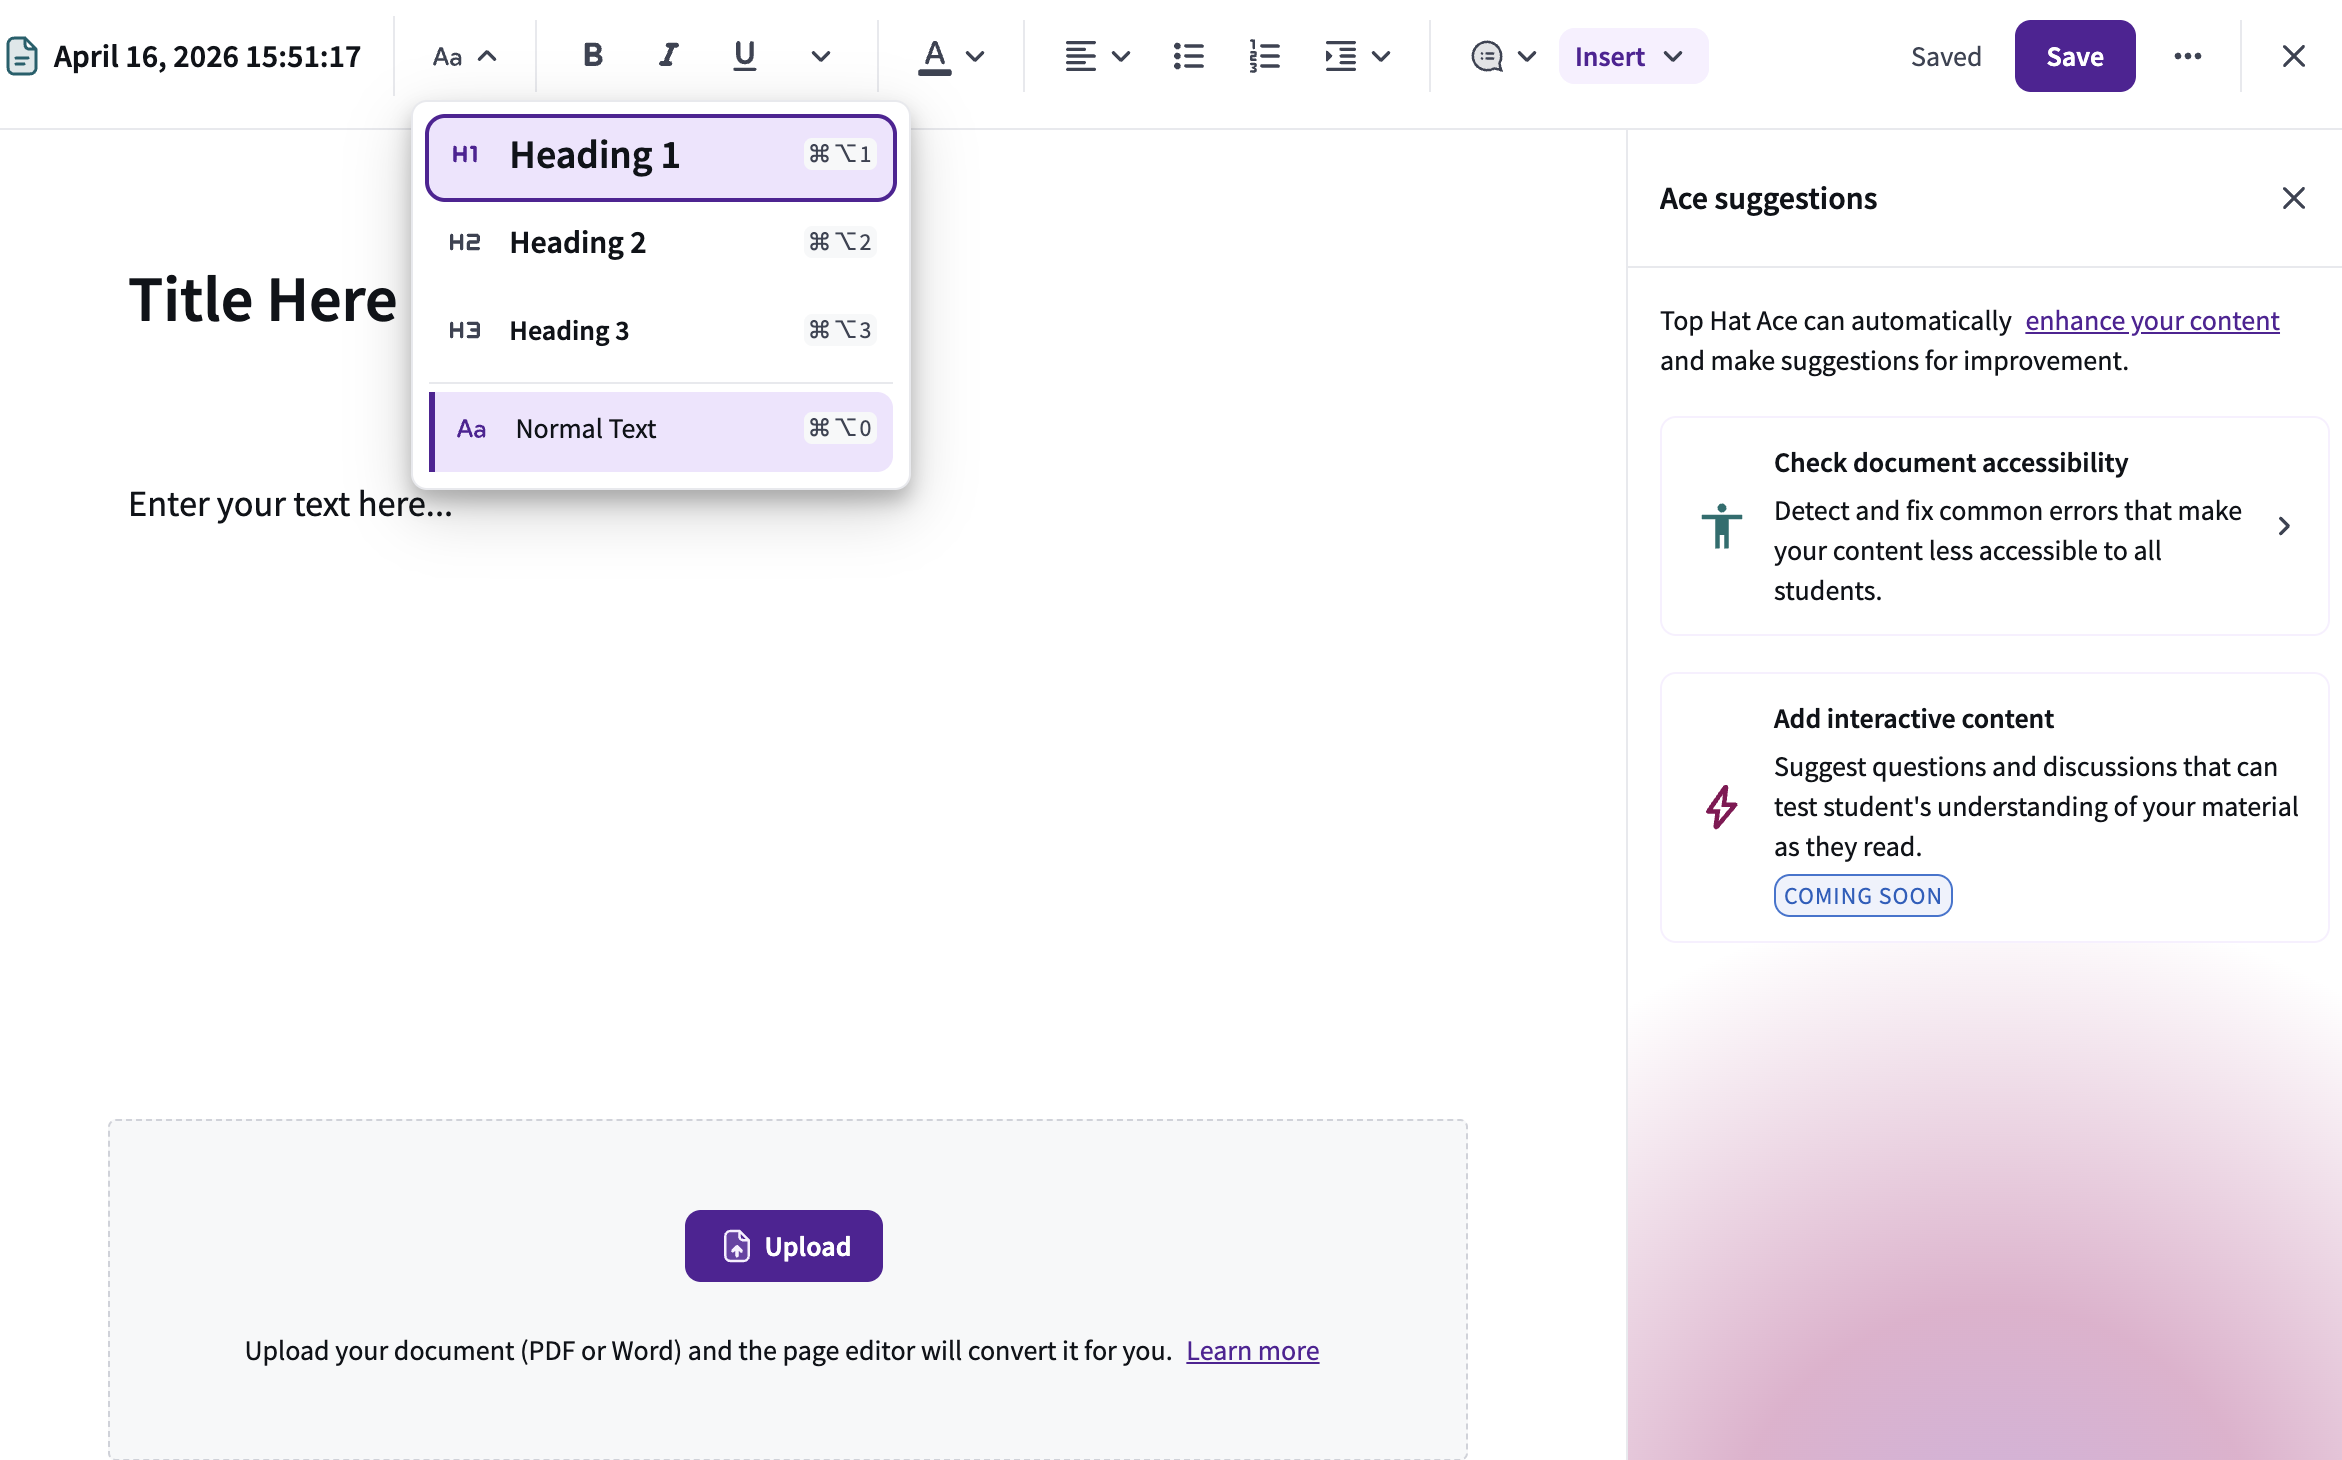
Image: Heading formatting
- Automatic Indexing: Any text formatted as a header will automatically appear in the student index, allowing for quick navigation between sections.
- Internal Linking: Headers can also be used as targets for internal links within the Page.
Text Alignment & Styling
Customize the appearance of your prose to emphasize key information:
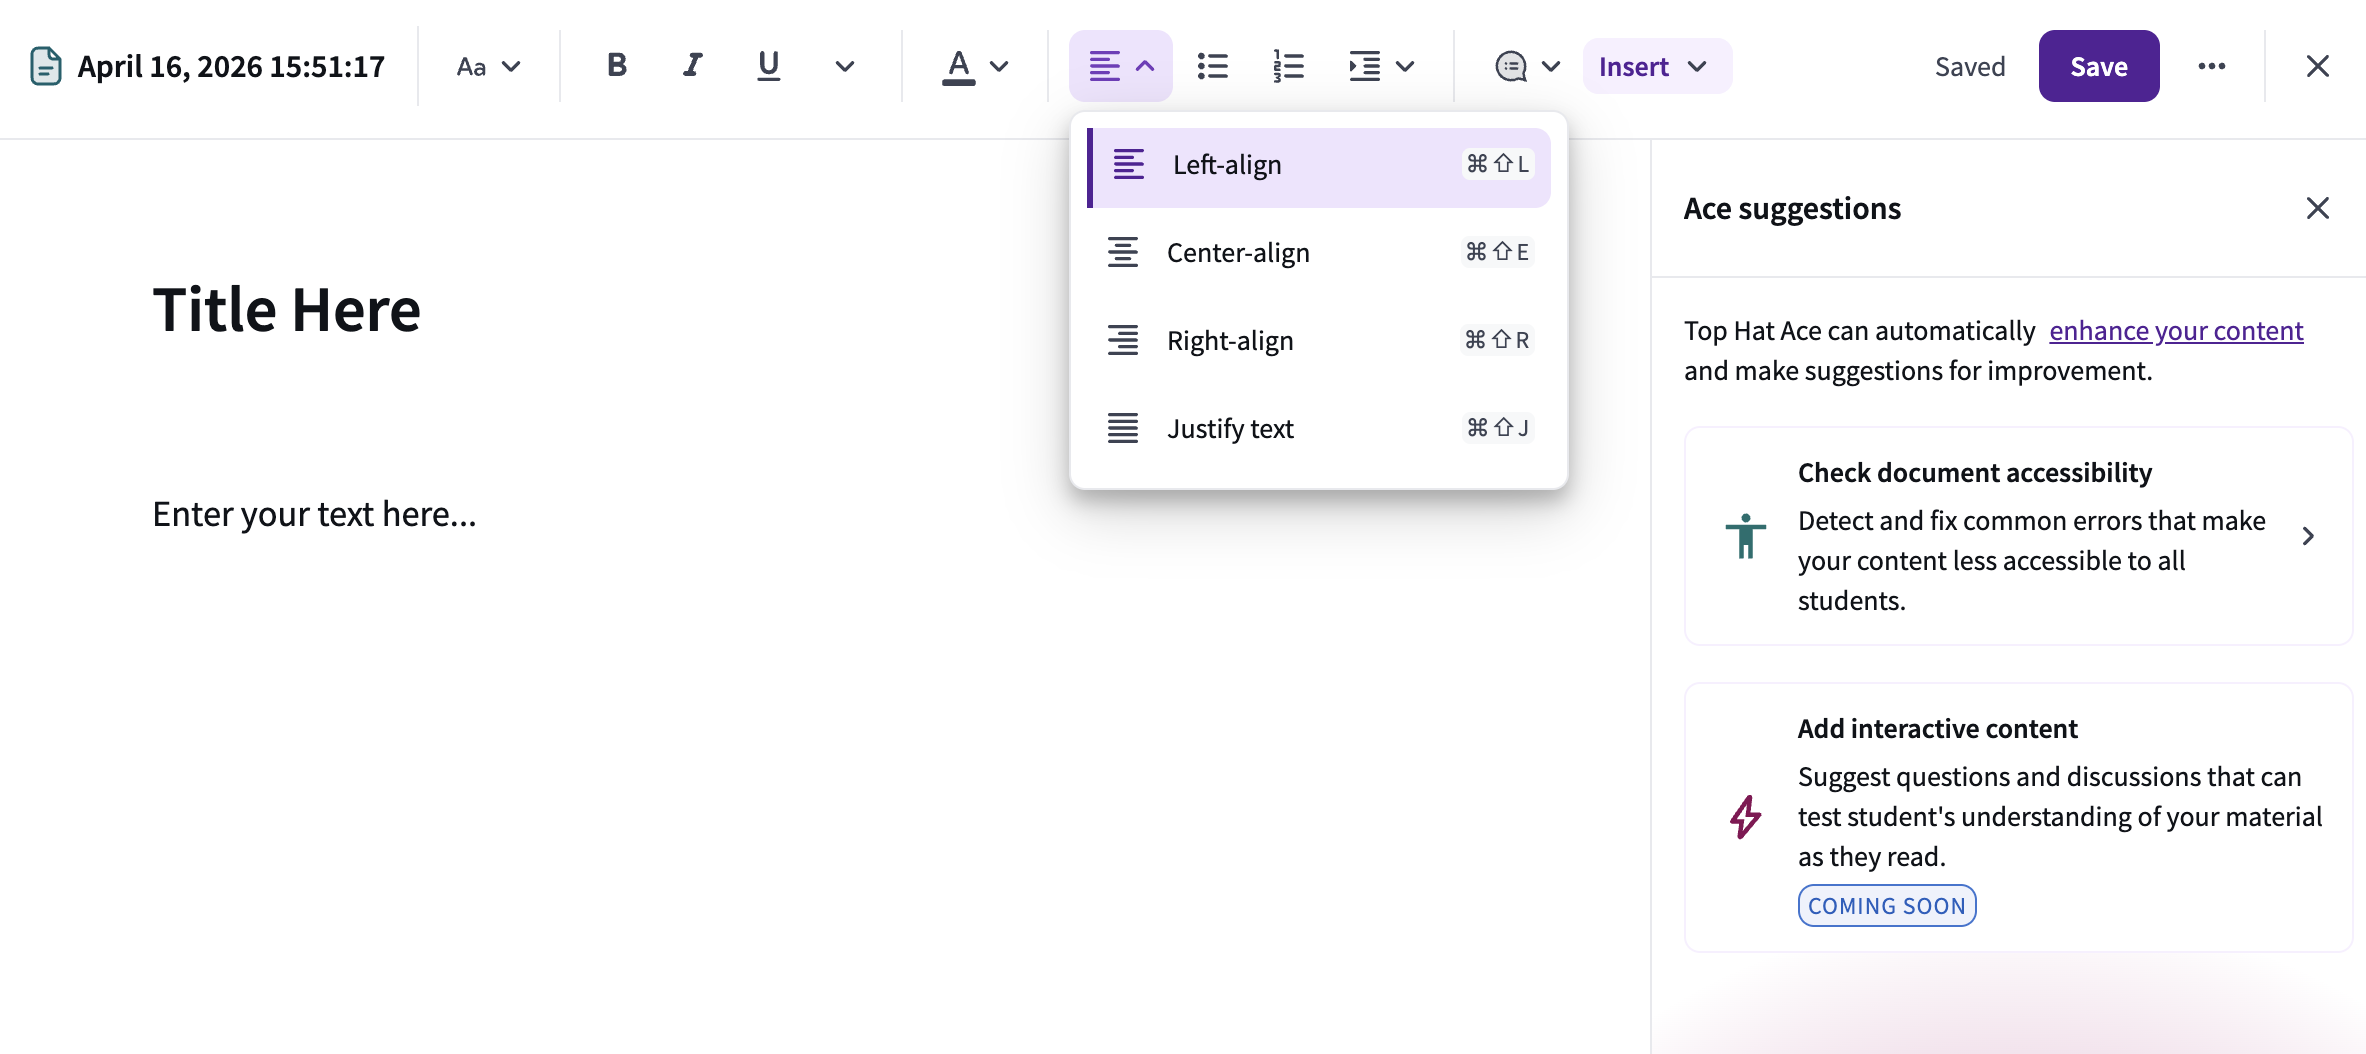
Image: Text alignment
- Alignment: Text can be aligned left, center, right, or justified (fit).
- Emphasis: Use Bold and Italicize to highlight important terms.
- Color: Change the Font Color to distinguish different types of content.
- Advanced Notation: Use Superscript and Subscript for mathematical or scientific formula or add a Math or Coding section.
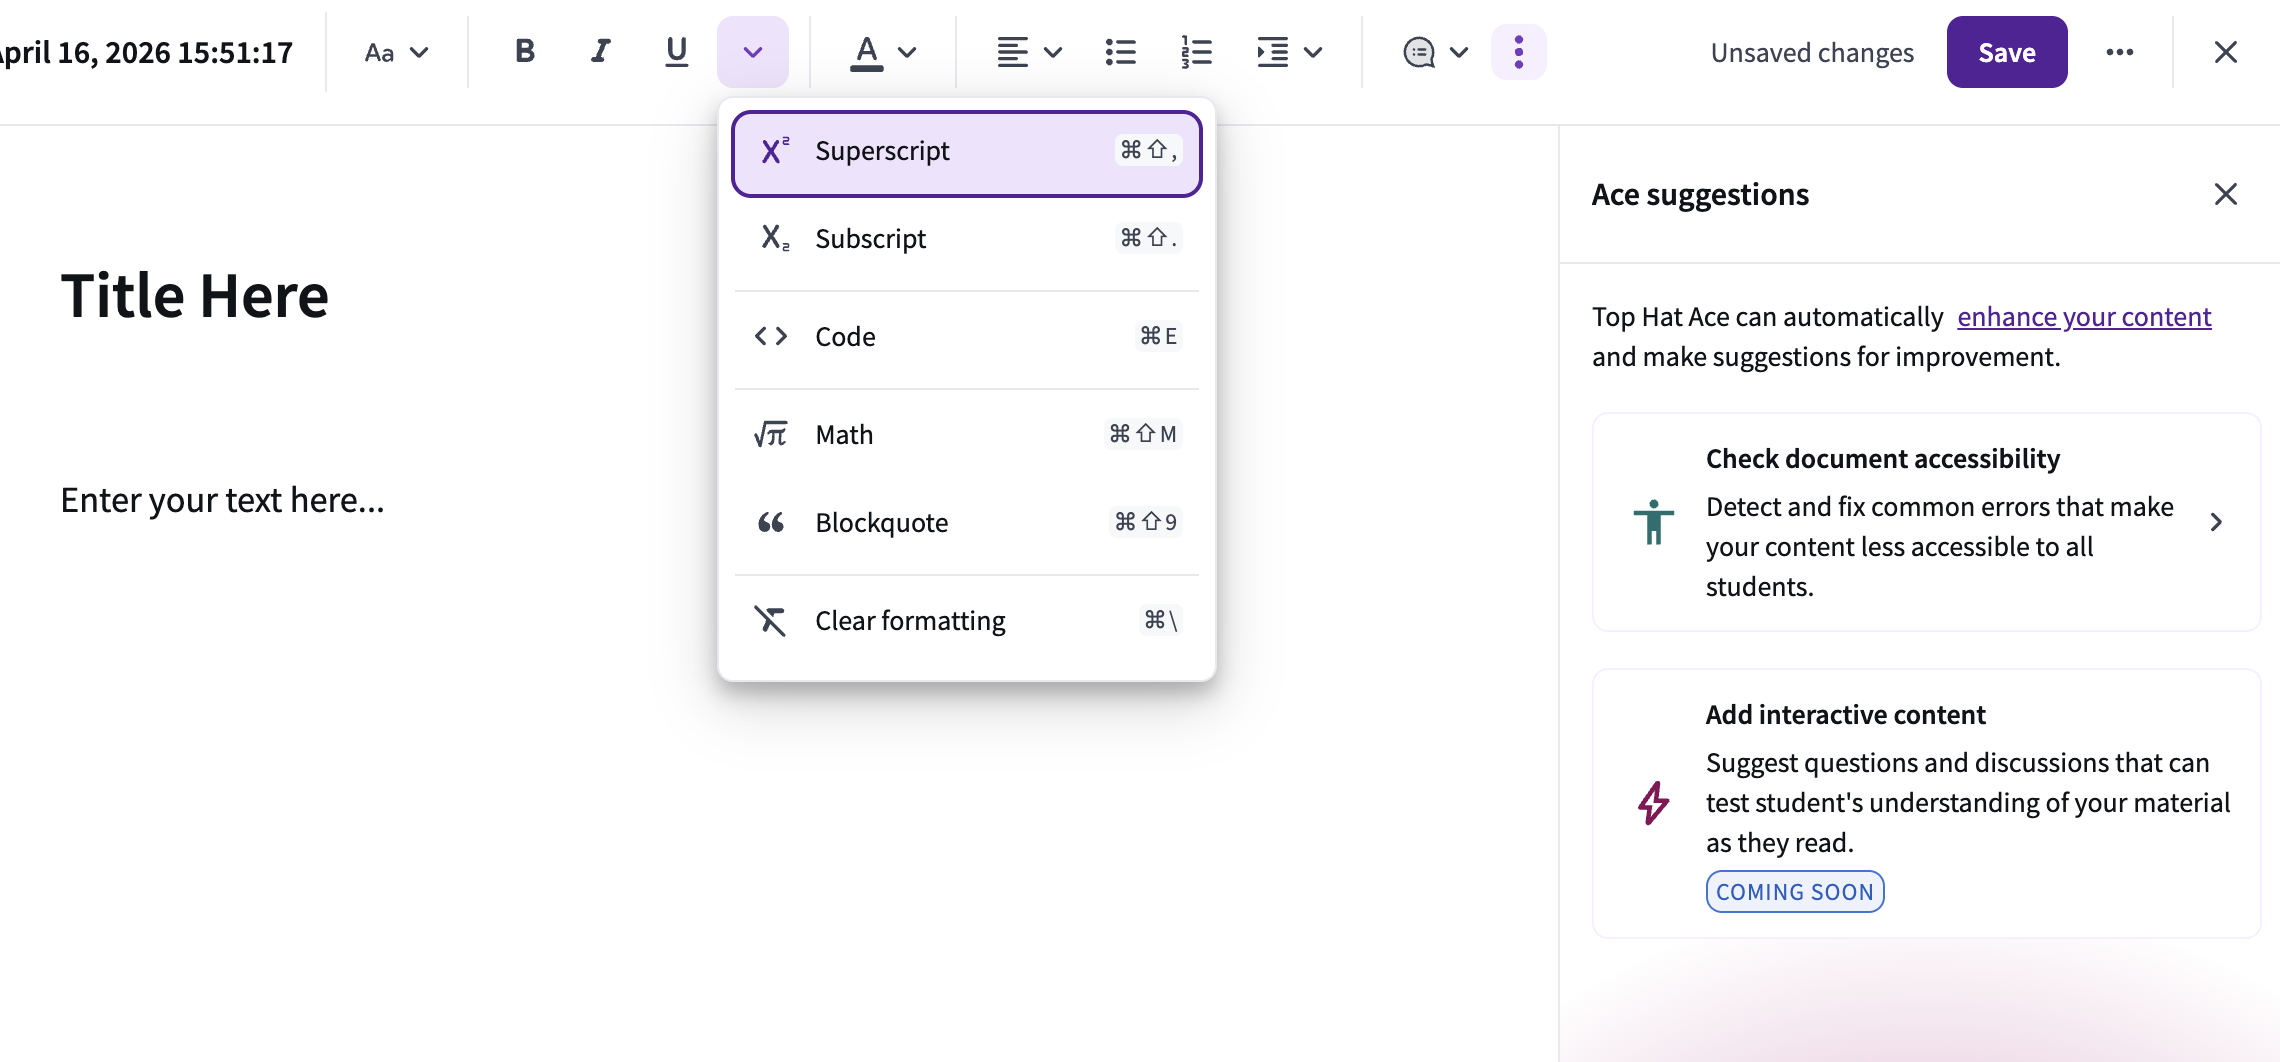
Image: Advanced Notation
Lists & Organization
- Bulleted Lists: Ideal for breaking down complex ideas into digestible points.
- Numbered Lists: Best for step-by-step instructions or sequential data.
Insert Visual and Interactive Elements
Top Hat’s Pages allows you to incorporate visual and interactive elements such as images, videos, iframes, rollover definitions and more! You can access these options by clicking on the 'Insert' button:
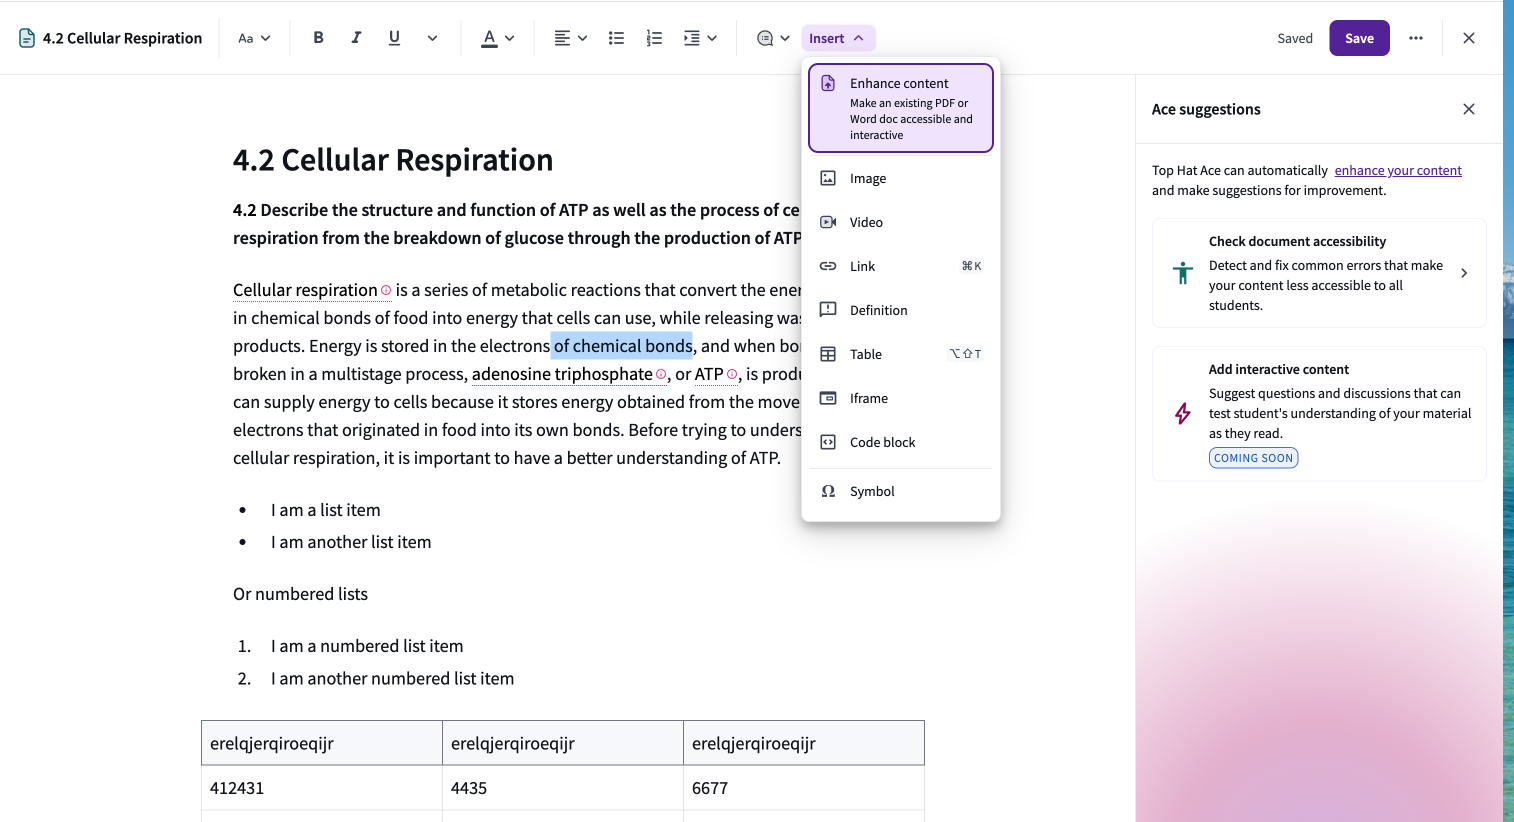
Image: Enhancing Content
Note that images have a file upload limit of 10MB. Files larger than 10MB cannot be uploaded.
Rollover Definitions
Rollover Definitions enable Educators to make supporting documentation or definitions immediately available to the reader without requiring navigation.
To insert a Rollover Definition, highlight the word and then click the "Insert" button. Select 'definition' from the drowndown menu.
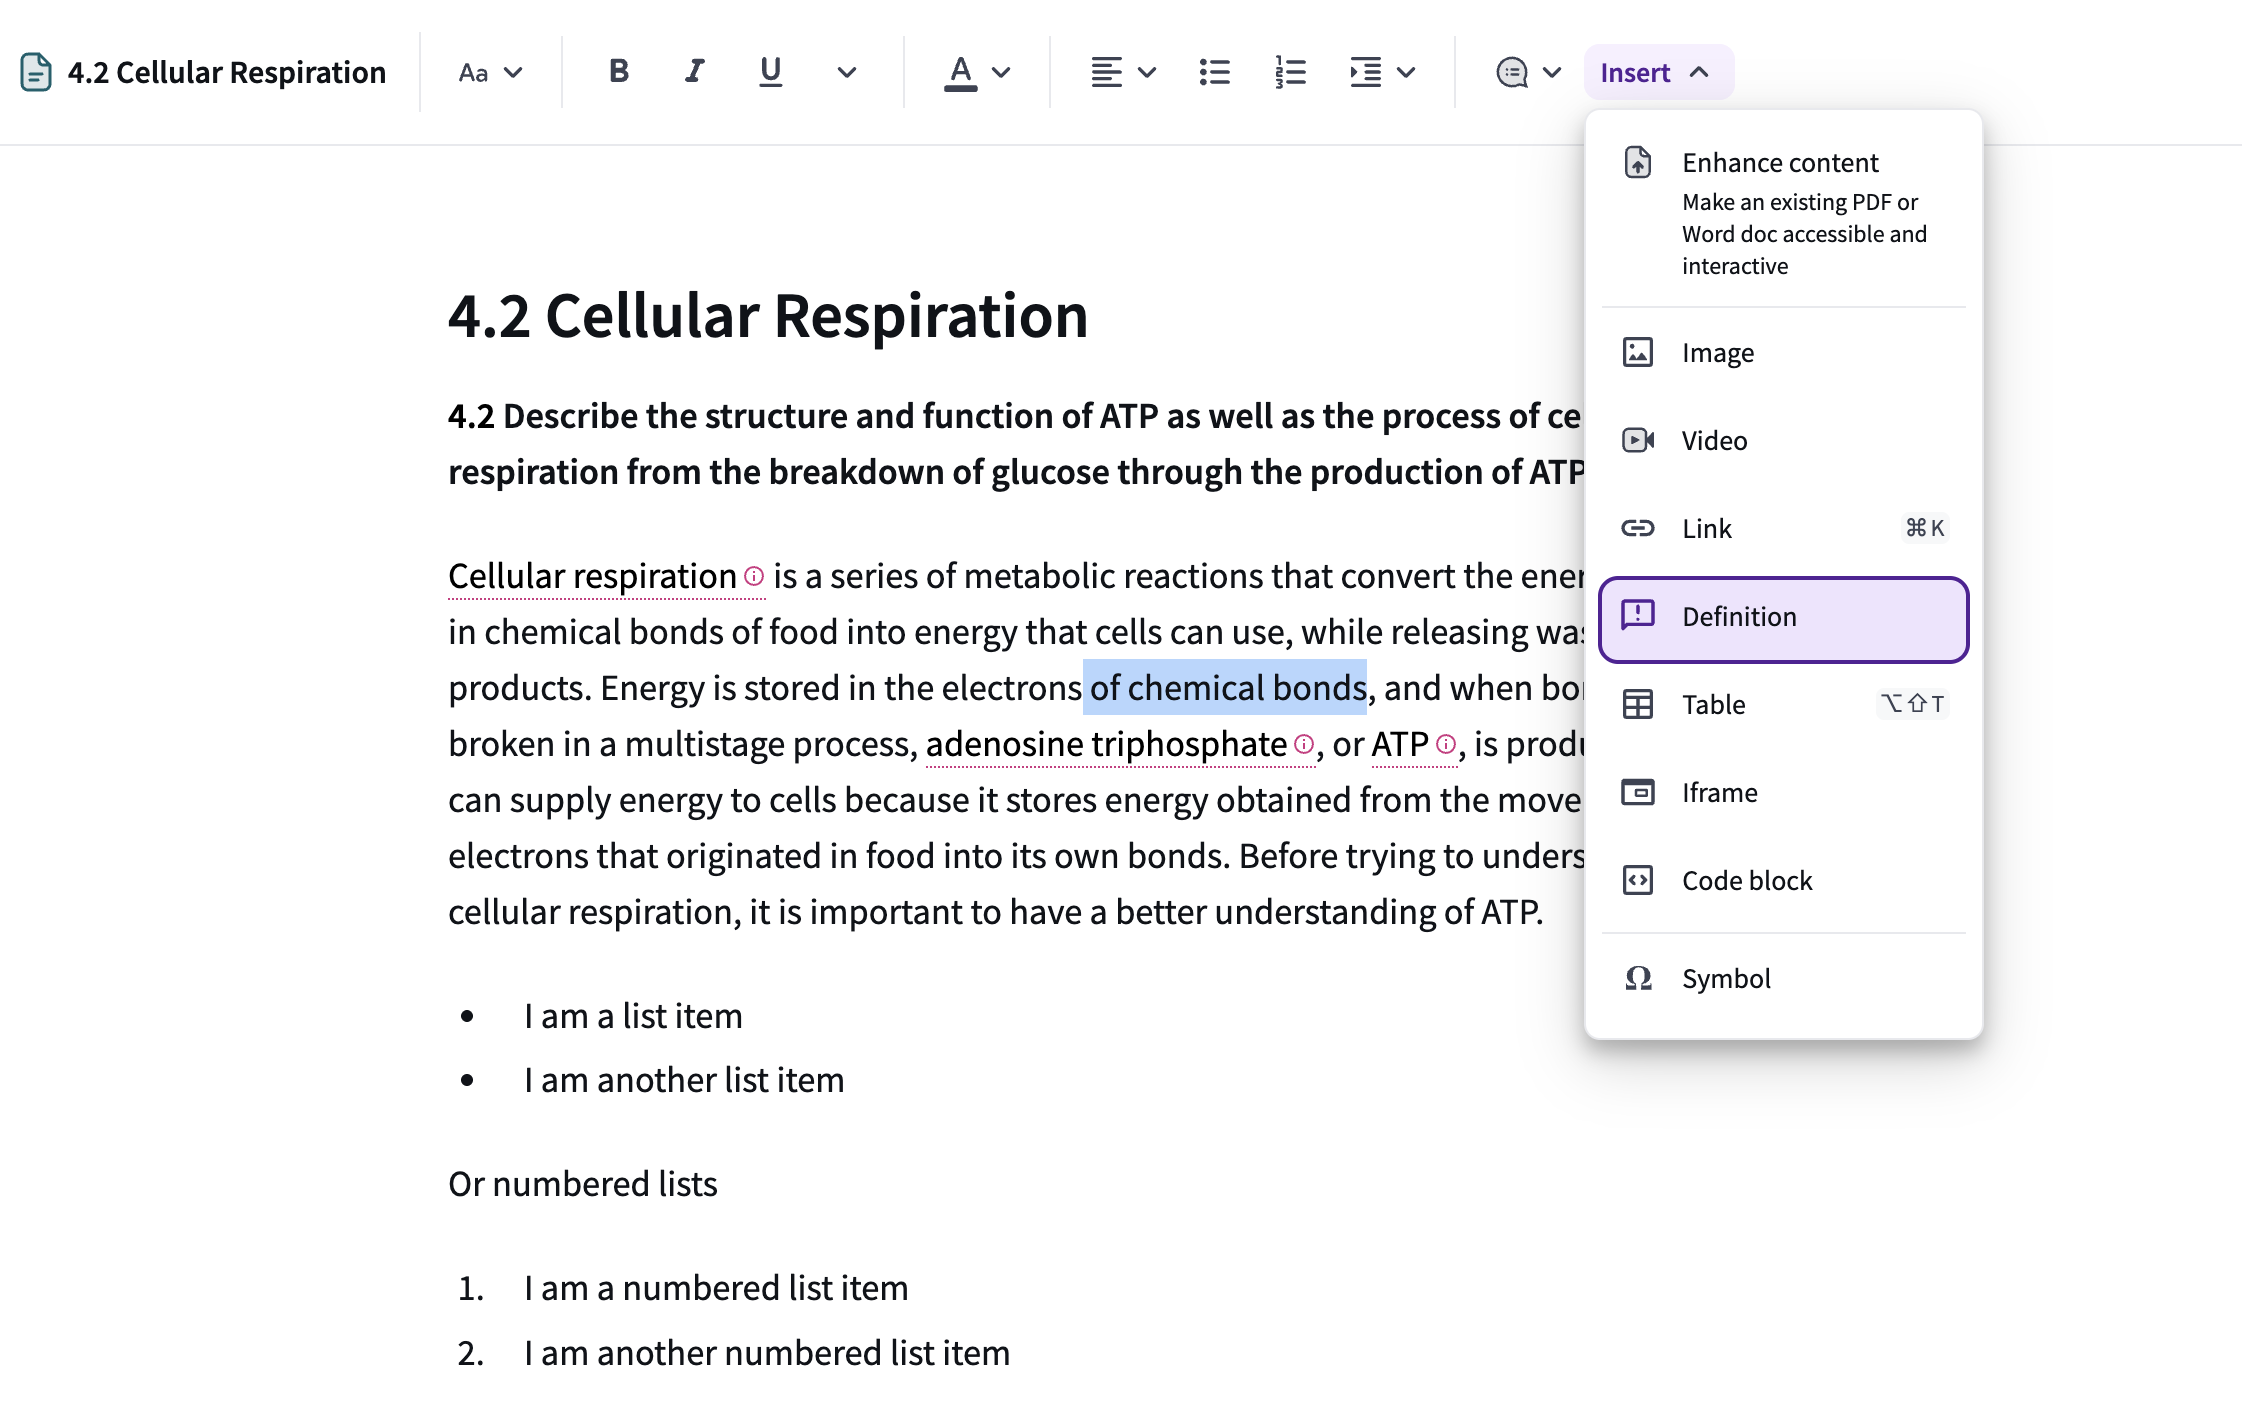
Image: Inserting a Rollover Definition
Include your definition in the popup window and an optional title, then press "Insert".
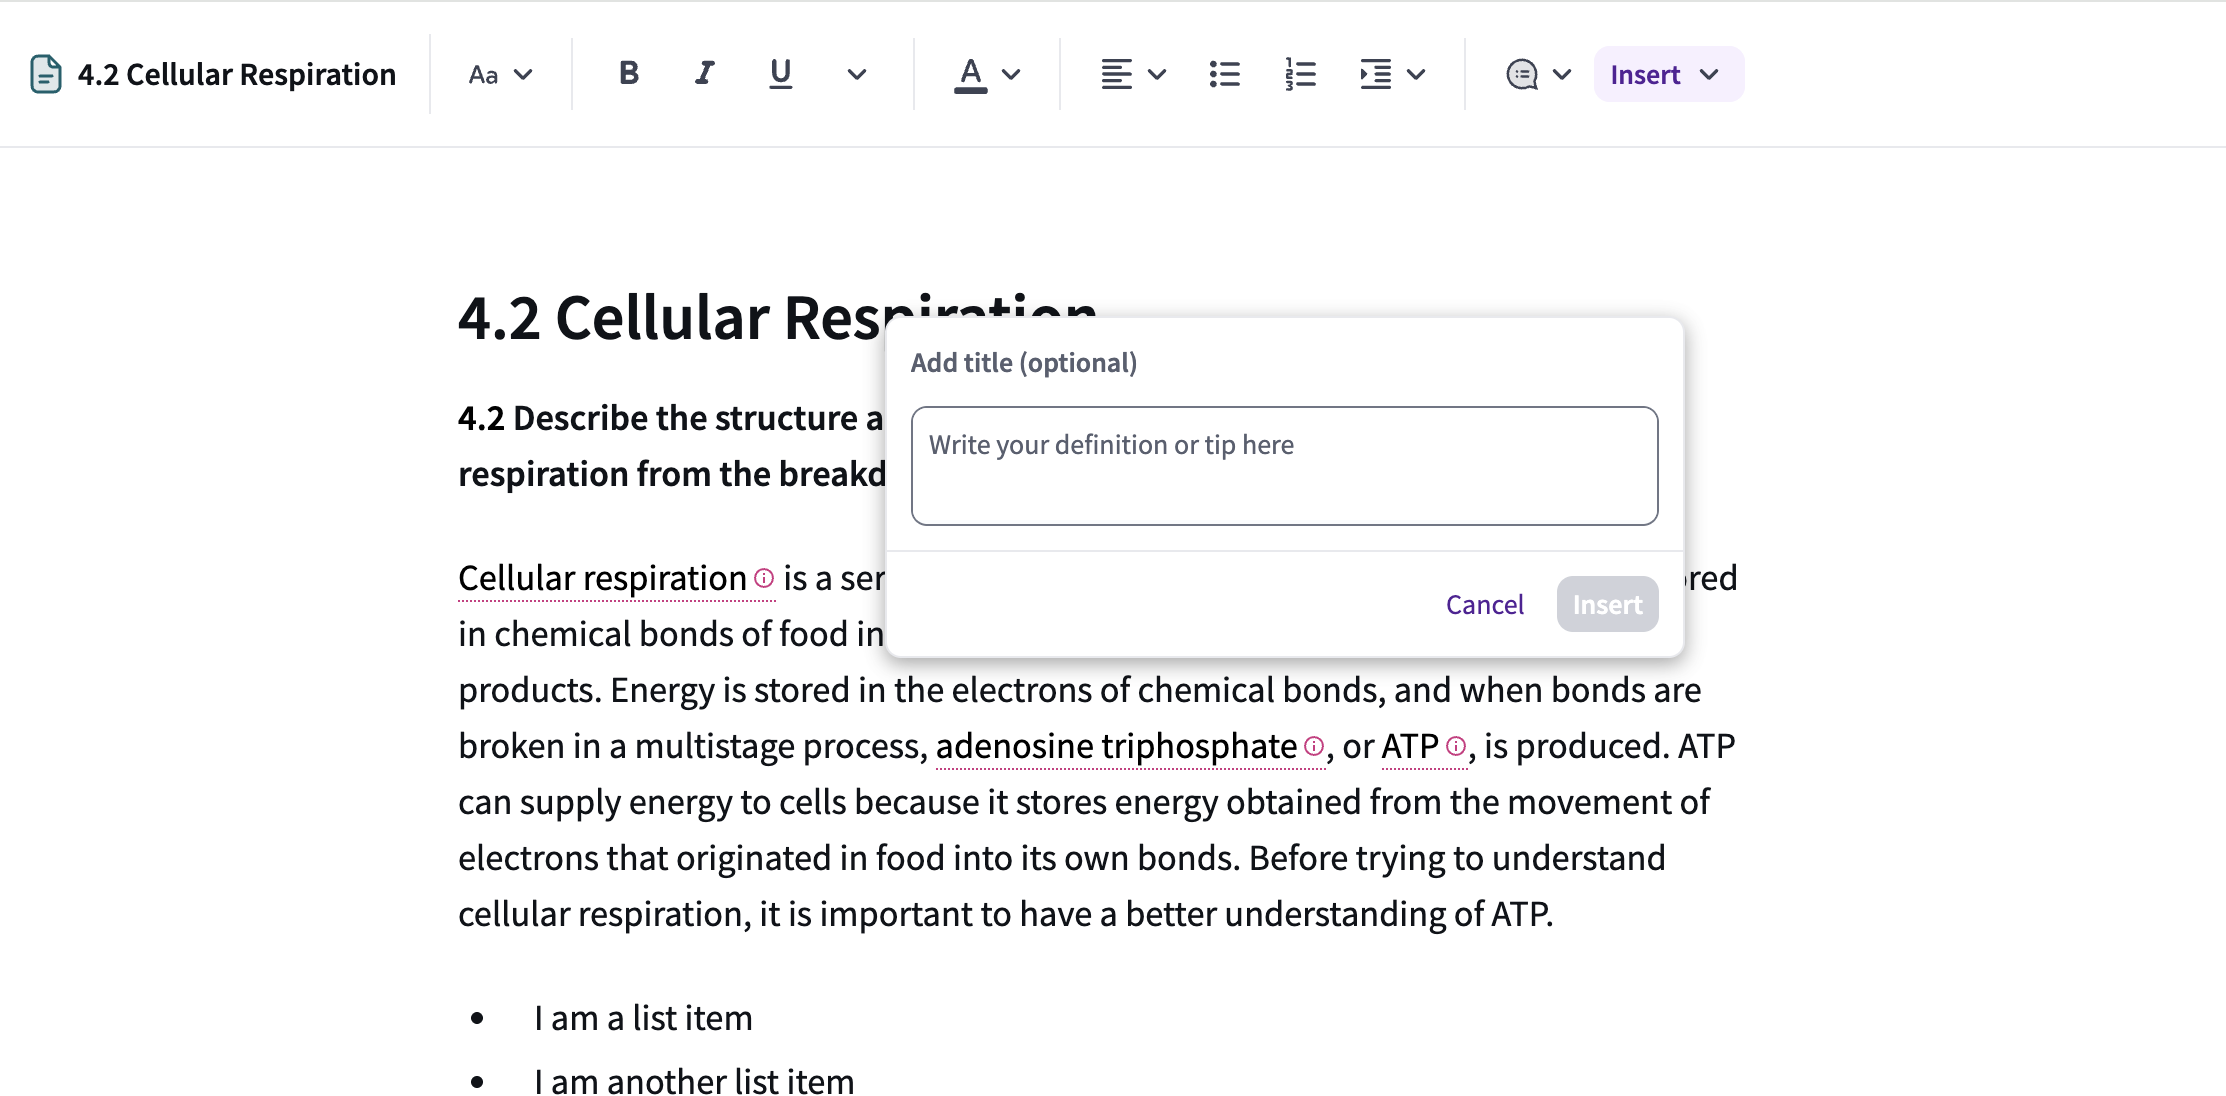
Image: Adding a rollover definition
The rollover definition will appear when a learner is working through the assigned chapter or Pages content document and they hover their cursor over the defined word.
Existing definitions can be modified in the Pages editor by clicking on the word that has been defined -- the popup window will appear and the definition can be changed.
Adding Videos
Whether you're authoring a textbook, creating a homework assignment, or providing lecture resources, embedding videos in Top Hat Pages is a great way to enhance student engagement.
To add a video, click on the Insert button in the Pages Editor and select Video. In the resulting popup window, enter the URL of the video you wish to add.
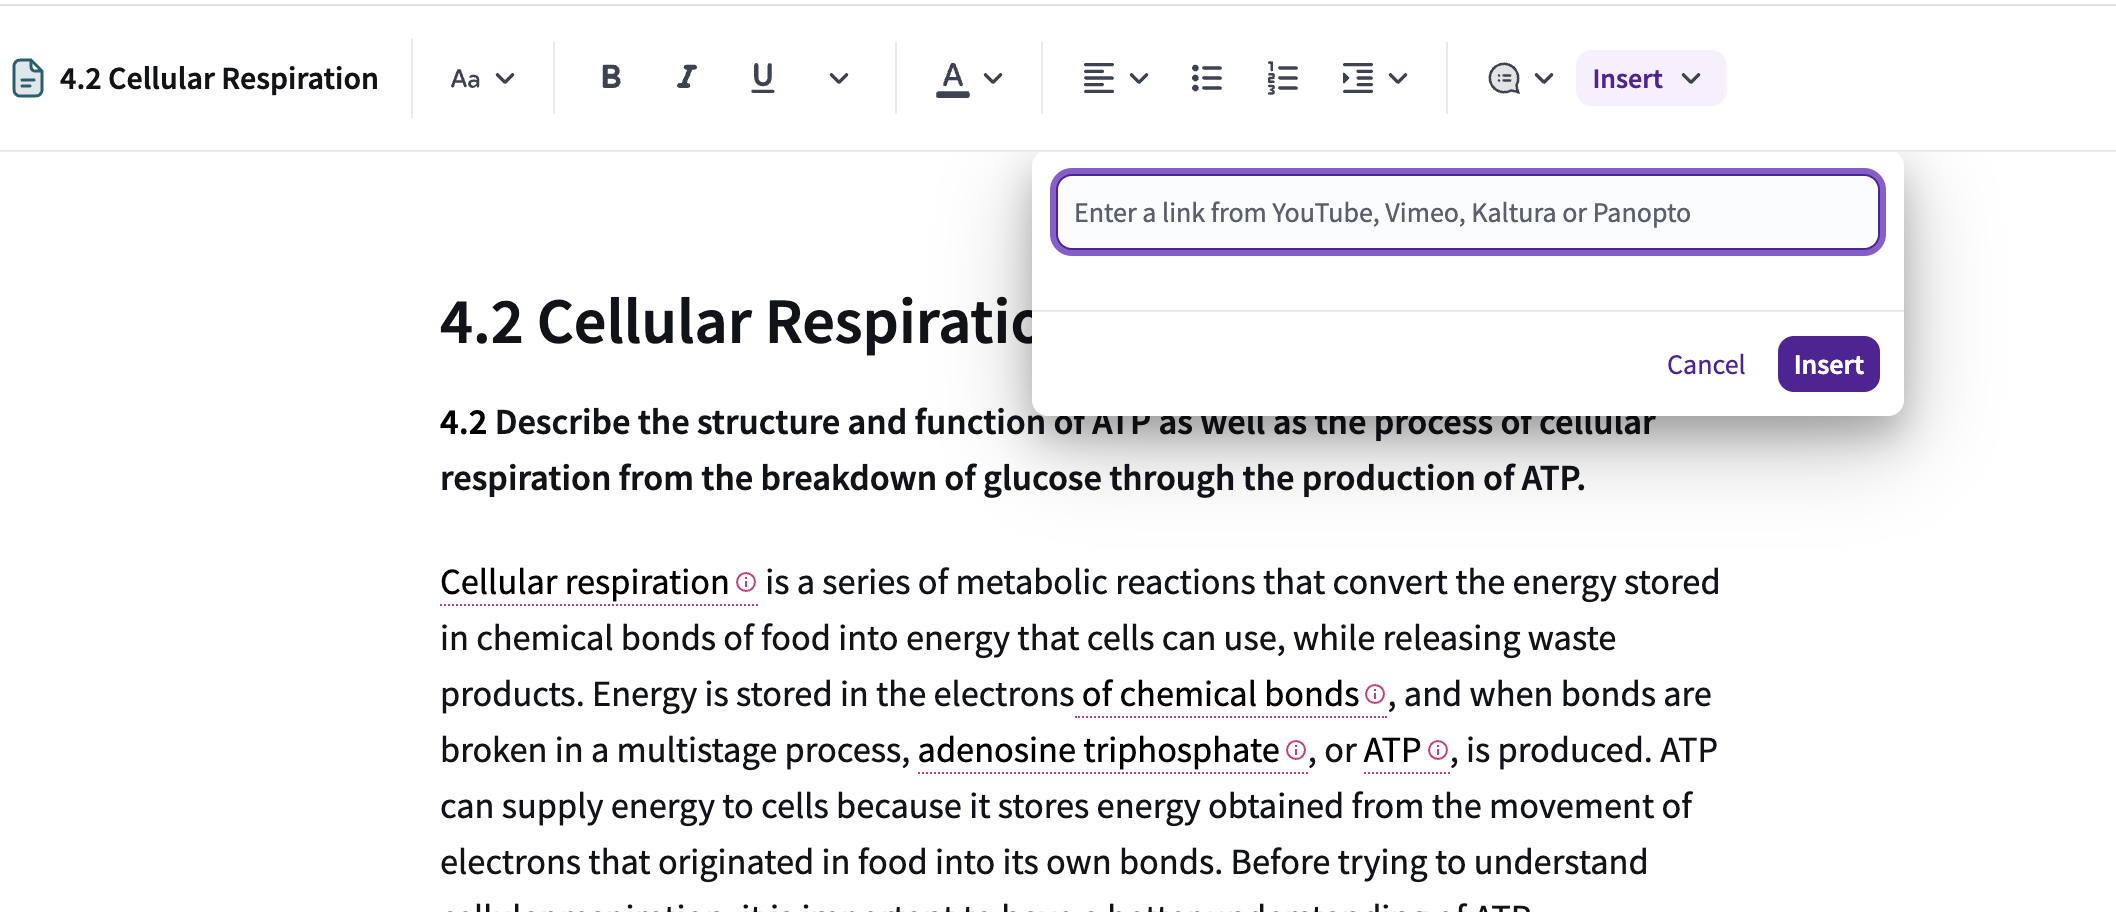
Image: Adding a Video
You may paste a video link from one of the approved sources: YouTube, Vimeo, Kaltura (embed code), or Panopto. Click Insert or press Enter on your keyboard to embed it in the Page
Note: When a link is added, Top Hat cannot detect if the video has been removed from its host platform. Please ensure the video is available and playable.
Start a YouTube video at a specific time
- Play and pause the video at the desired starting point.
- Click the SHARE button next to the video title.
- Check the checkbox next to Start at:
- Click COPY to copy the timestamped link.
- Paste this link into the video embed field in your Top Hat Page.
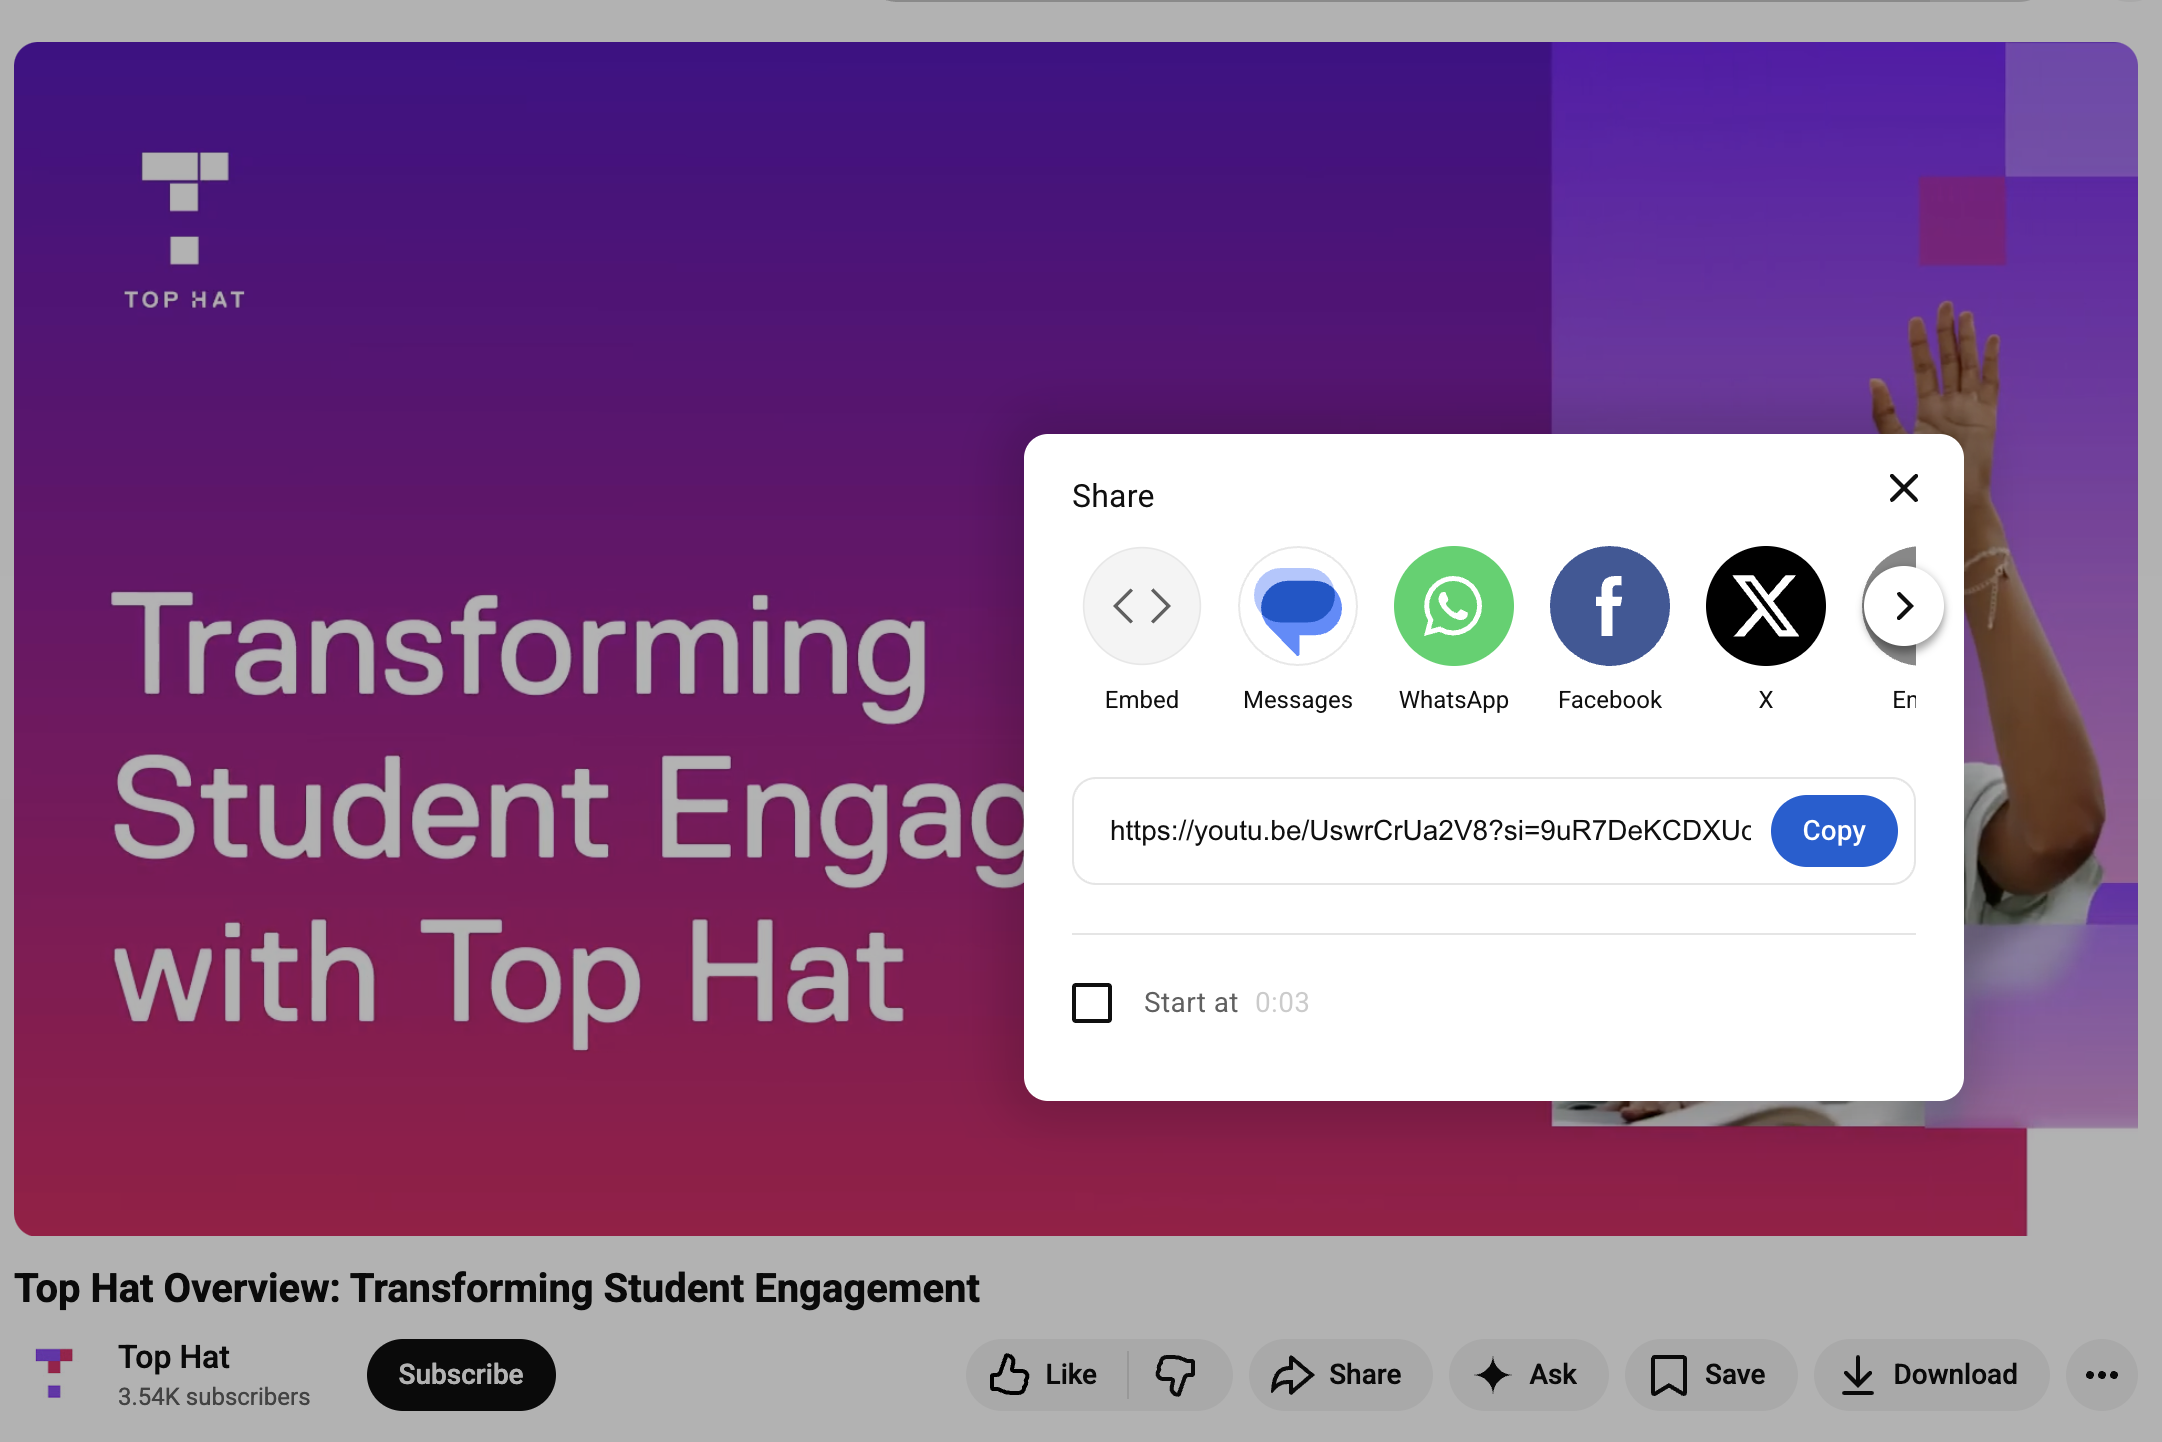
Image: The video embedding dialog
If an error occurs, the same messages listed above will apply.
Reminder: Top Hat does not verify if the video is still hosted or available. Always check your video link to ensure it works as expected. When you embed Kaltura, or Panopto as standalone videos, Ace uses the video transcript to generate practice questions exclusively for students enrolled in your course who choose to use Ace Practice. No content is shared externally or reused beyond your course.
Editing Videos
You can modify embedded videos with the following options:
- Title (Required): Defaults to “Video” but can be customized for the content tree or the Edit video popup window shown below.
- Description (Optional): Provides context or instructions below the video.
- Start and End Time: Define specific segments to play.
- Use a different video: Replace the current video with a new link.
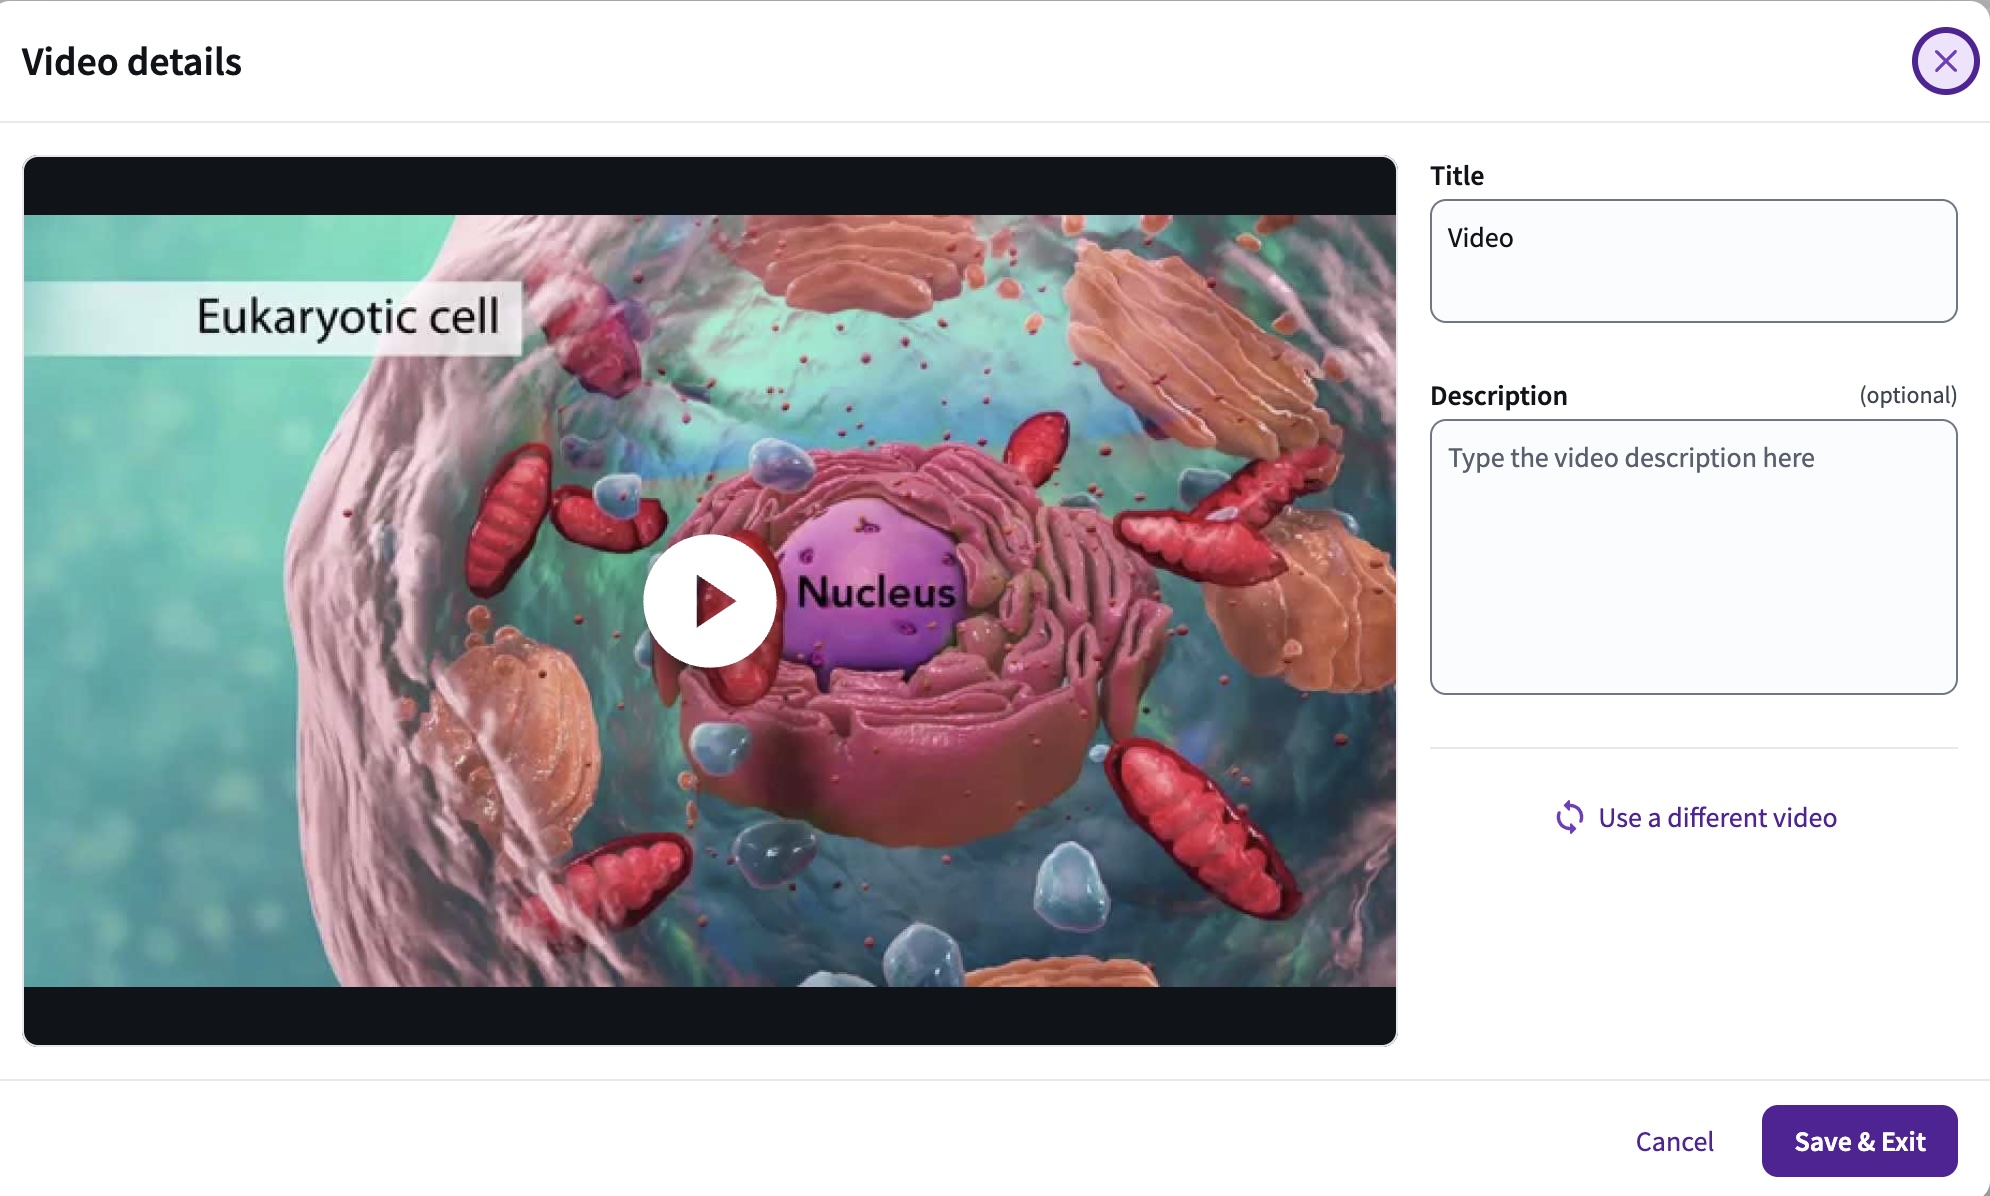
Image: Editing a Video
Edit with AI
Ace’s powerful ‘Edit with AI’ feature can help to make your course content more engaging and personalized to your students.
Content Refinement
You can adjust the tone of selected text to better suit your teaching style. Simply highlight the text you want to refine, click ‘Edit with AI’ and select ‘Change Tone’
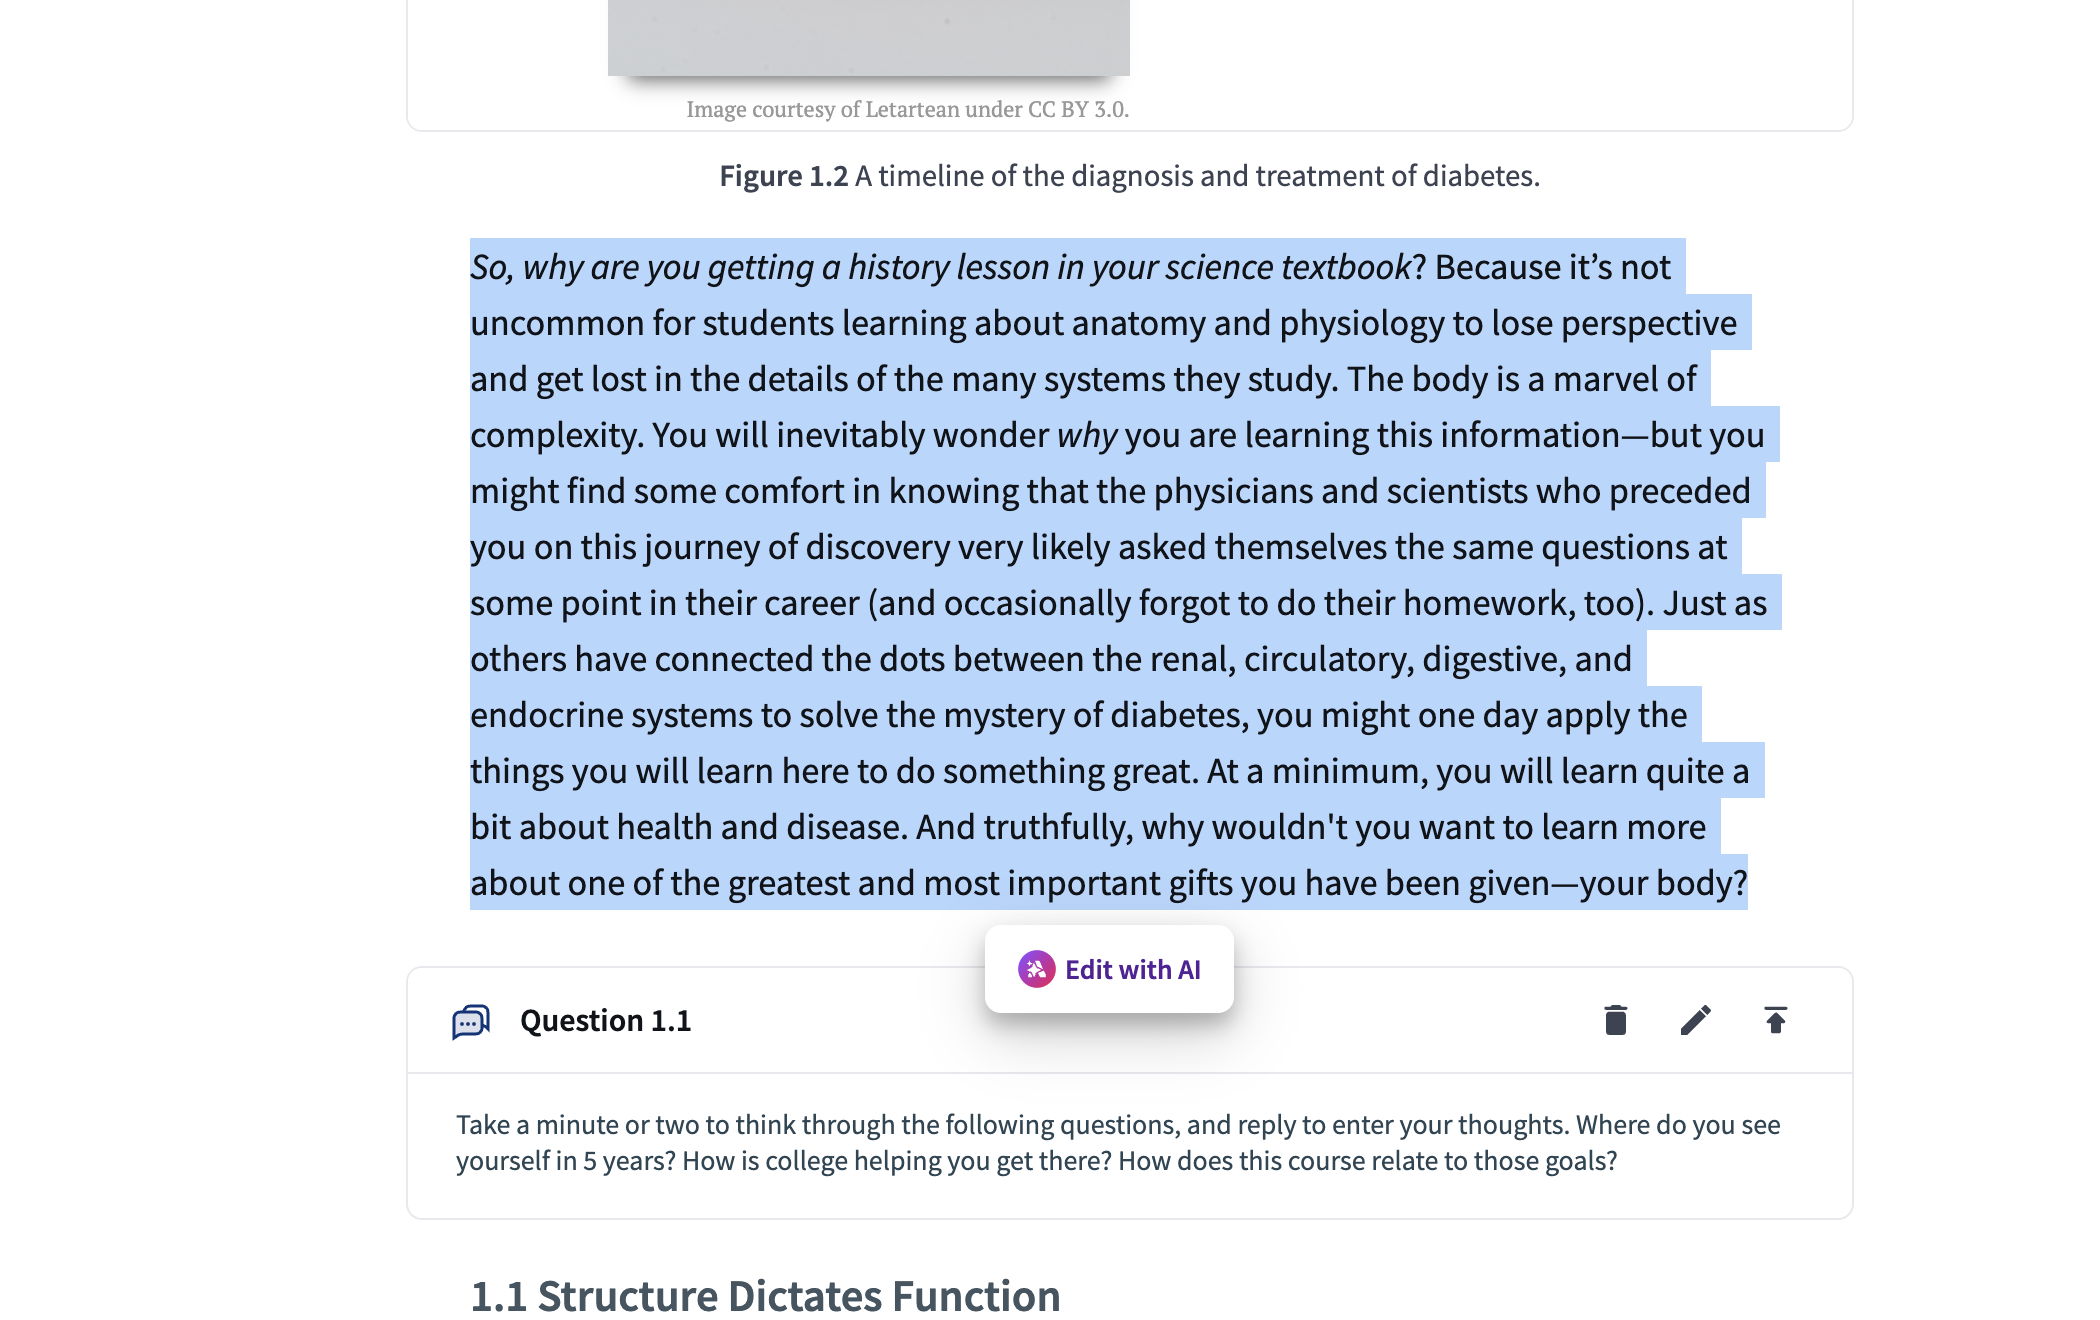
Image: Refining content- Edit with AI
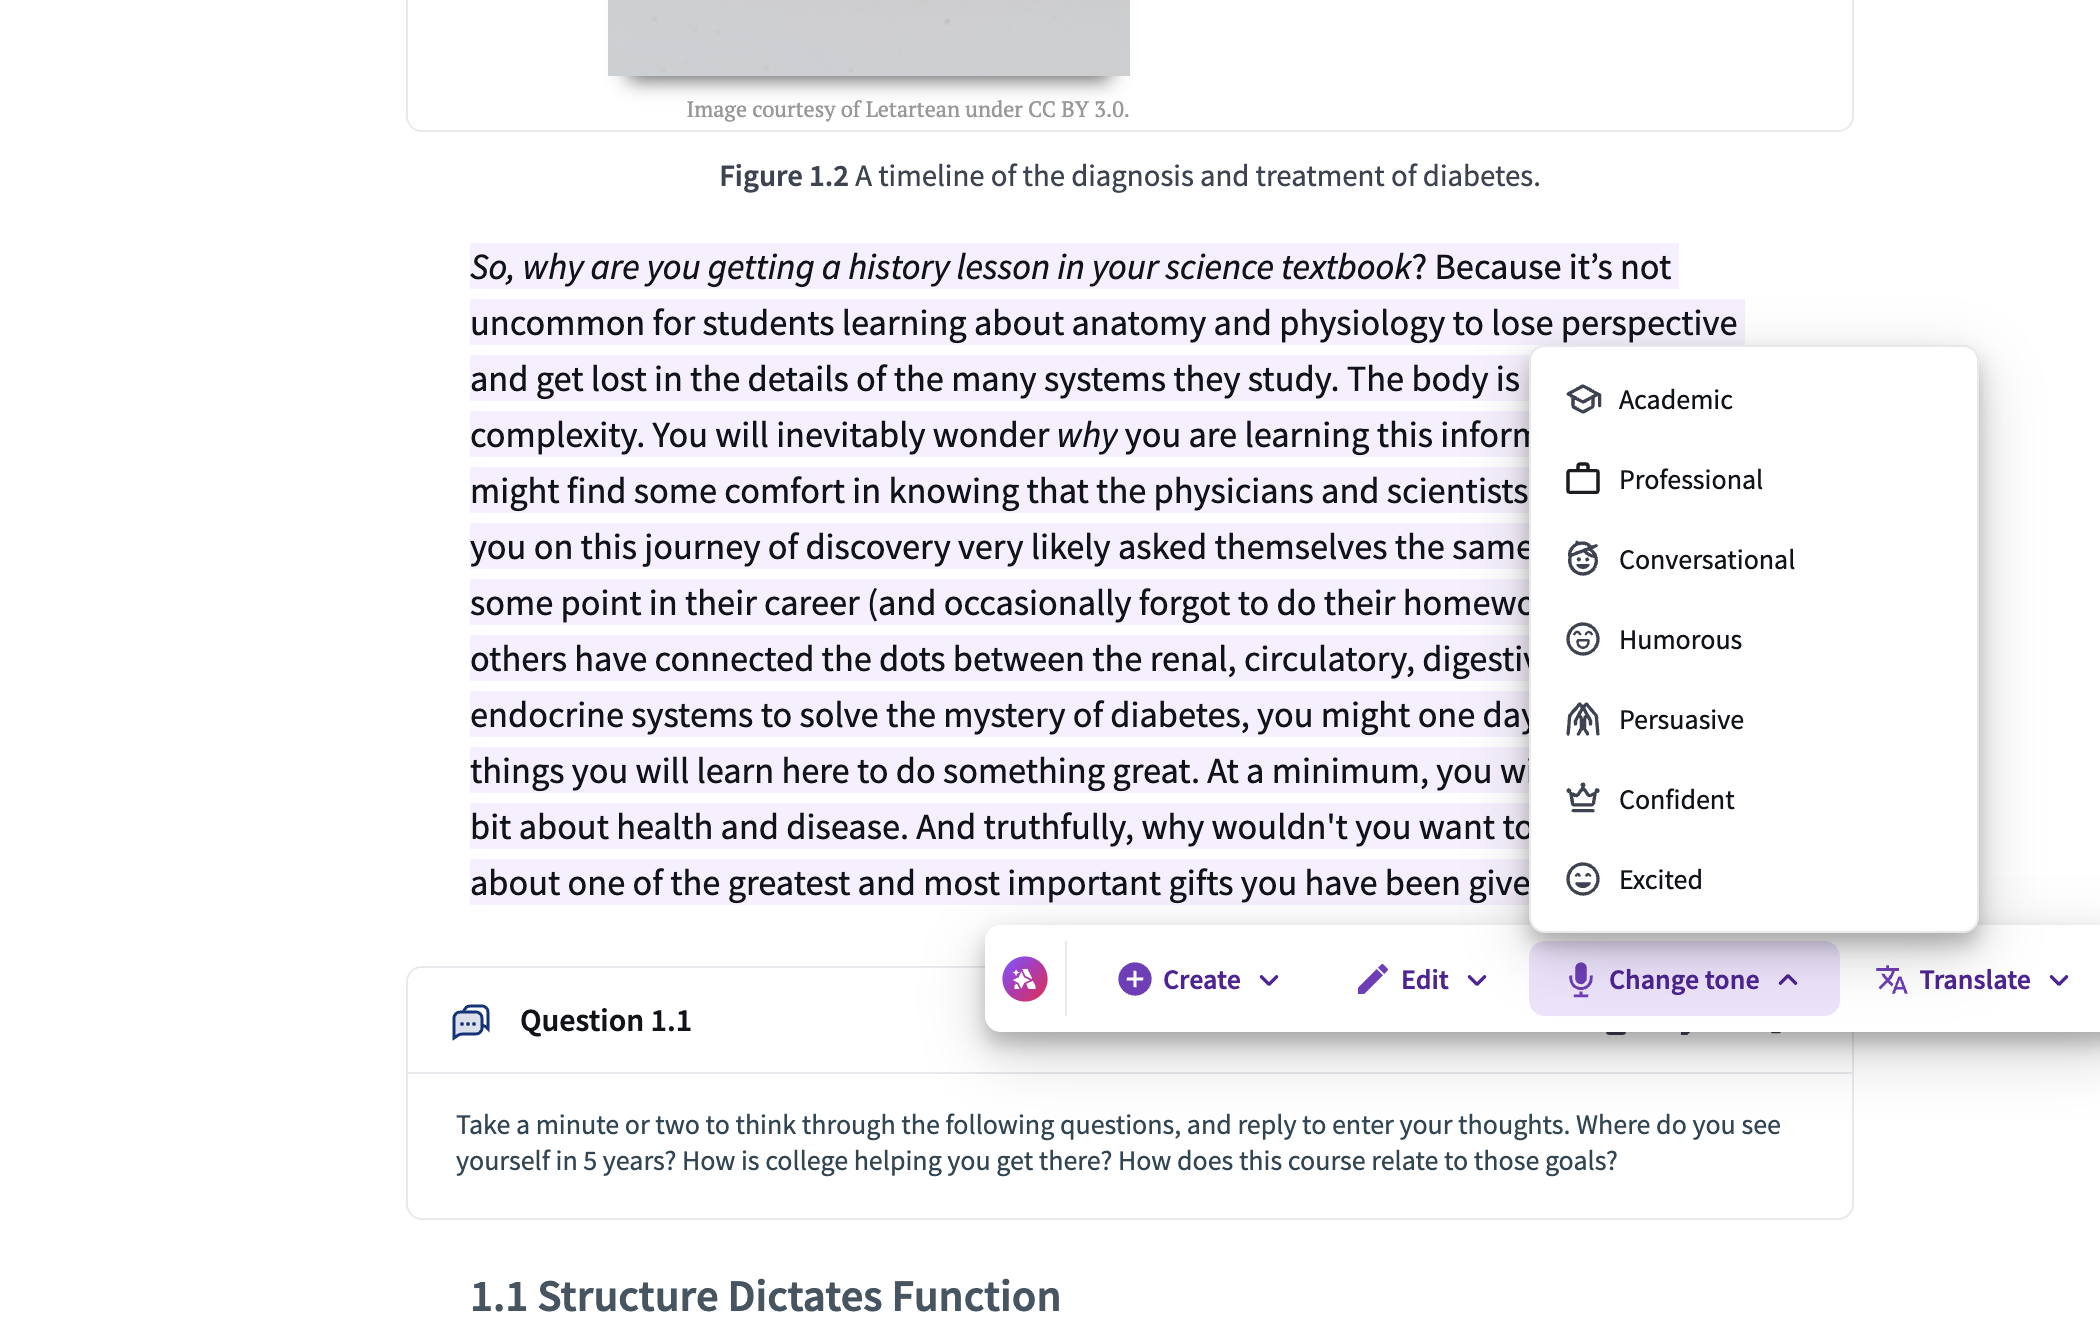
Image: Change tone
The text will be edited with AI and you can choose to Accept or Discard the suggestion. You can also provide feedback by clicking on the Feedback icon next to the Discard button. Your insights are vital to improving Ace and will be shared directly with our product team.
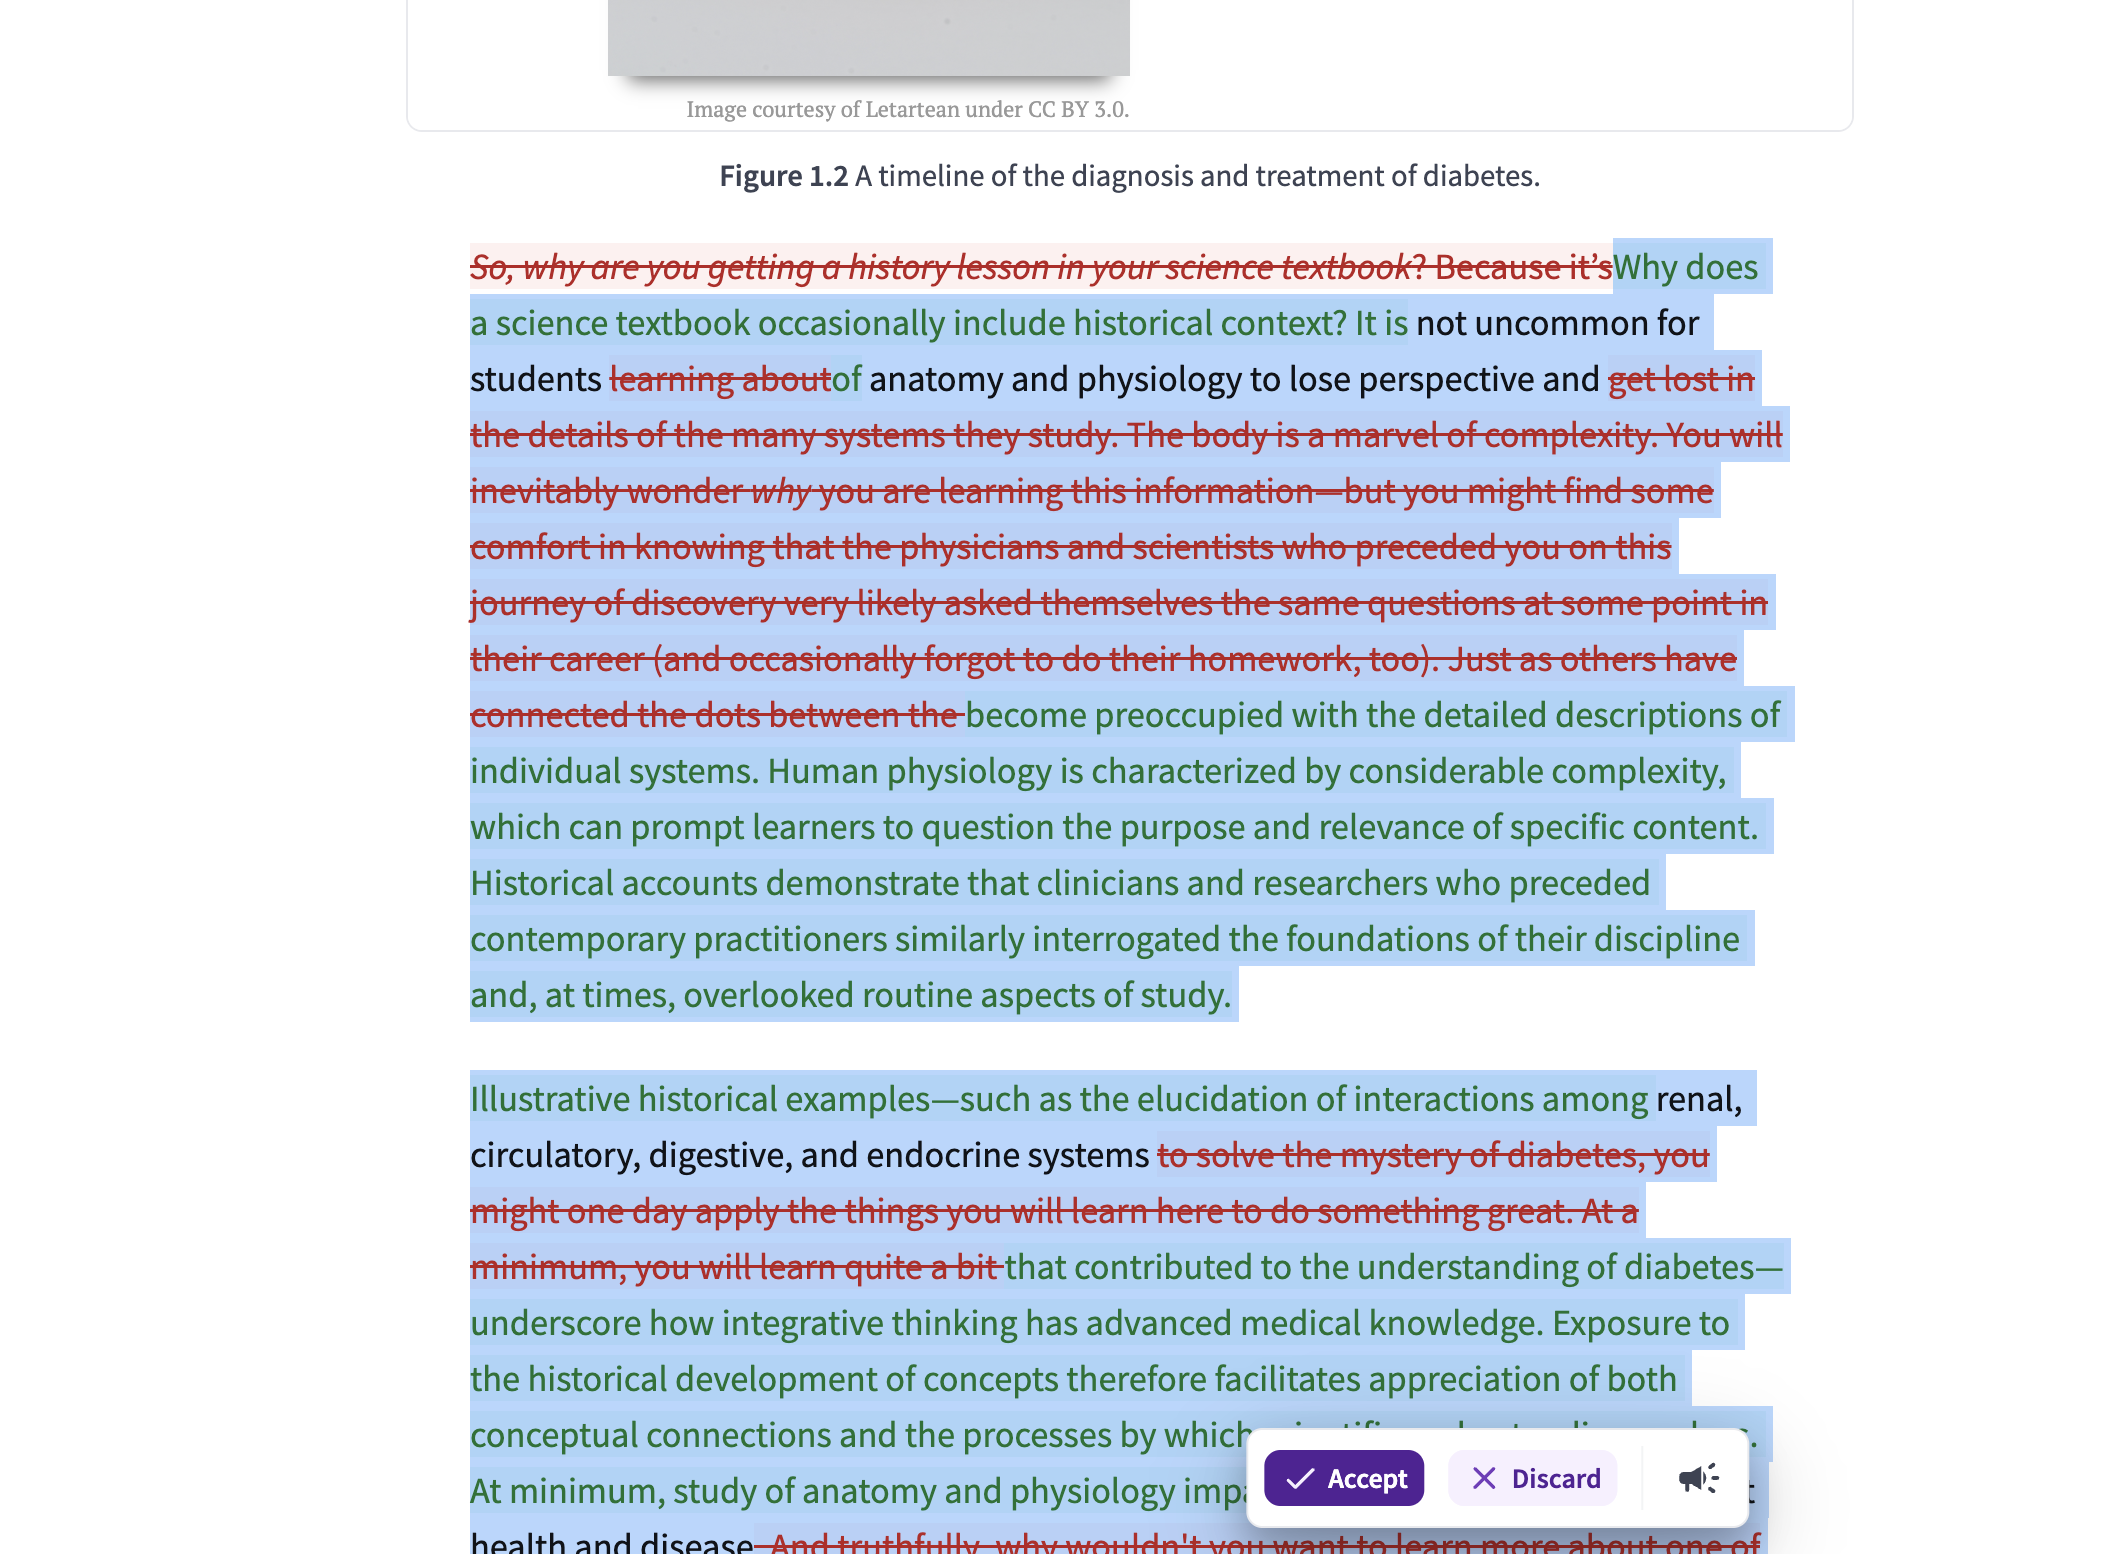
Image: Accept or Discard edited tone
Translation
You can translate text into the following languages:
You can do this by selecting the text you desire to translate, clicking on the ‘Edit with AI’ button and then selecting ‘Translate’
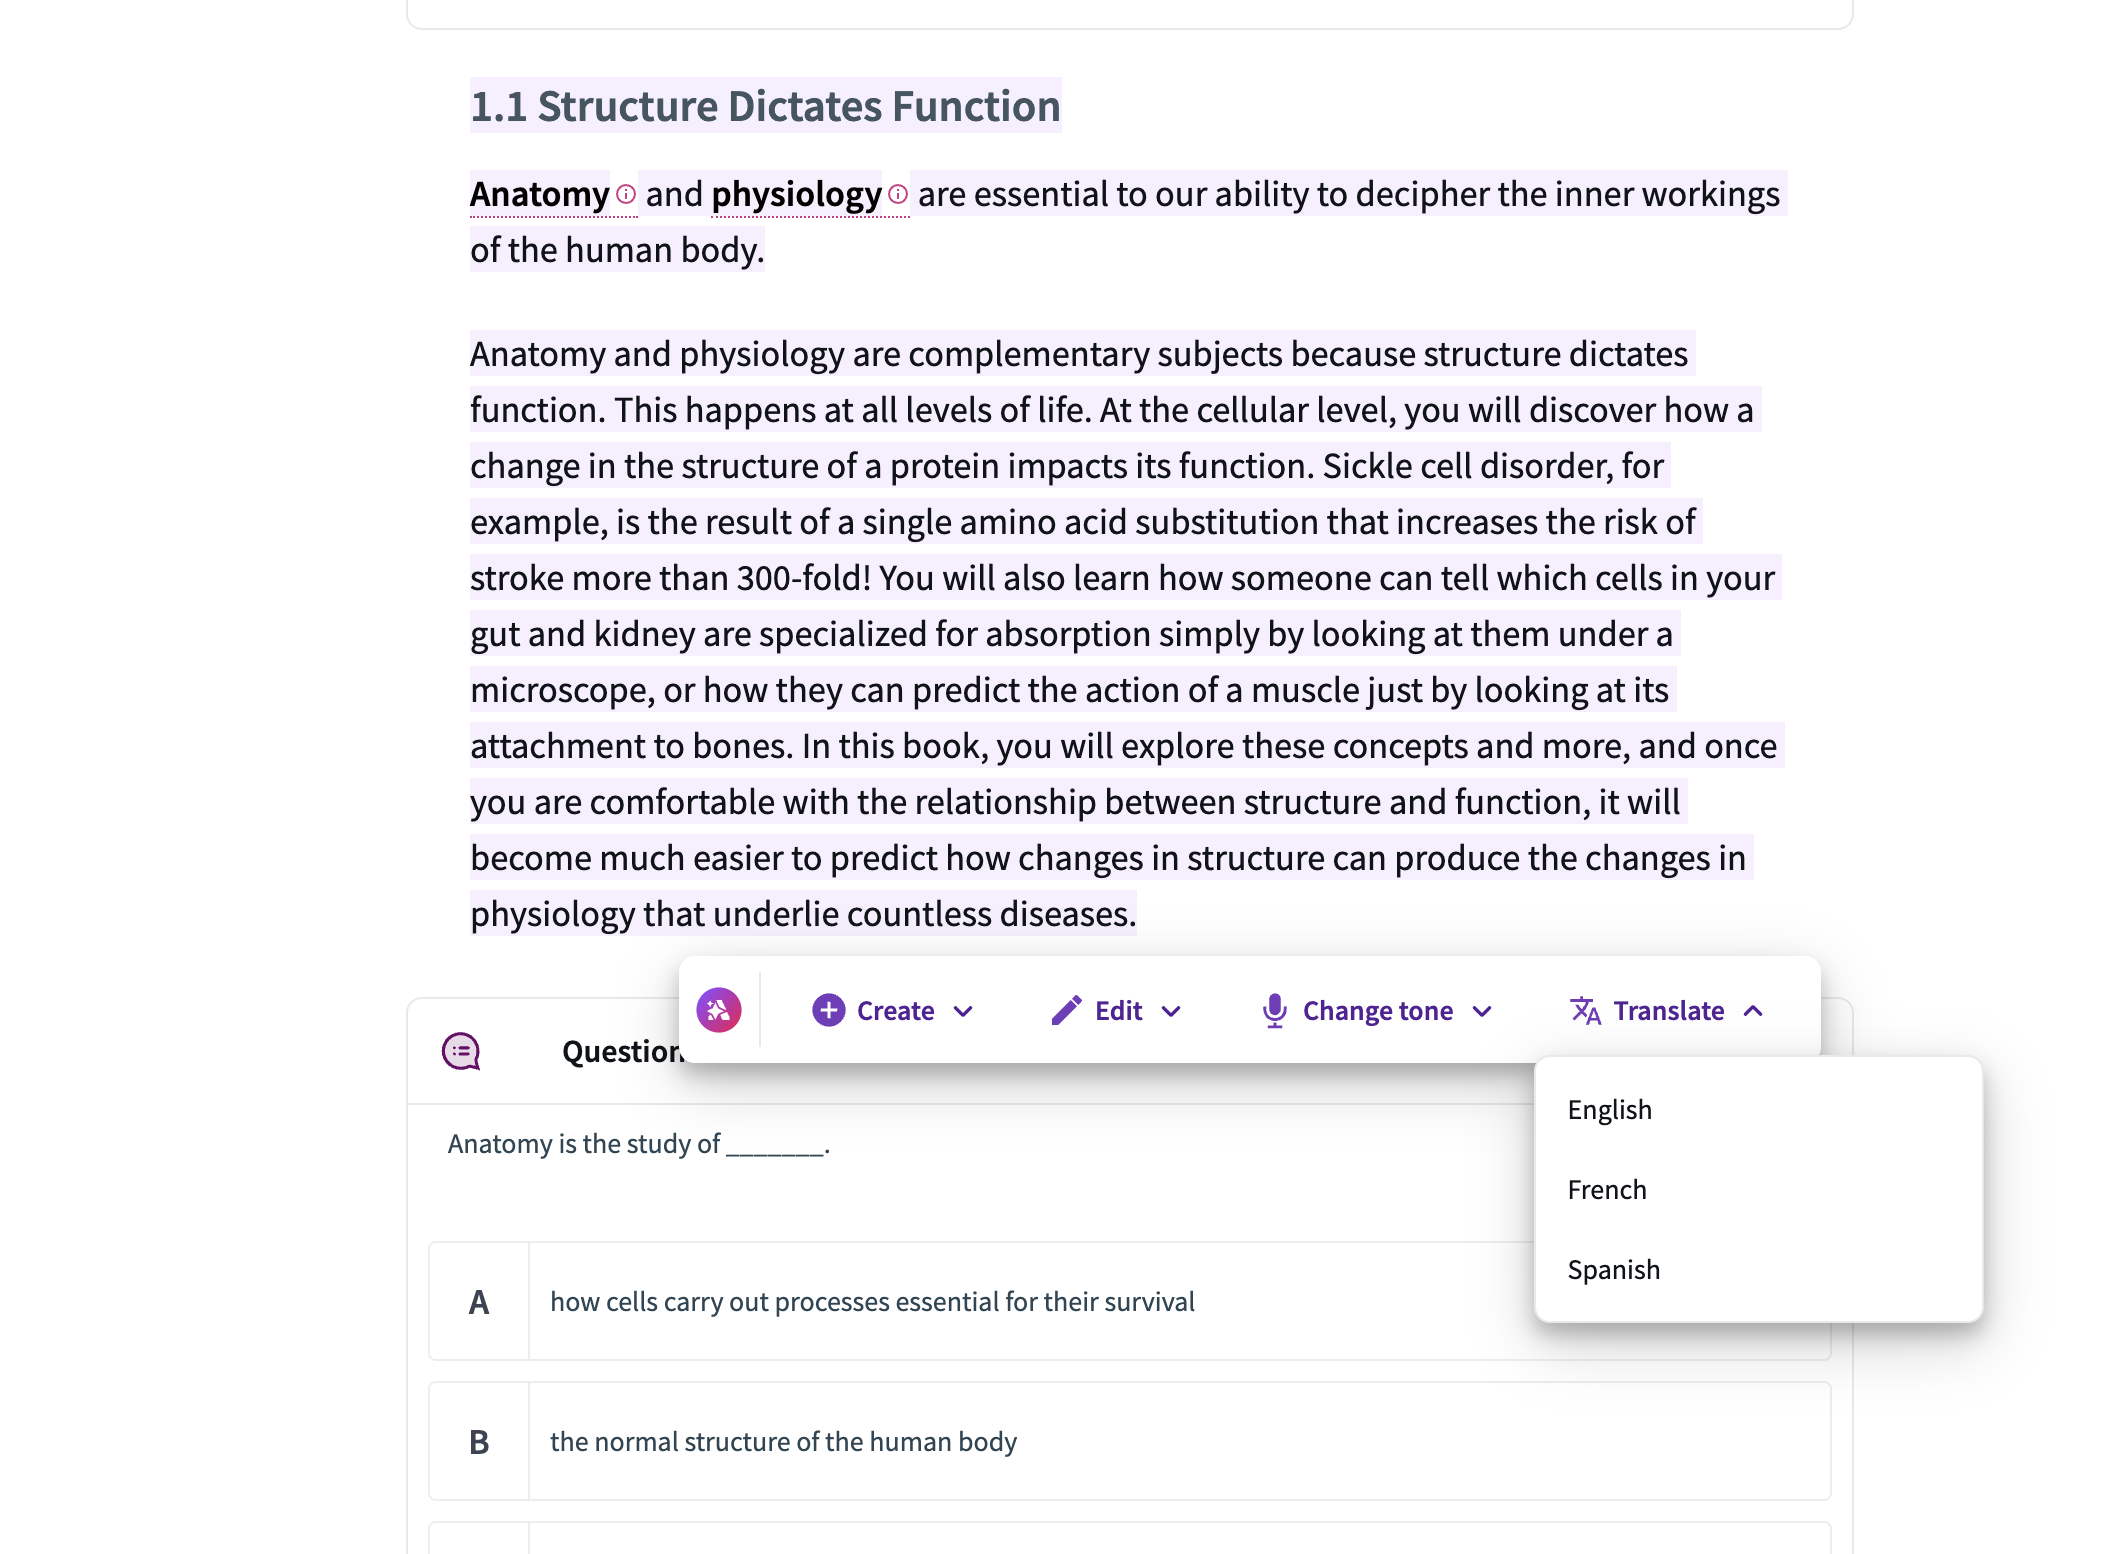
Image: AI generation loading state
The text will be translated with AI and you can choose to Accept or Discard the translation. You can also provide feedback by clicking on the Feedback icon next to the Discard button. Your insights are vital to improving Ace and will be shared directly with our product team.
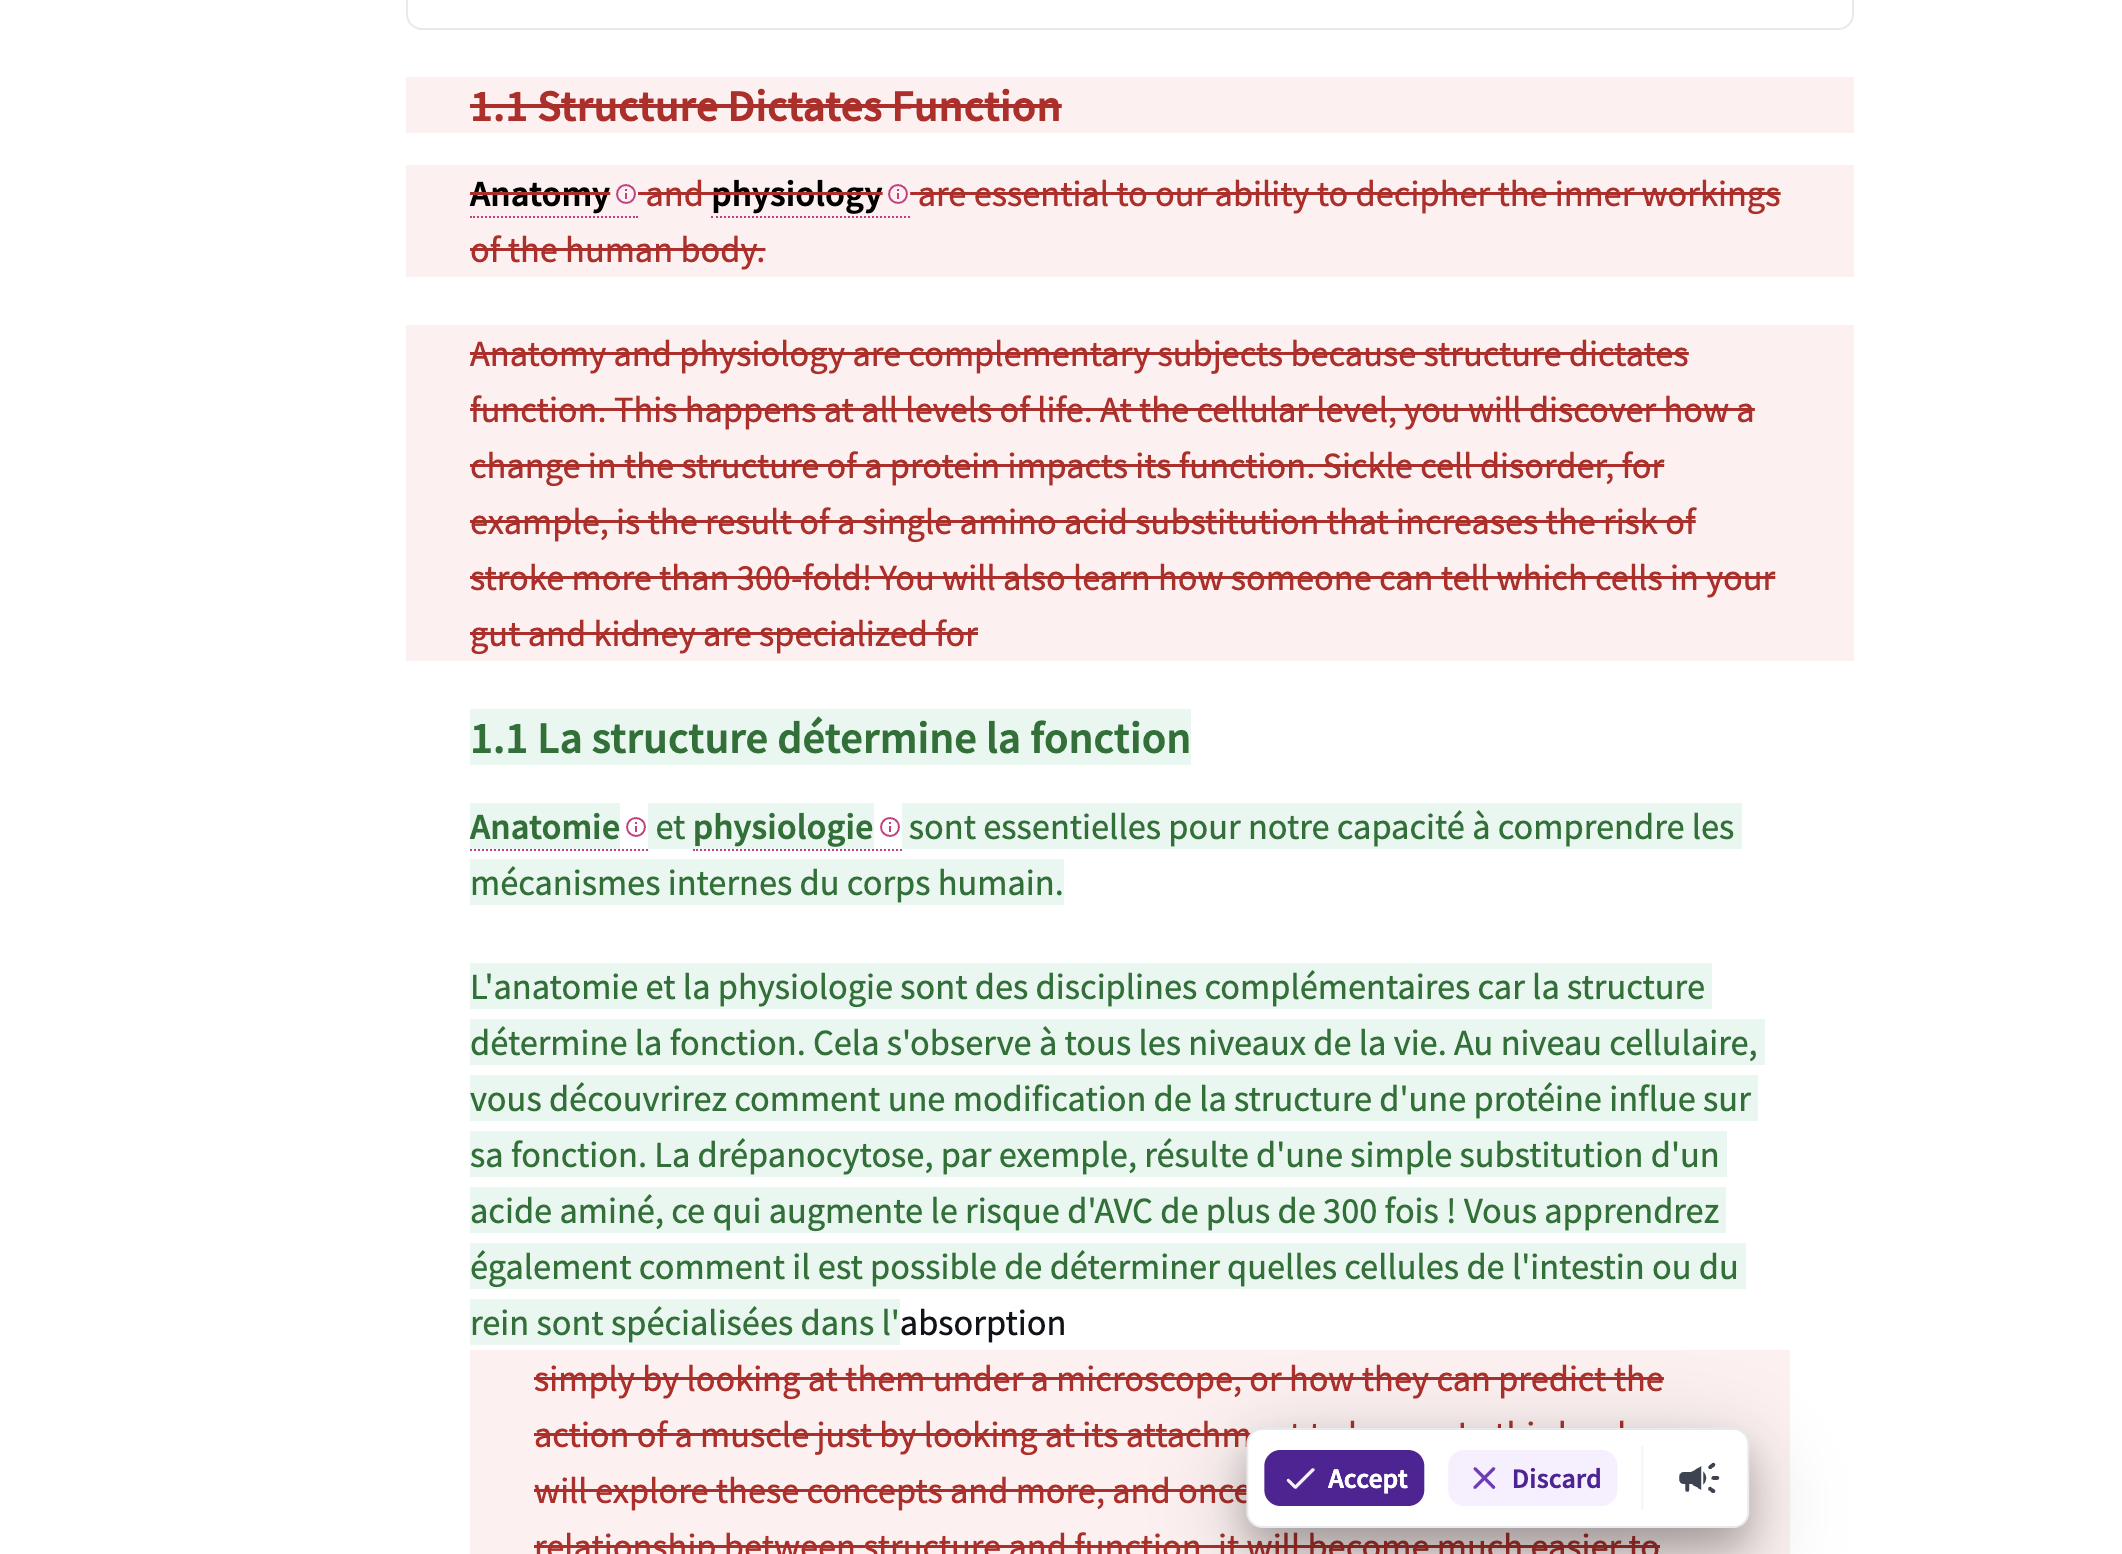
Image: Accept or Discard Translation
Personalized Examples
Ace can generate Personalized examples based on your text.
To generate a Personalized example, select the text you wish to create an example about, click the ‘Edit with AI’ button and then choose ‘Personalized Example’
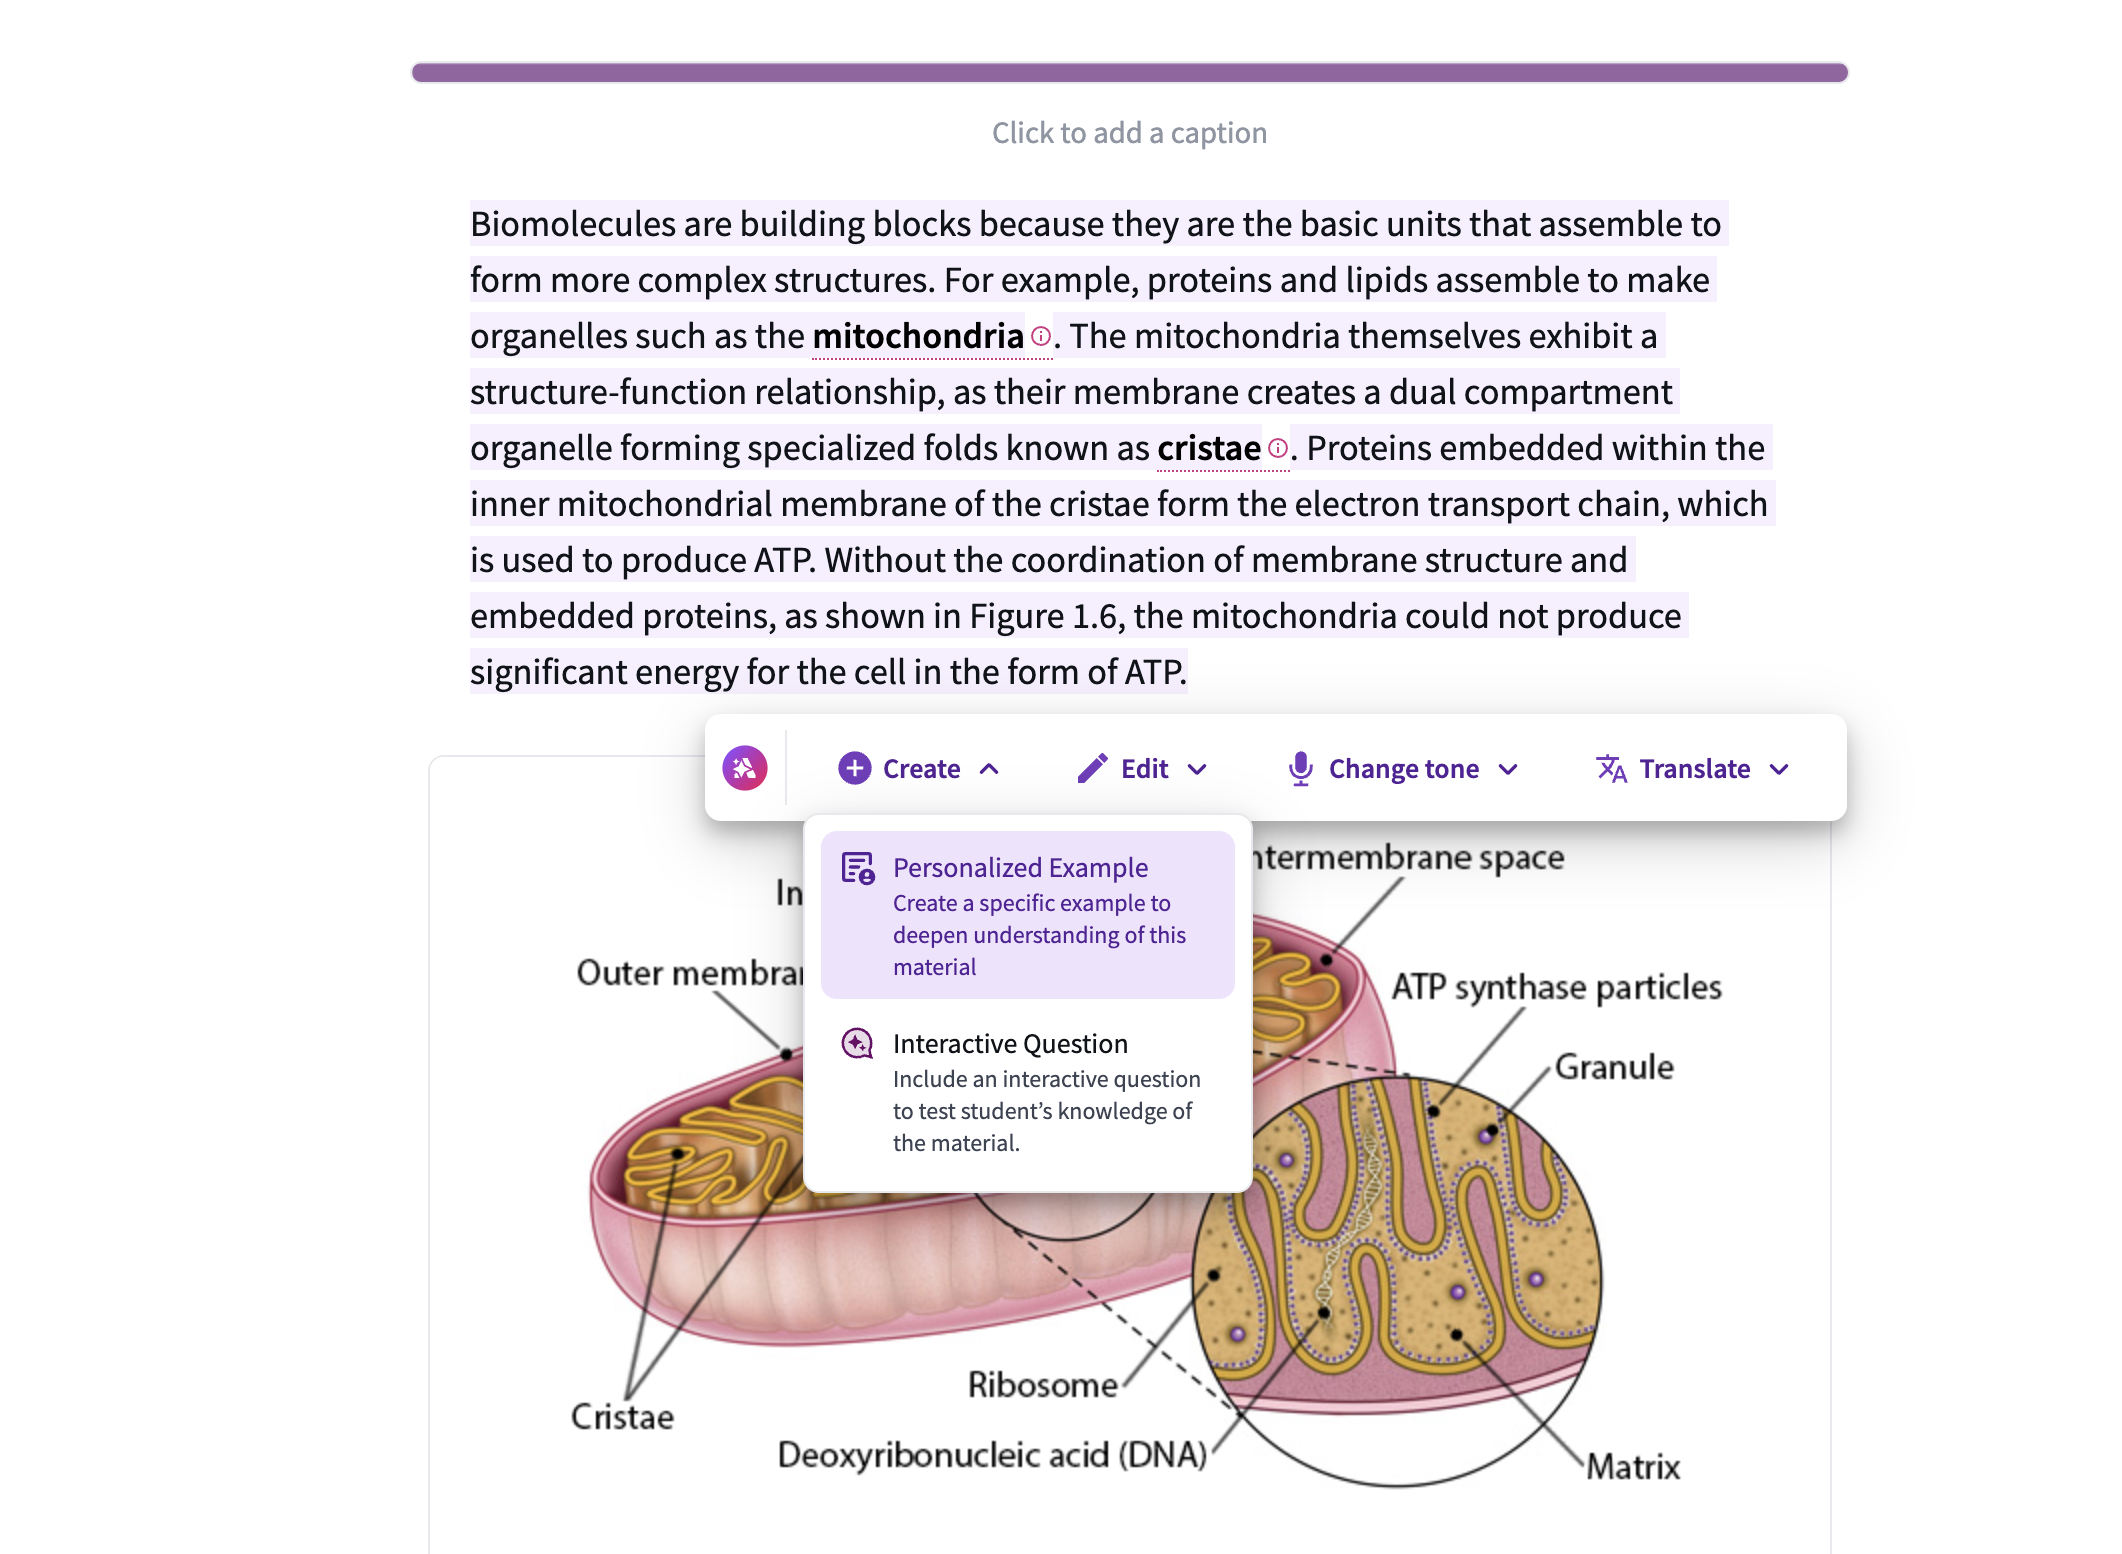
Image: Create a Personalized Example
You can choose to tell Ace what you want the personalized example to be about or you can leave it blank
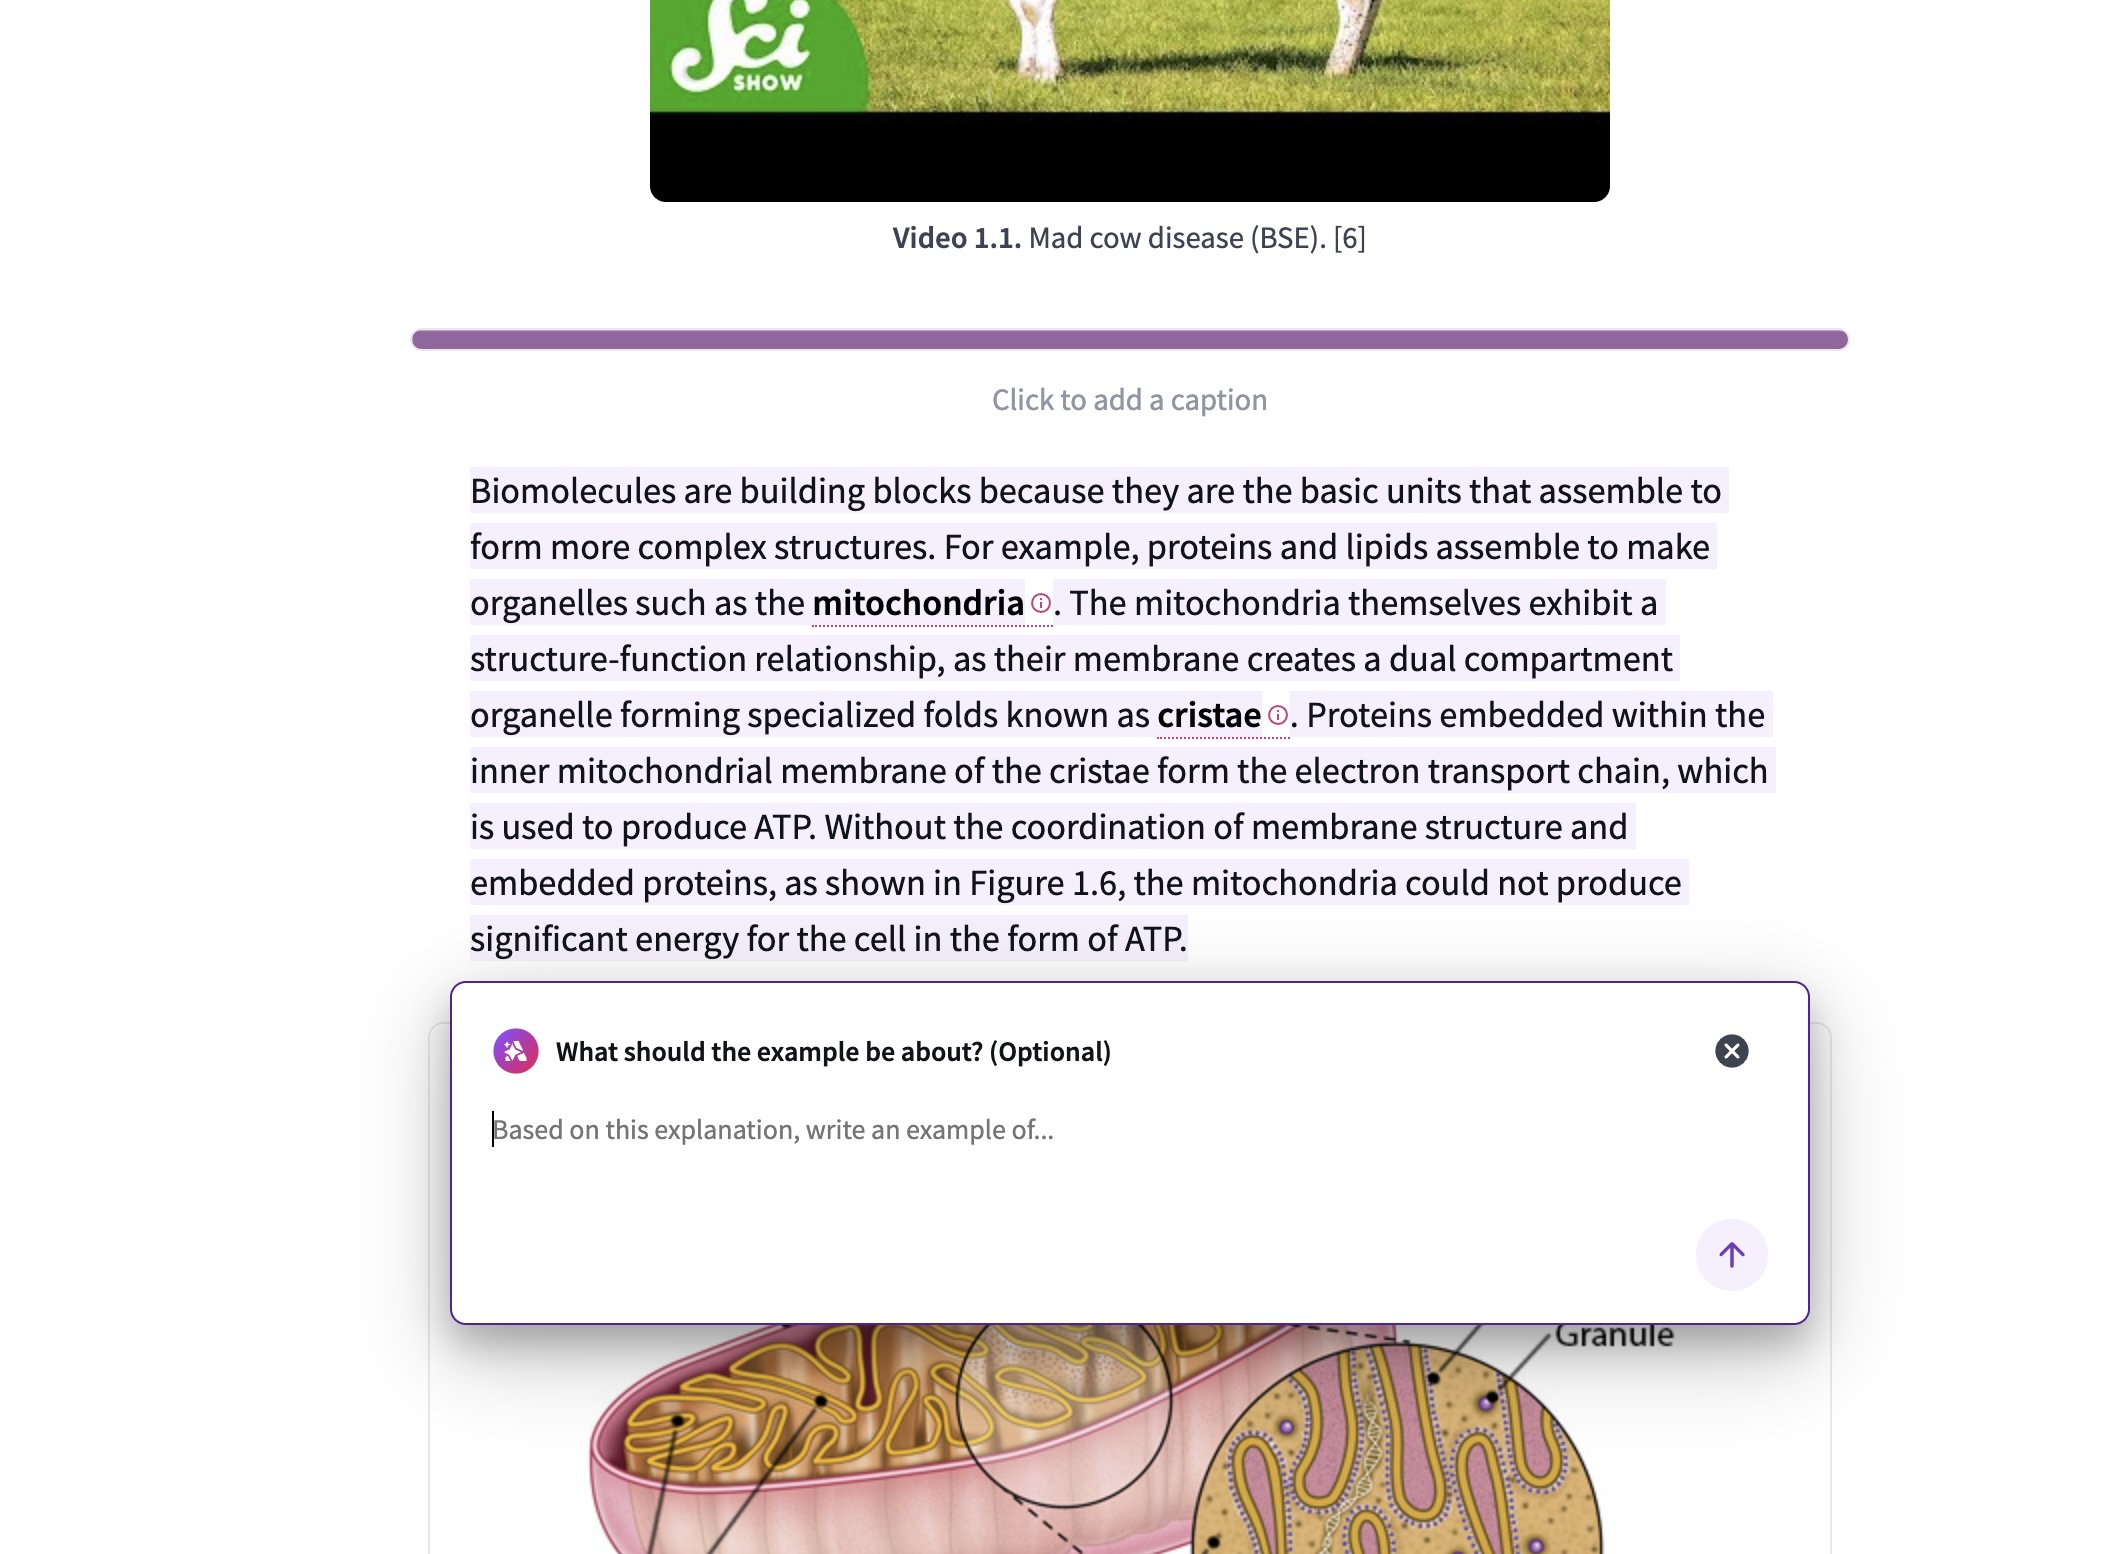
Image: Describe the Personalized Example
A personalized example will be added to the text and you can choose to Accept or Discard it. You can also provide feedback by clicking on the Feedback icon next to the Discard button. Your insights are vital to improving Ace and will be shared directly with our product team.
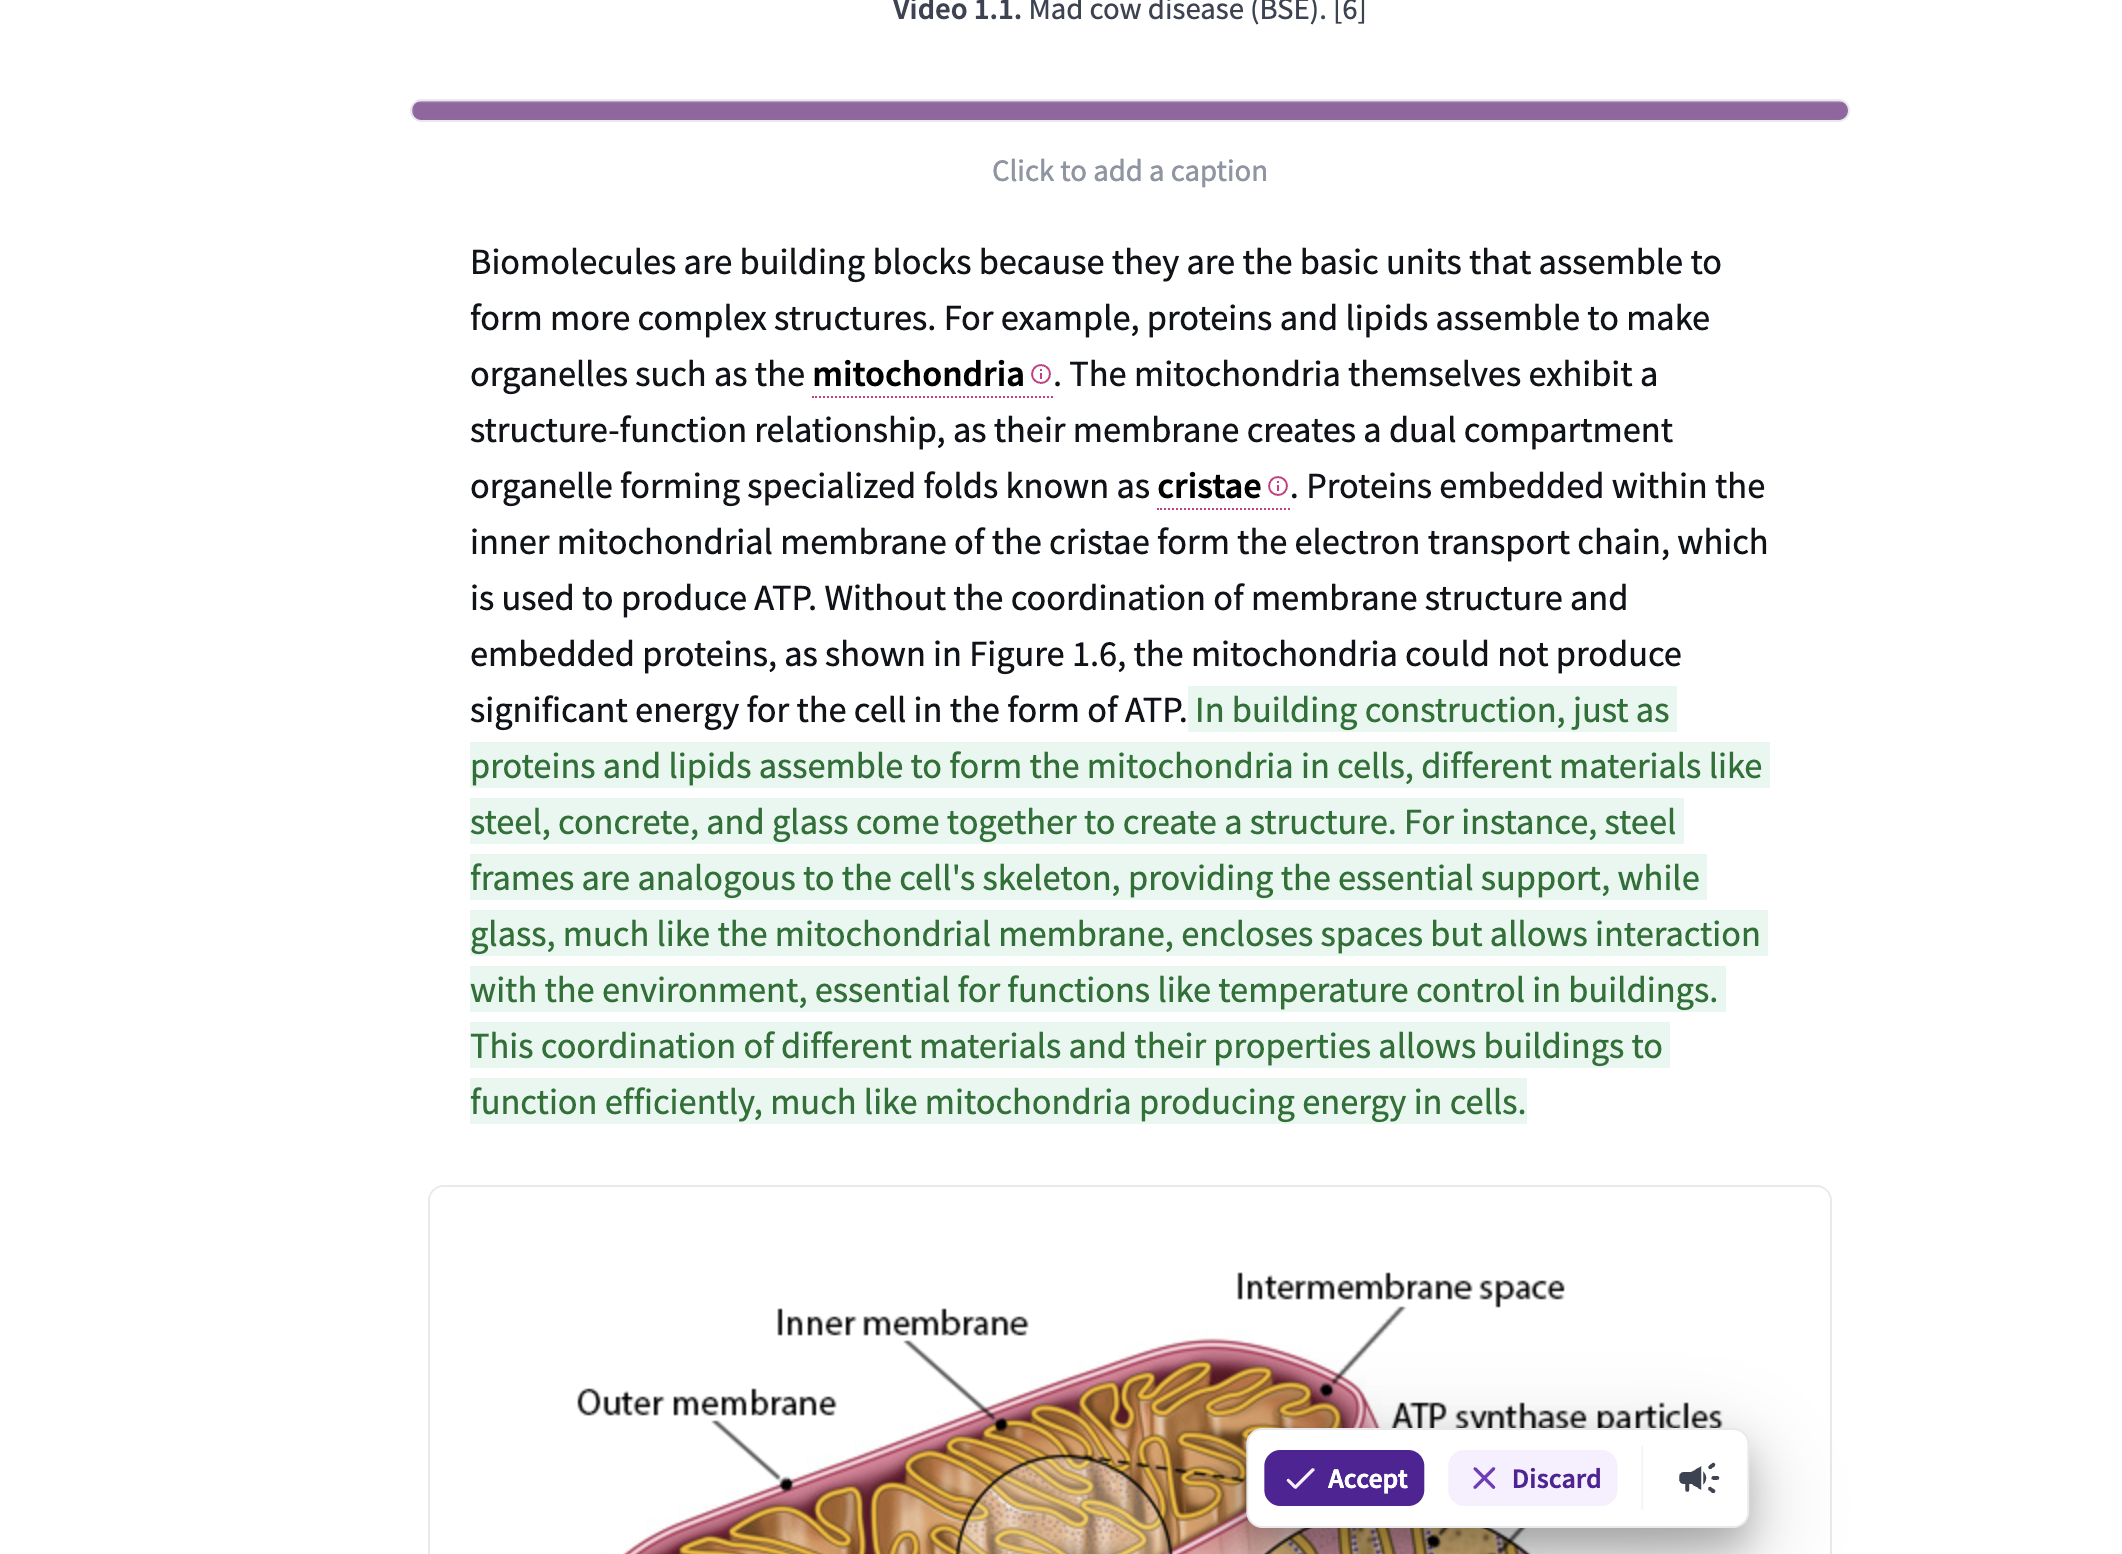
Image: Accept or Discard Personalized Example
AI-Powered Questions
Top Hat Ace: AI-Powered Questions allows you to generate assessments based on the surrounding content in your Top Hat Pages. This feature leverages generative AI to save you time when authoring course materials.
You can generate a question in two ways:
Option 1:In the Page editor,highlight the text you want to generate a question about. Once you do this, you will see an ‘Edit with AI’ button.
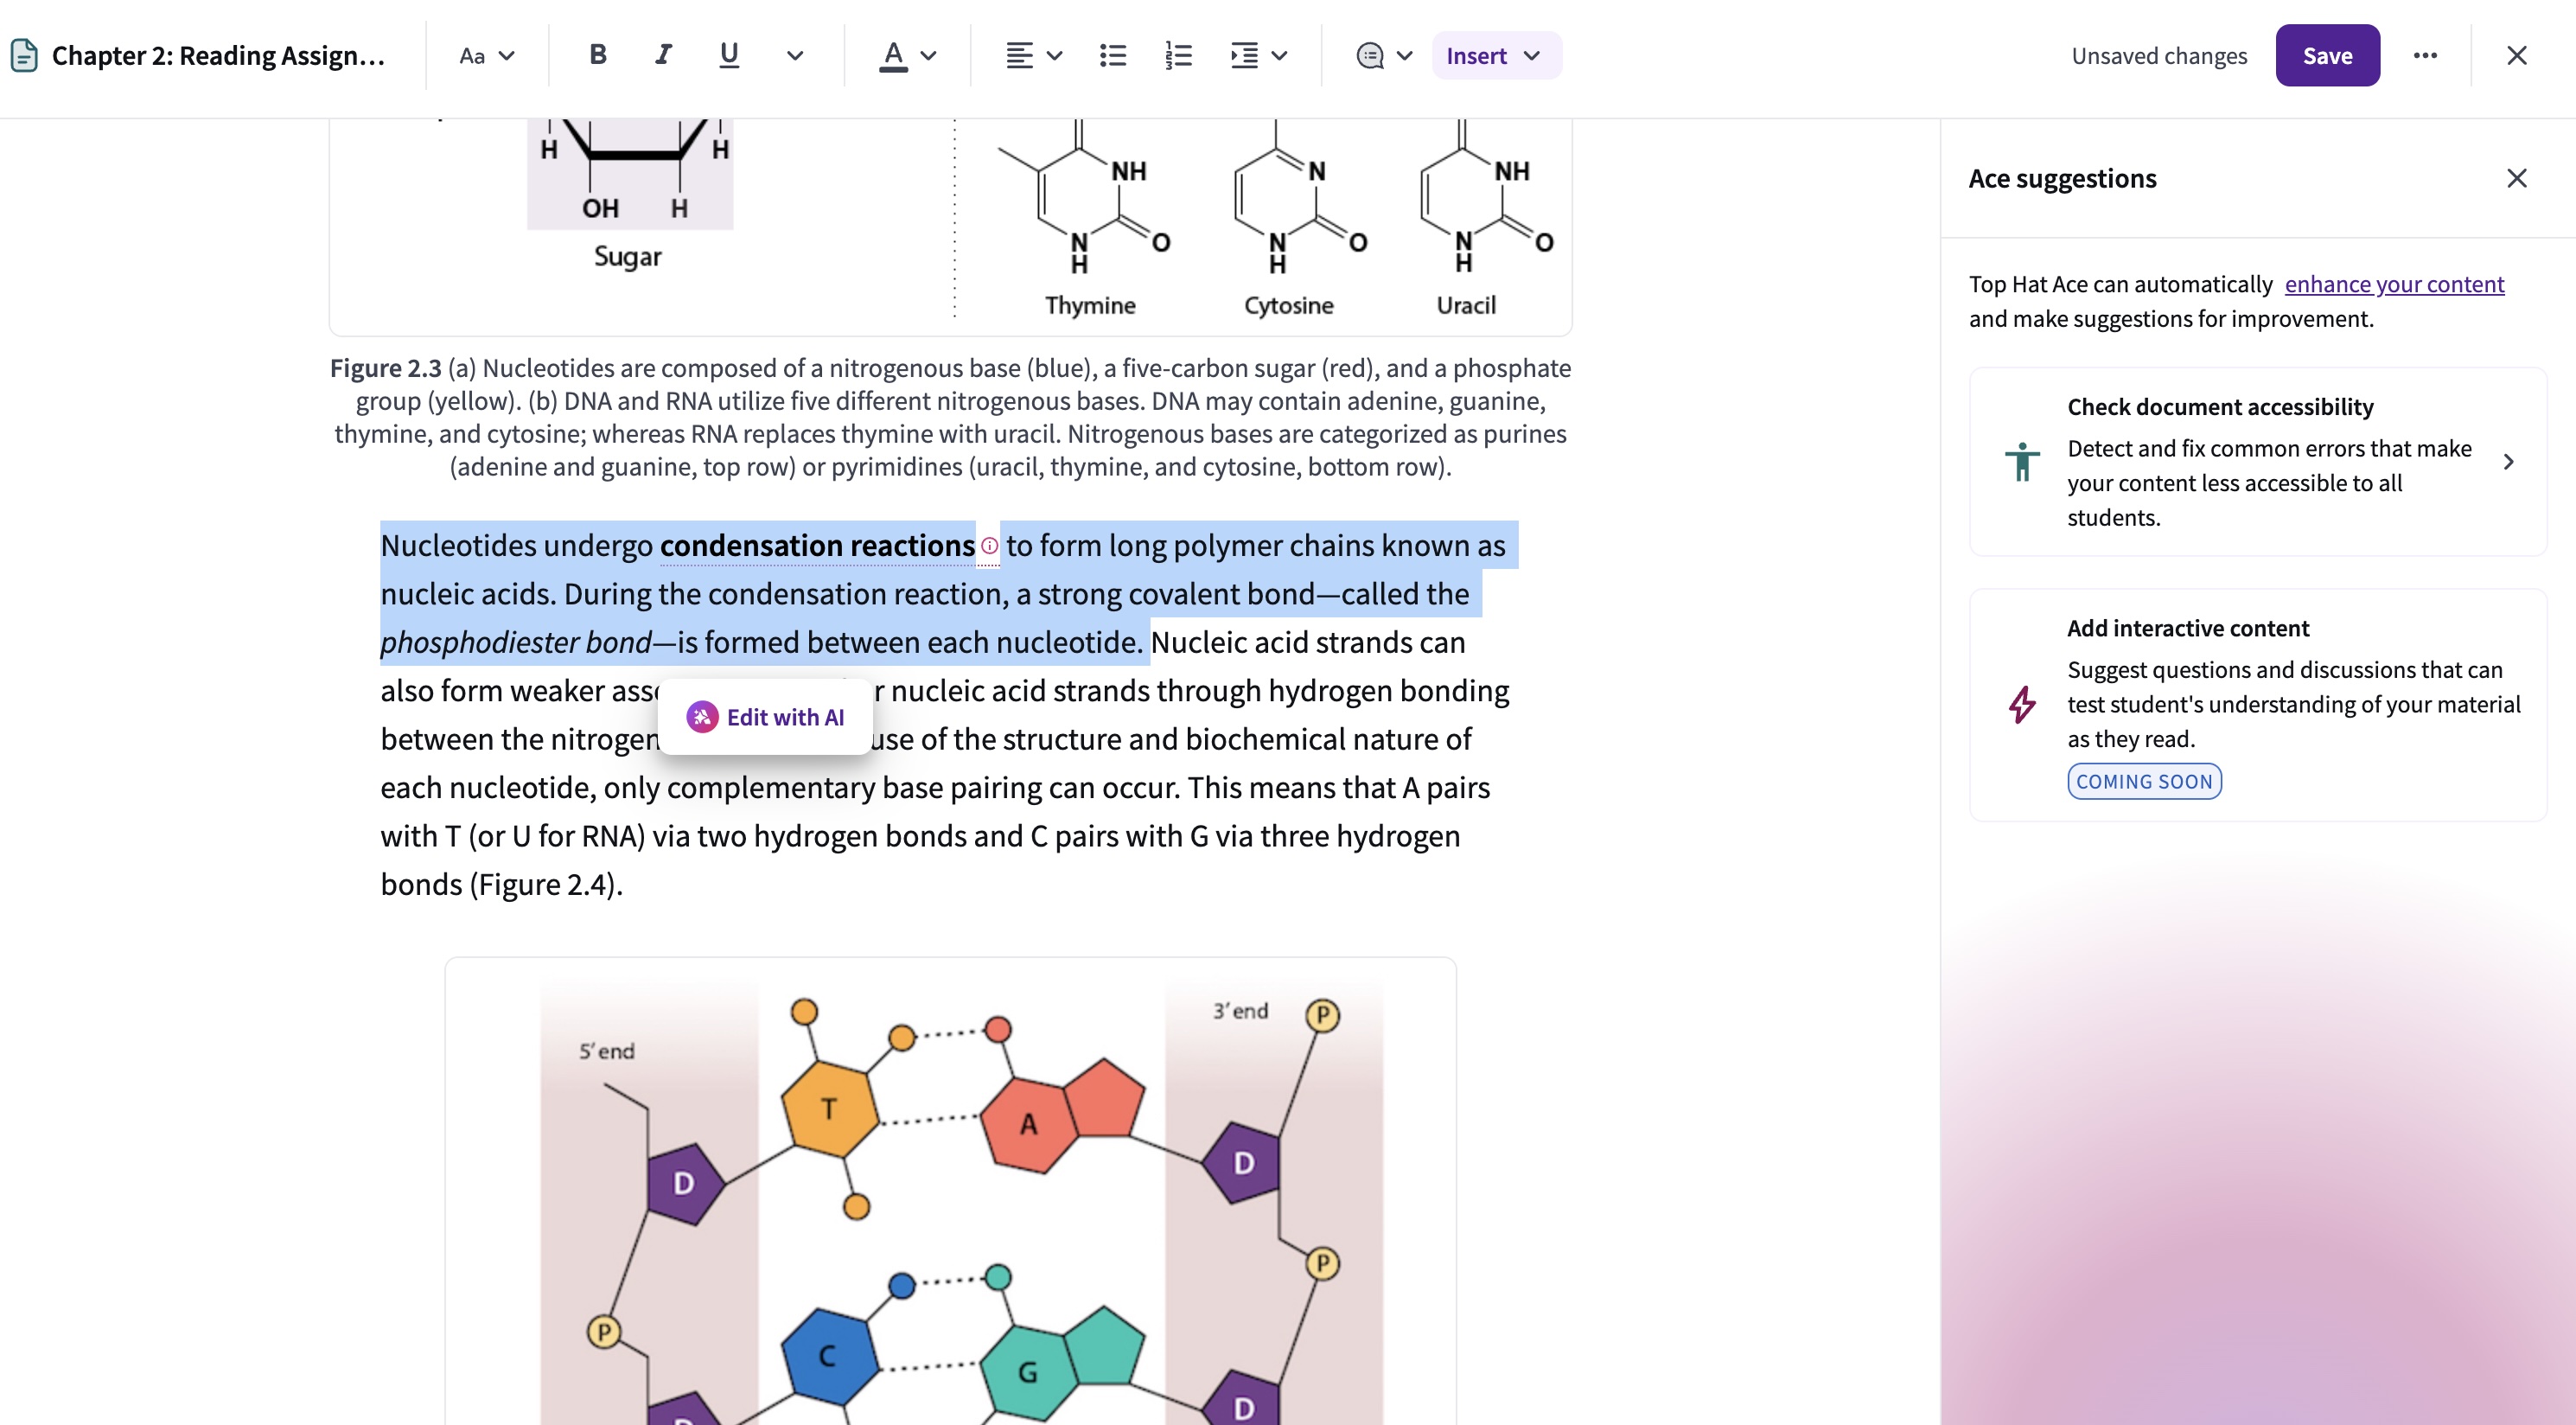
Image: Edit with AI
Click on the ‘Edit with AI’ button and then select ‘+Create’, ‘Interactive Question.
Option 2: In the Page editor,highlight the text you want to generate a question about. Then click on the Question icon in the toolbar and select ‘Generate Question’
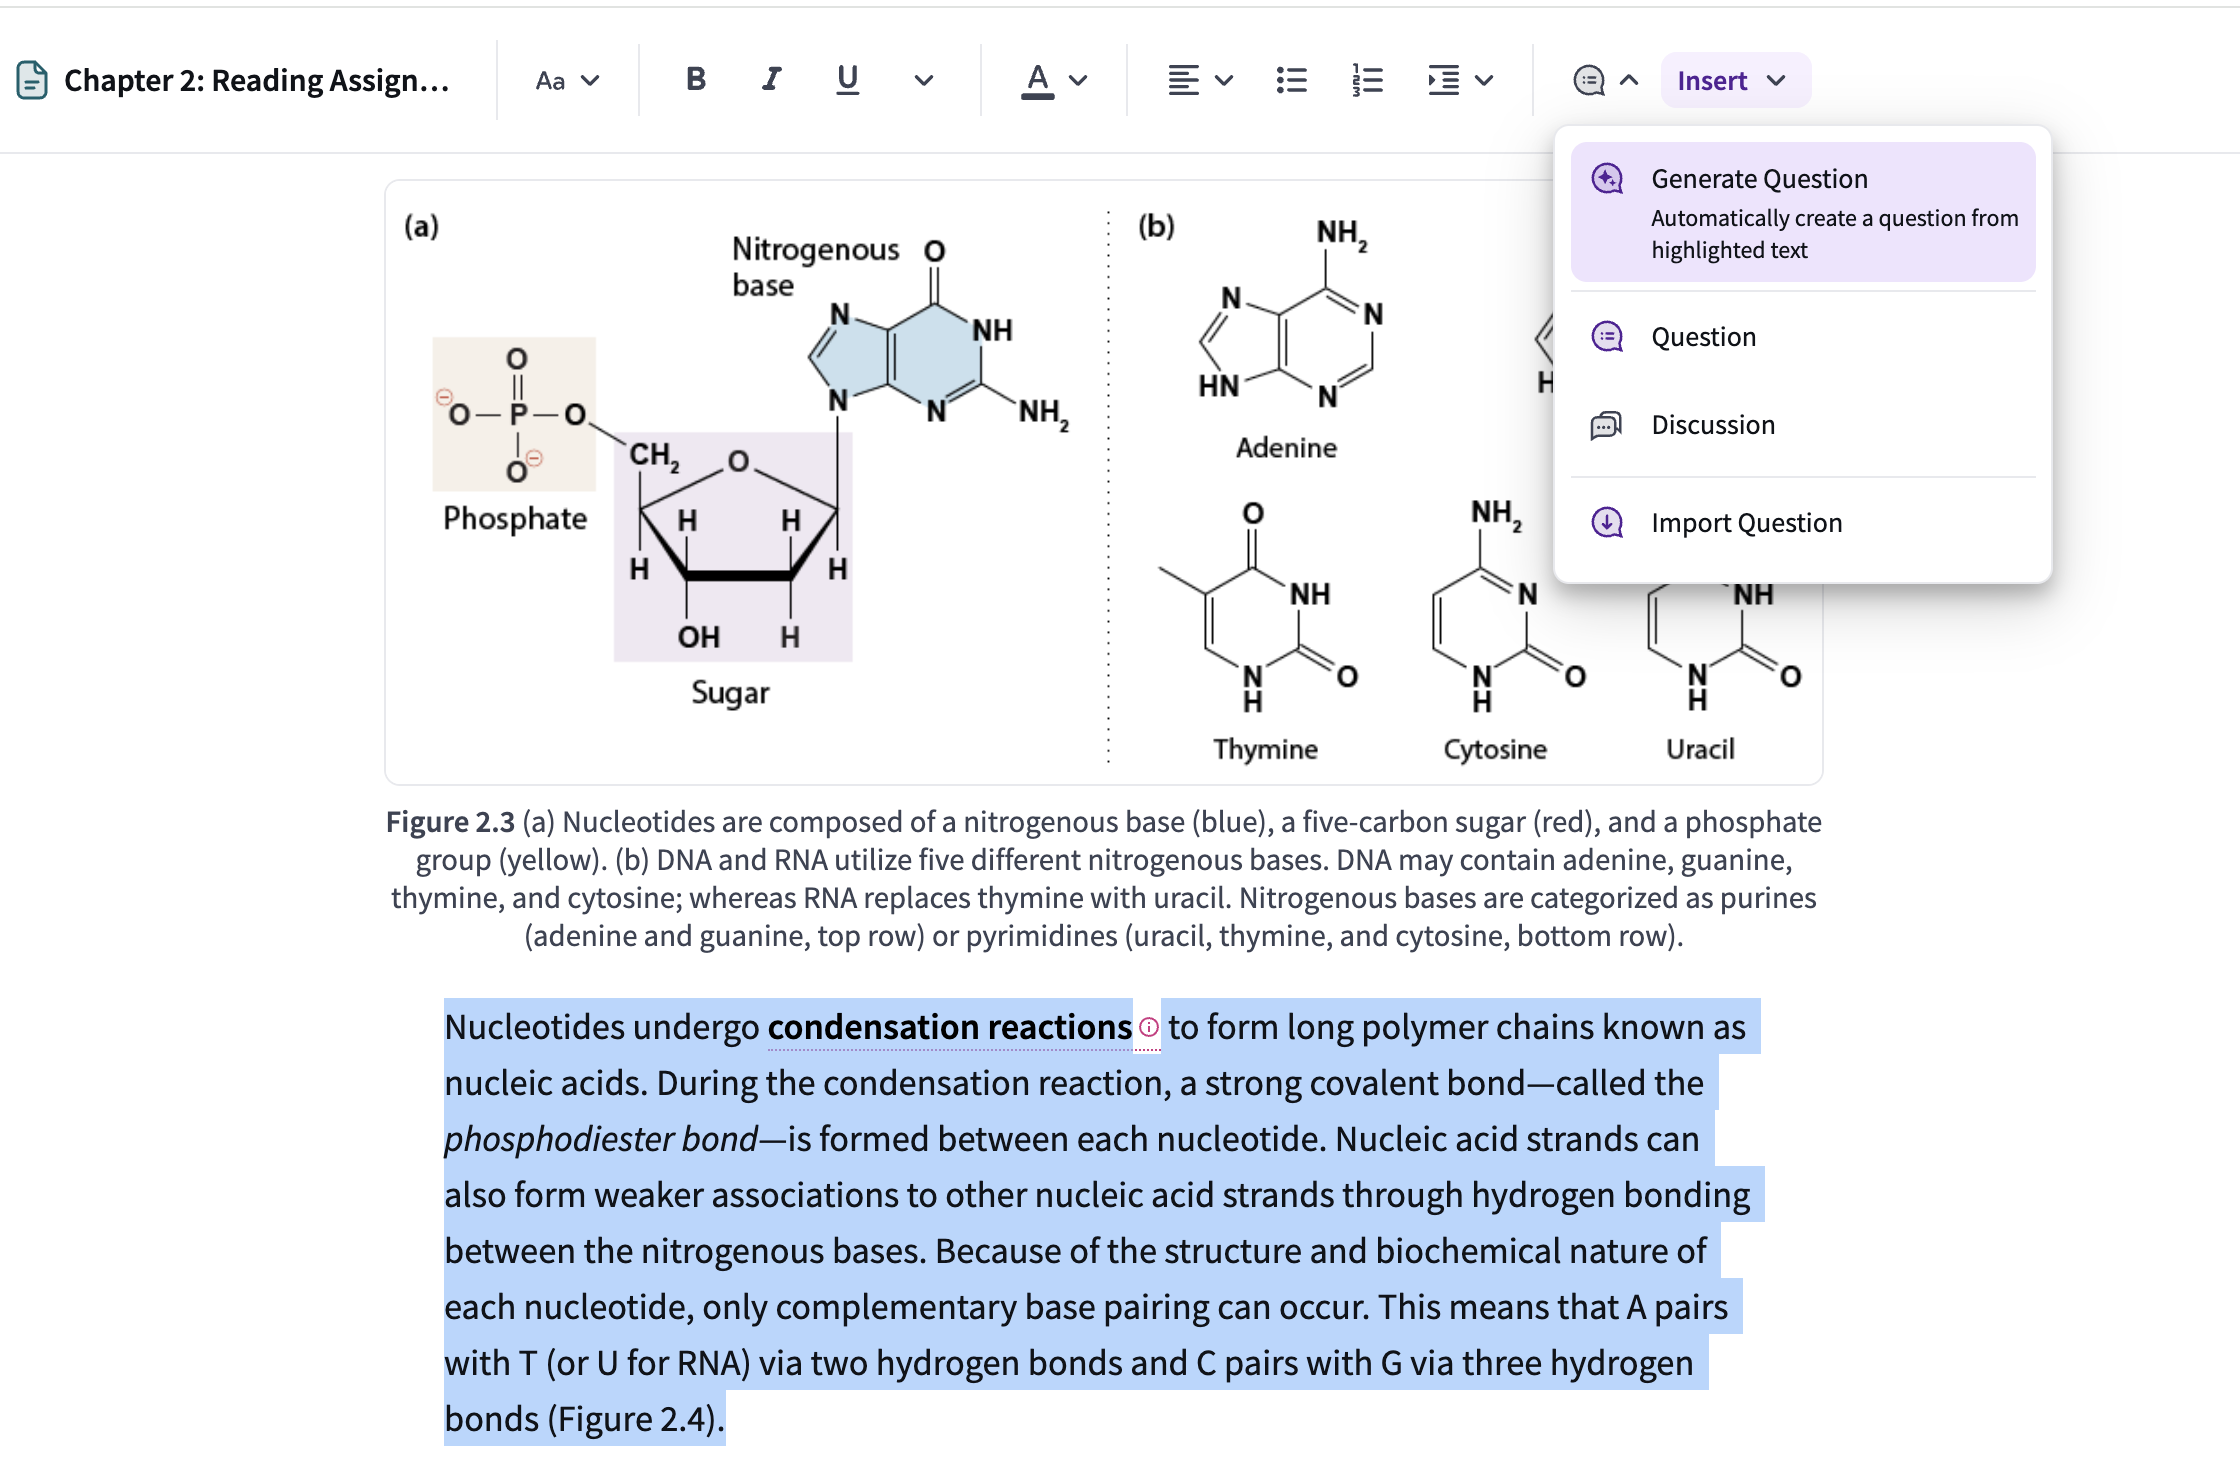
Image: Generate a Question
Once generated, the question appears on the page. You have several follow-up options:
- Modify: Click the pencil icon to open the Question Builder for manual edits.
- Delete: Remove the question if it does not meet your needs.
As with any AI-generated content, you should always independently evaluate the accuracy of any generated questions before assigning them to your students.
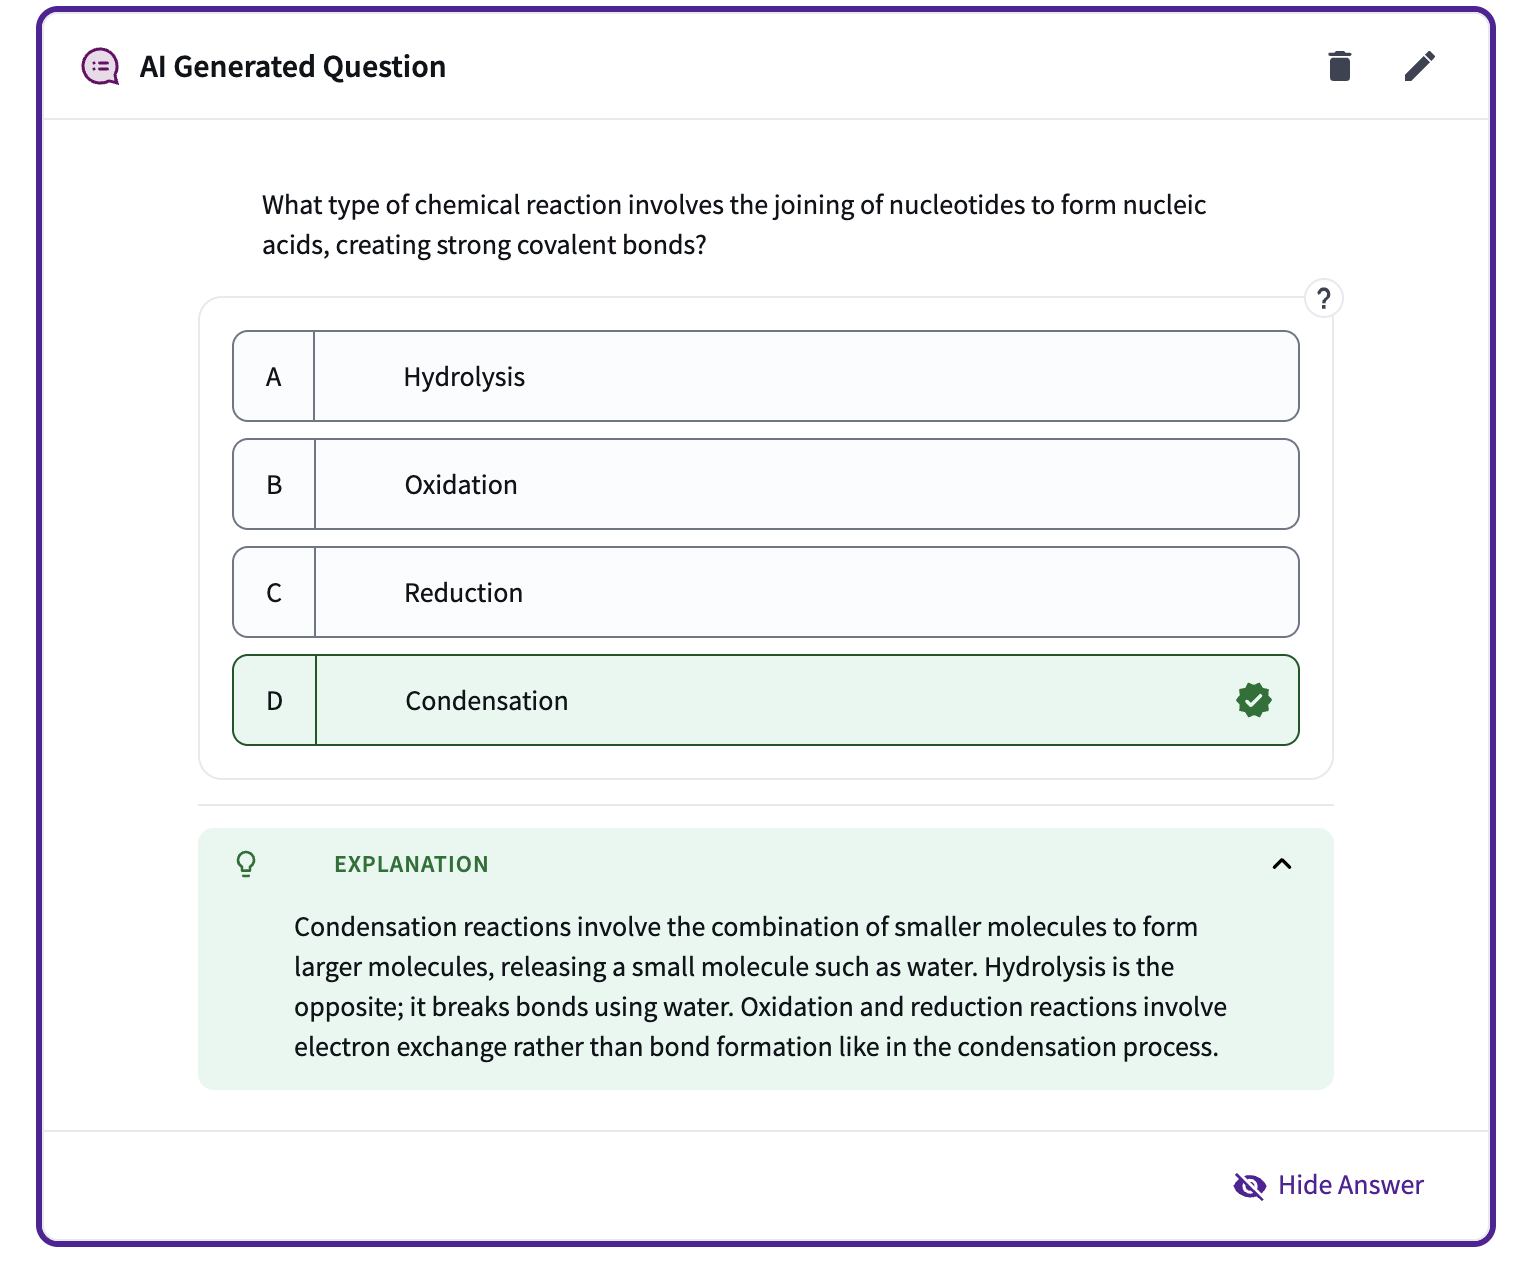
Image: AI Generated Question
Accessibility Suggestions
Top Hat ACe can automatically identify and fix issues on your page to ensure that it is aligned with WCAG guidelines.
Ace can:
- Generate missing alt-text and long descriptions for images.
- Structure semantic headings and subheadings.
- Create meaningful text links and page titles.
- Check for meaningful page titles.
You can get suggestions by clicking on the ‘Check document accessibility’ button in the ‘Ace Suggestions’ toolbar on the right hand side of the page
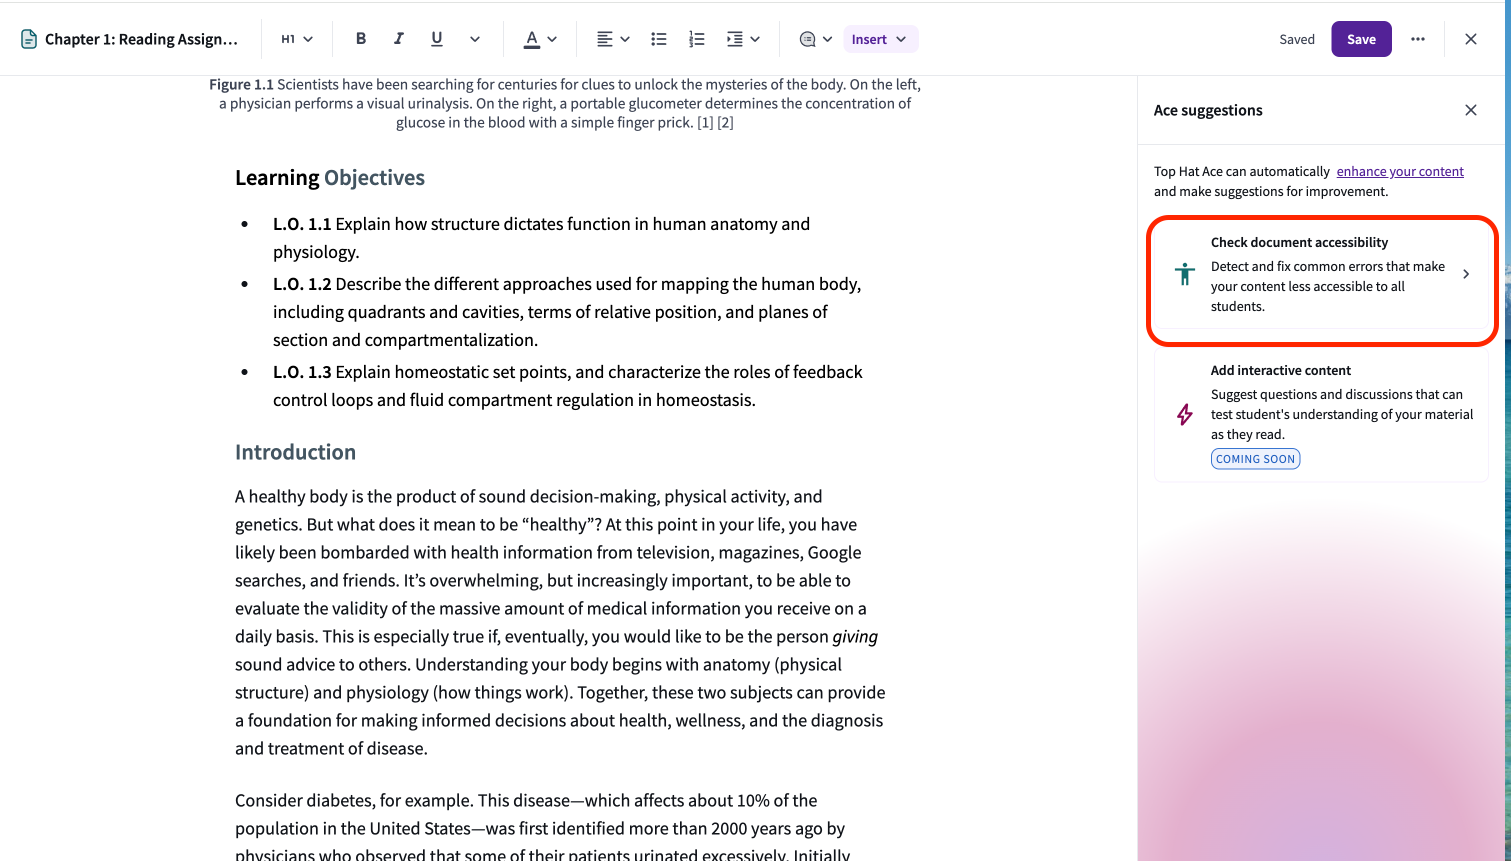
Image: Review Document Accessibility
You can choose to get all the types of available Accessibility suggestions or only some
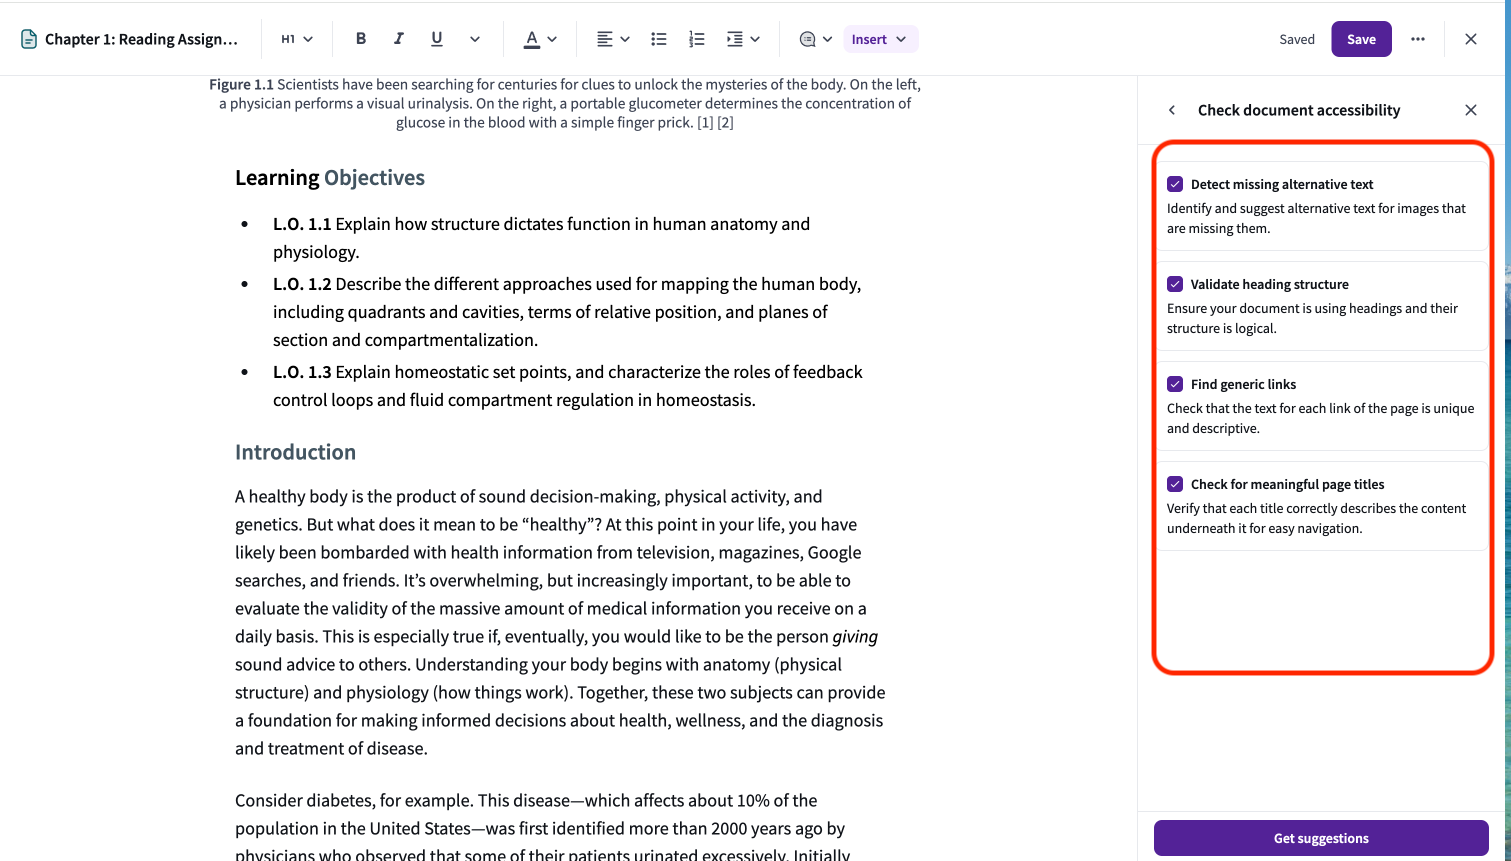
Image: Get Accessibility Suggestions
When you click on ‘Get suggestions’, the suggestions will take 10-15 seconds to load.
Ace will show you a list of issues and you can choose to remediate each one individually by clicking on the identified issue
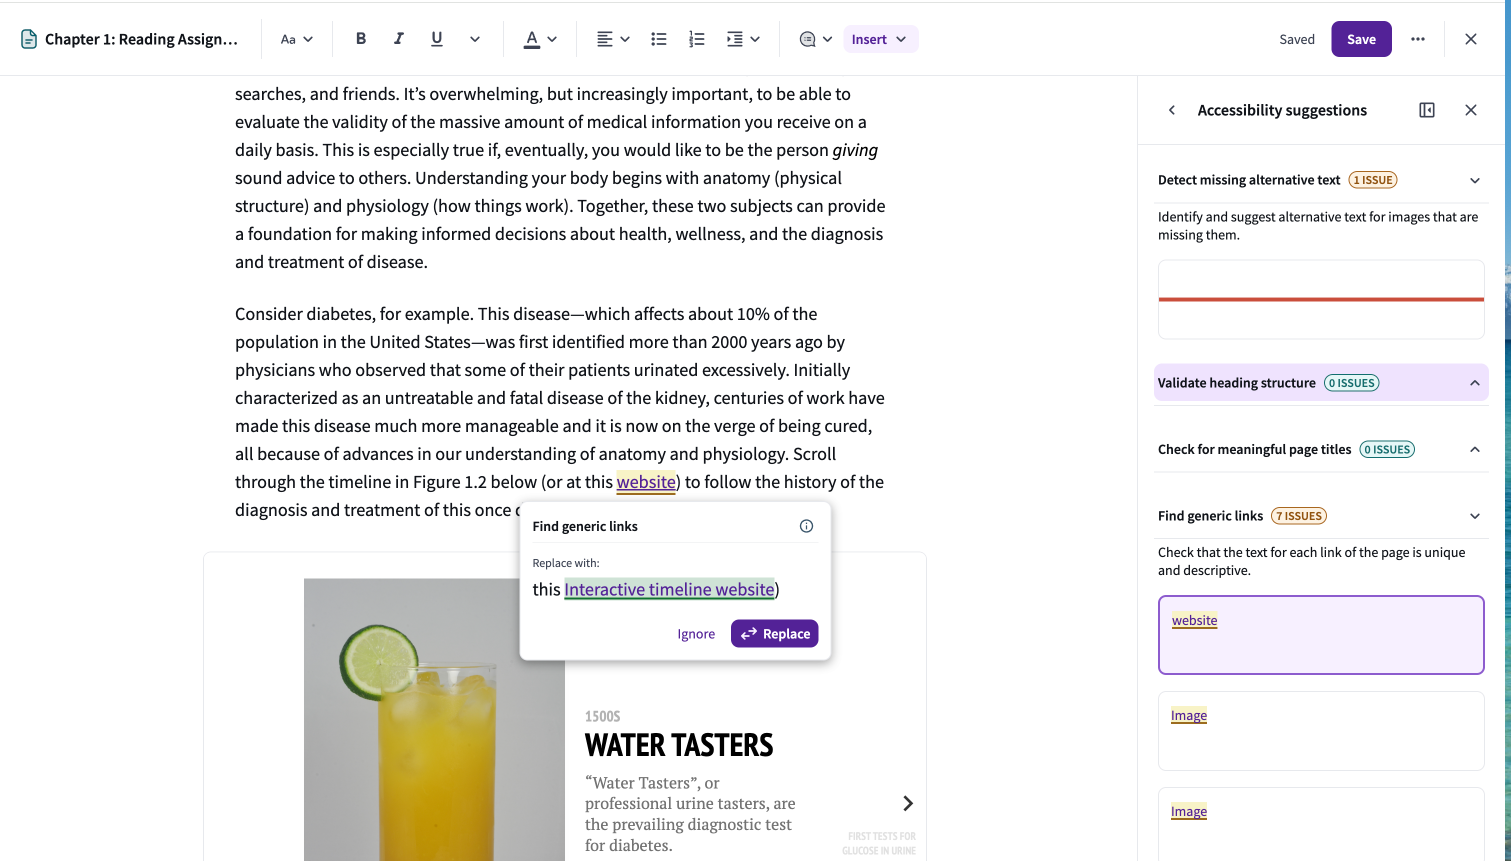
Image: Review Accessibility Suggestions
Generating Alternative Text and Long text for an Image:
If missing alternative text is detected for a specific image, you can click on the “Issue” and use the ‘Suggest’ feature to generate alternative text using AI
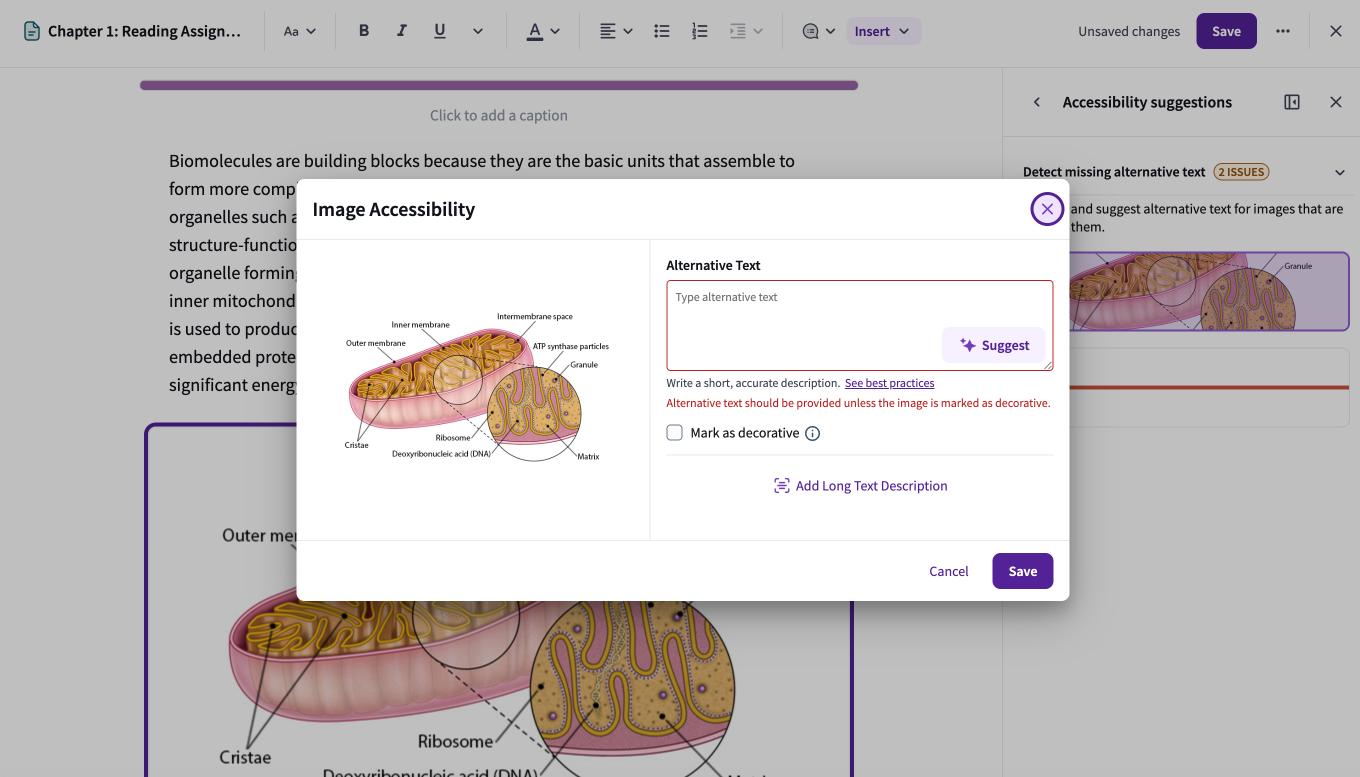
Image: Generating Alternative Text
You can also use the ‘Suggest’ feature to generate the Long Text description using AI.
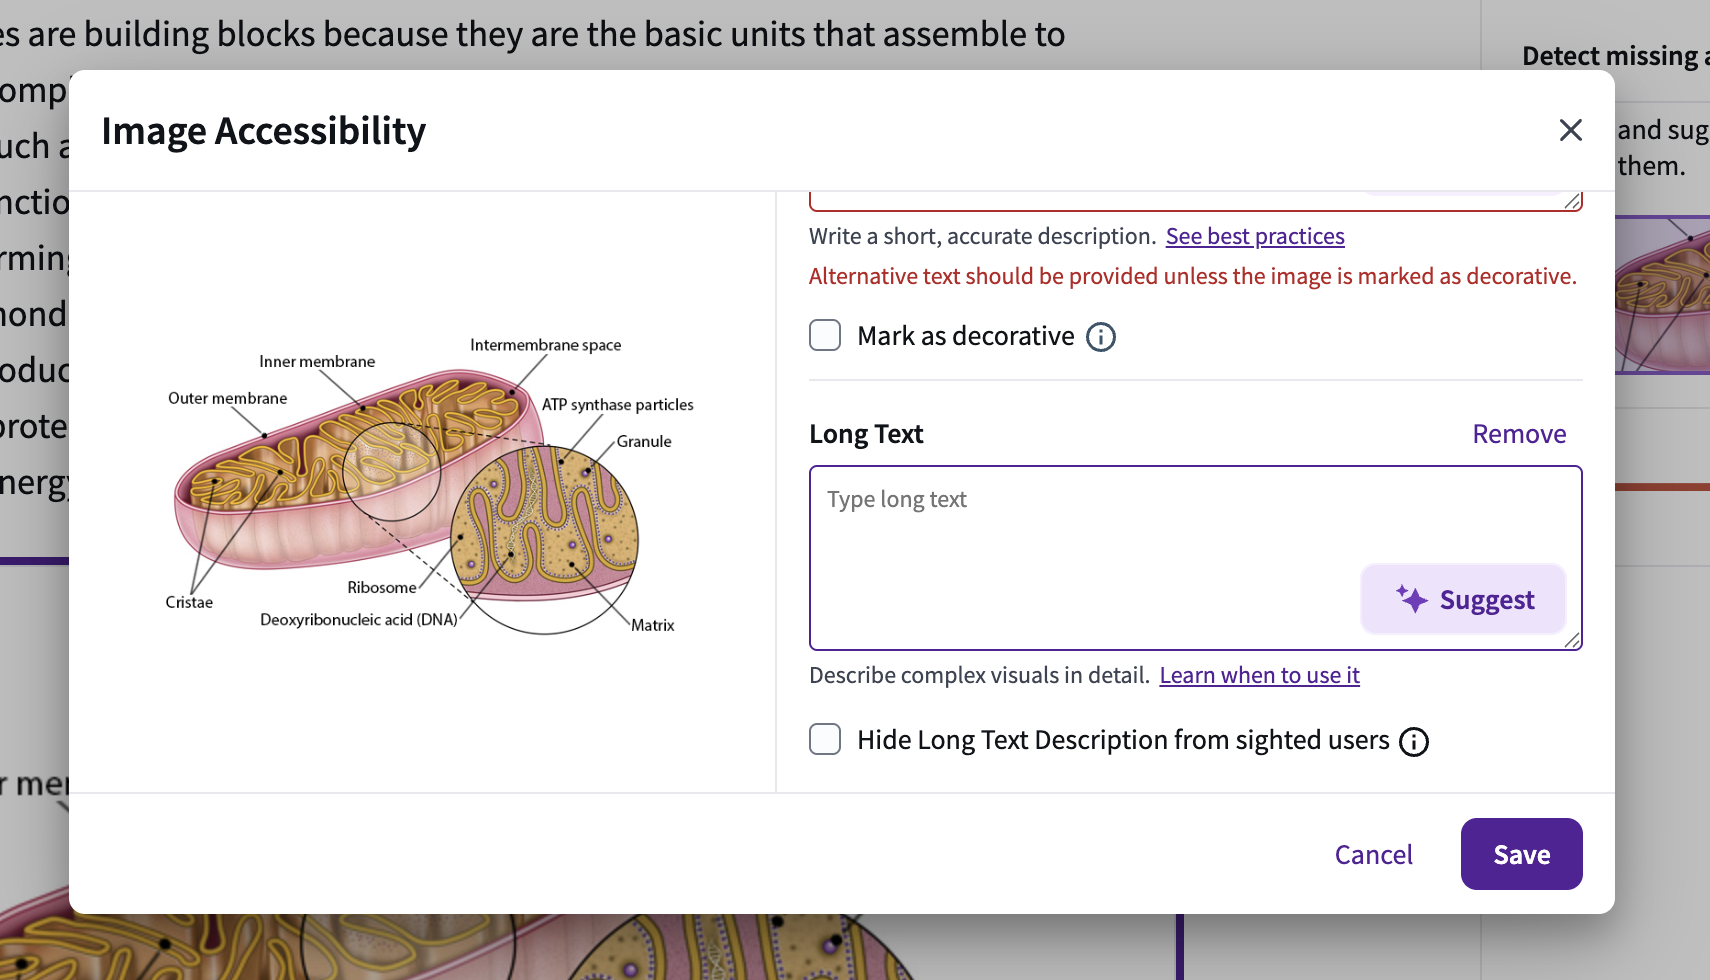
Image: Adding Long Text description
PDF/Word Import
You can use Ace’s Content Enhancer to quickly convert a static PDF or Word document into an editable Top Hat page.
You can do this by clicking the ‘Add to Course’ button in your Course and selecting ‘Enhance Content’
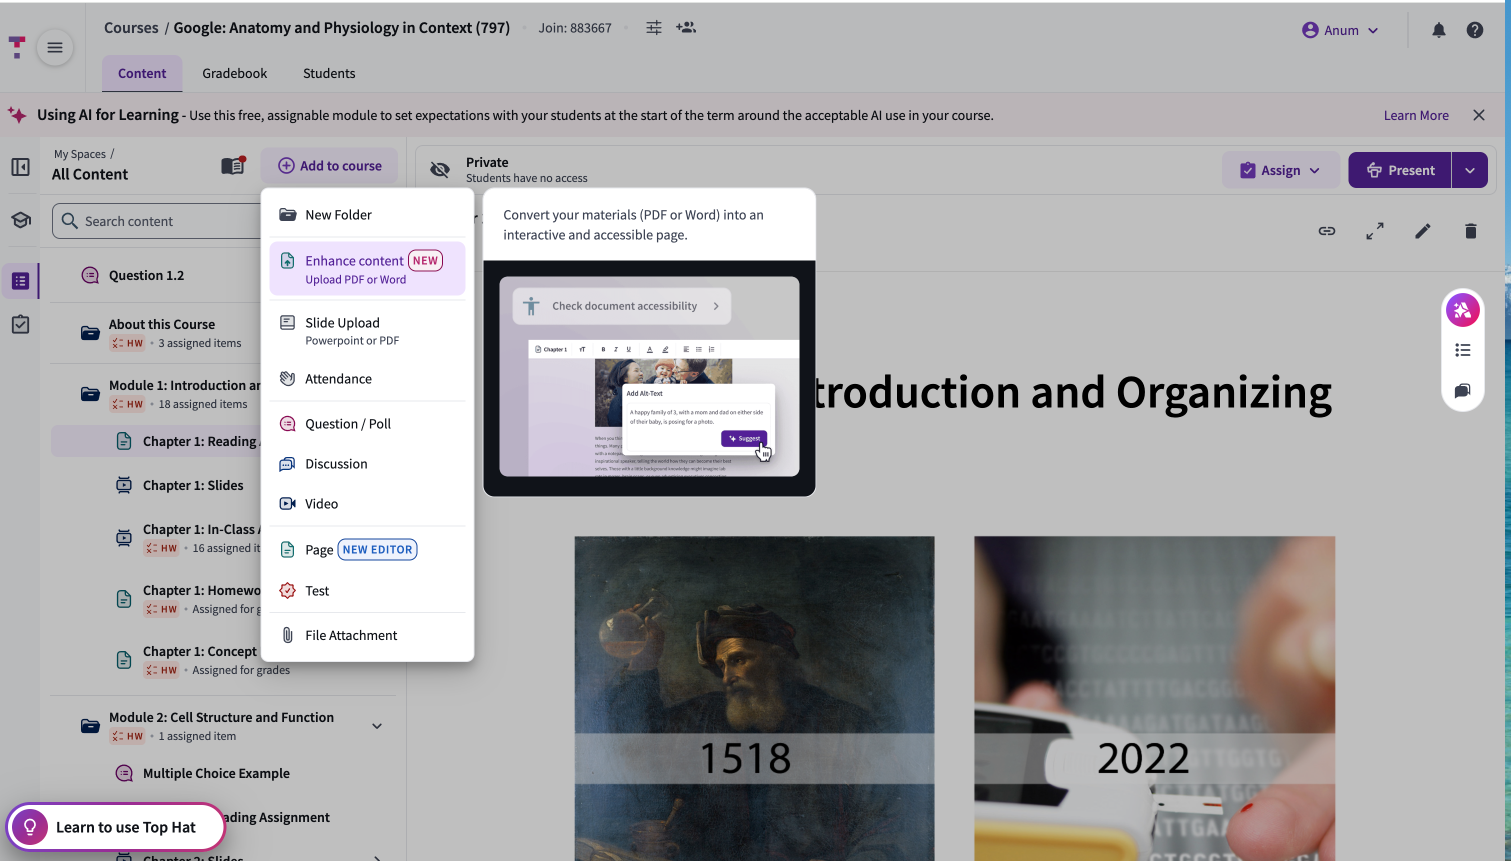
Image: Import PDF or Word Doc
The PDF/Word document will be opened in a new page, which you can then edit as normal, and will also get added to the content tree.
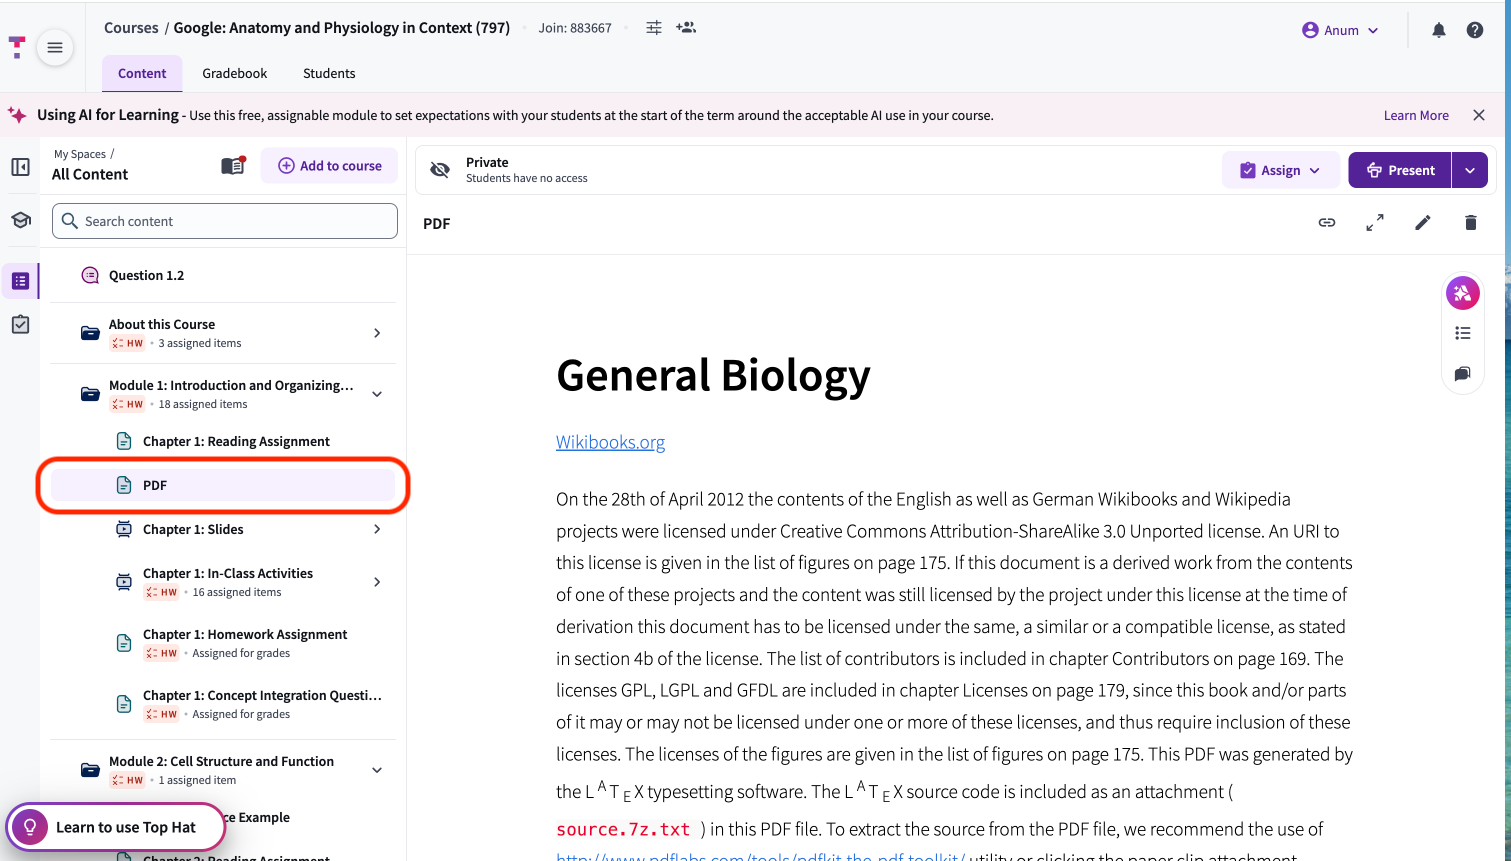
Image: PDF added to Content Tree
You can also Import a PDF or Word Doc directly into a new page by clicking on the ‘File menu’ in the Page Editor and selecting “Enhance Content”
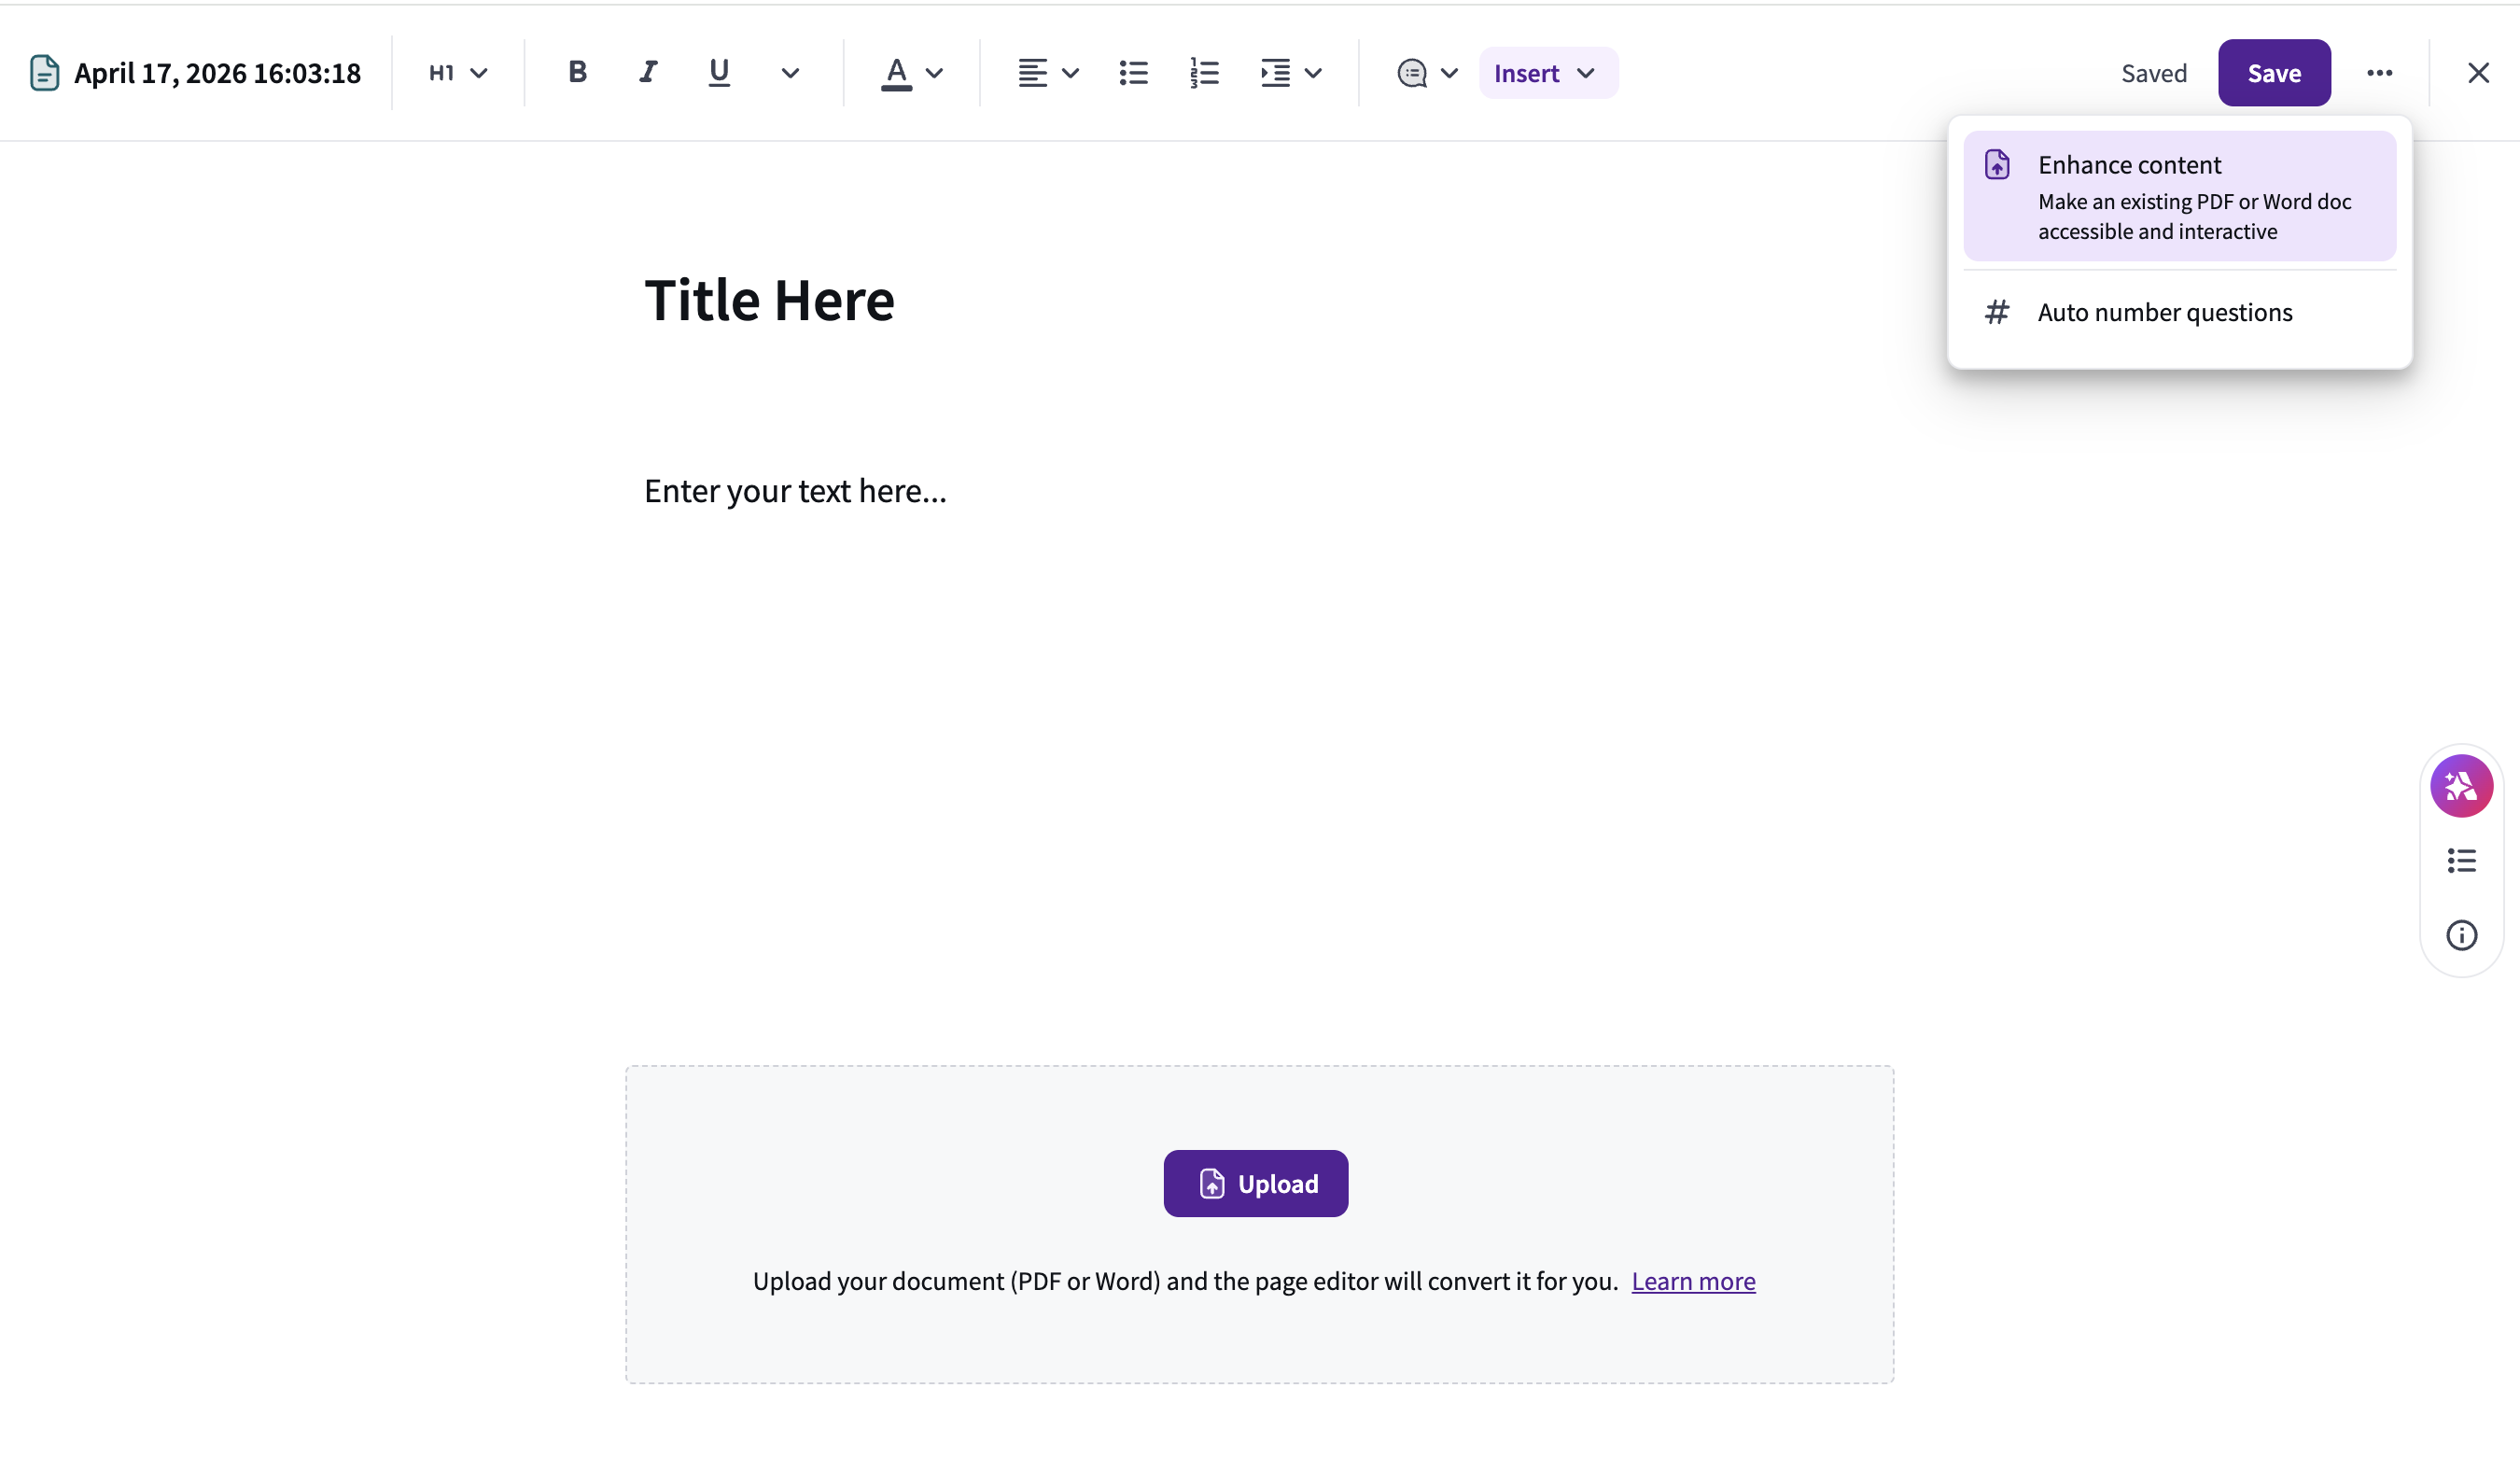
Image: Enhance Content from Page Editor
The New Editor does not support PDF or Word files larger than 200 MB. Additionally, while the AI is powerful, certain complex elements may require manual formatting after import:
- Complex data tables
- Advanced Math/Chemistry notations and symbols.
- Multi-column or decorative "magazine-style" layouts: this will be converted into a single column layout post import
Embedding a Zoom/Google Meets recording
Instructors using Zoom or Google Meets to record their live lectures, tutorials, or demonstrations can embed their recordings into a Page alongside questions and other media to create an interactive assignment. This technique is a versatile way to disseminate engaging course material to students for asynchronous consumption.
Step 1: Record your session
Step 2: Upload to YouTube or Vimeo
Upload the video to a video sharing platform such as YouTube or Vimeo. Note: Set the video visibility to "Anyone" or "Public". If this is not set correctly, the videos will not be viewable in Top Hat.
For Vimeo users, please use the "Embed" option instead of "Copy Link" when pasting into Top Hat.
Step 3: Embed the video into your Page
From the Content page, click Add to course and select the Video option to add your YouTube or Vimeo video.
Linking Between Pages
You can link one Top Hat Page to another within the same course, helping guide students through related content or chapters.
You can hyperlink any text on a Page to guide students to additional resources:
- External: Link to any outside webpage.
- Internal: Link to a specific header section within the same Page.
- Course-wide: Link to a different assigned Page within the same course.
Highlight the Text
In the Page editor, highlight the text you want to use as the hyperlink. Then click on the Insert button and select ‘Link’
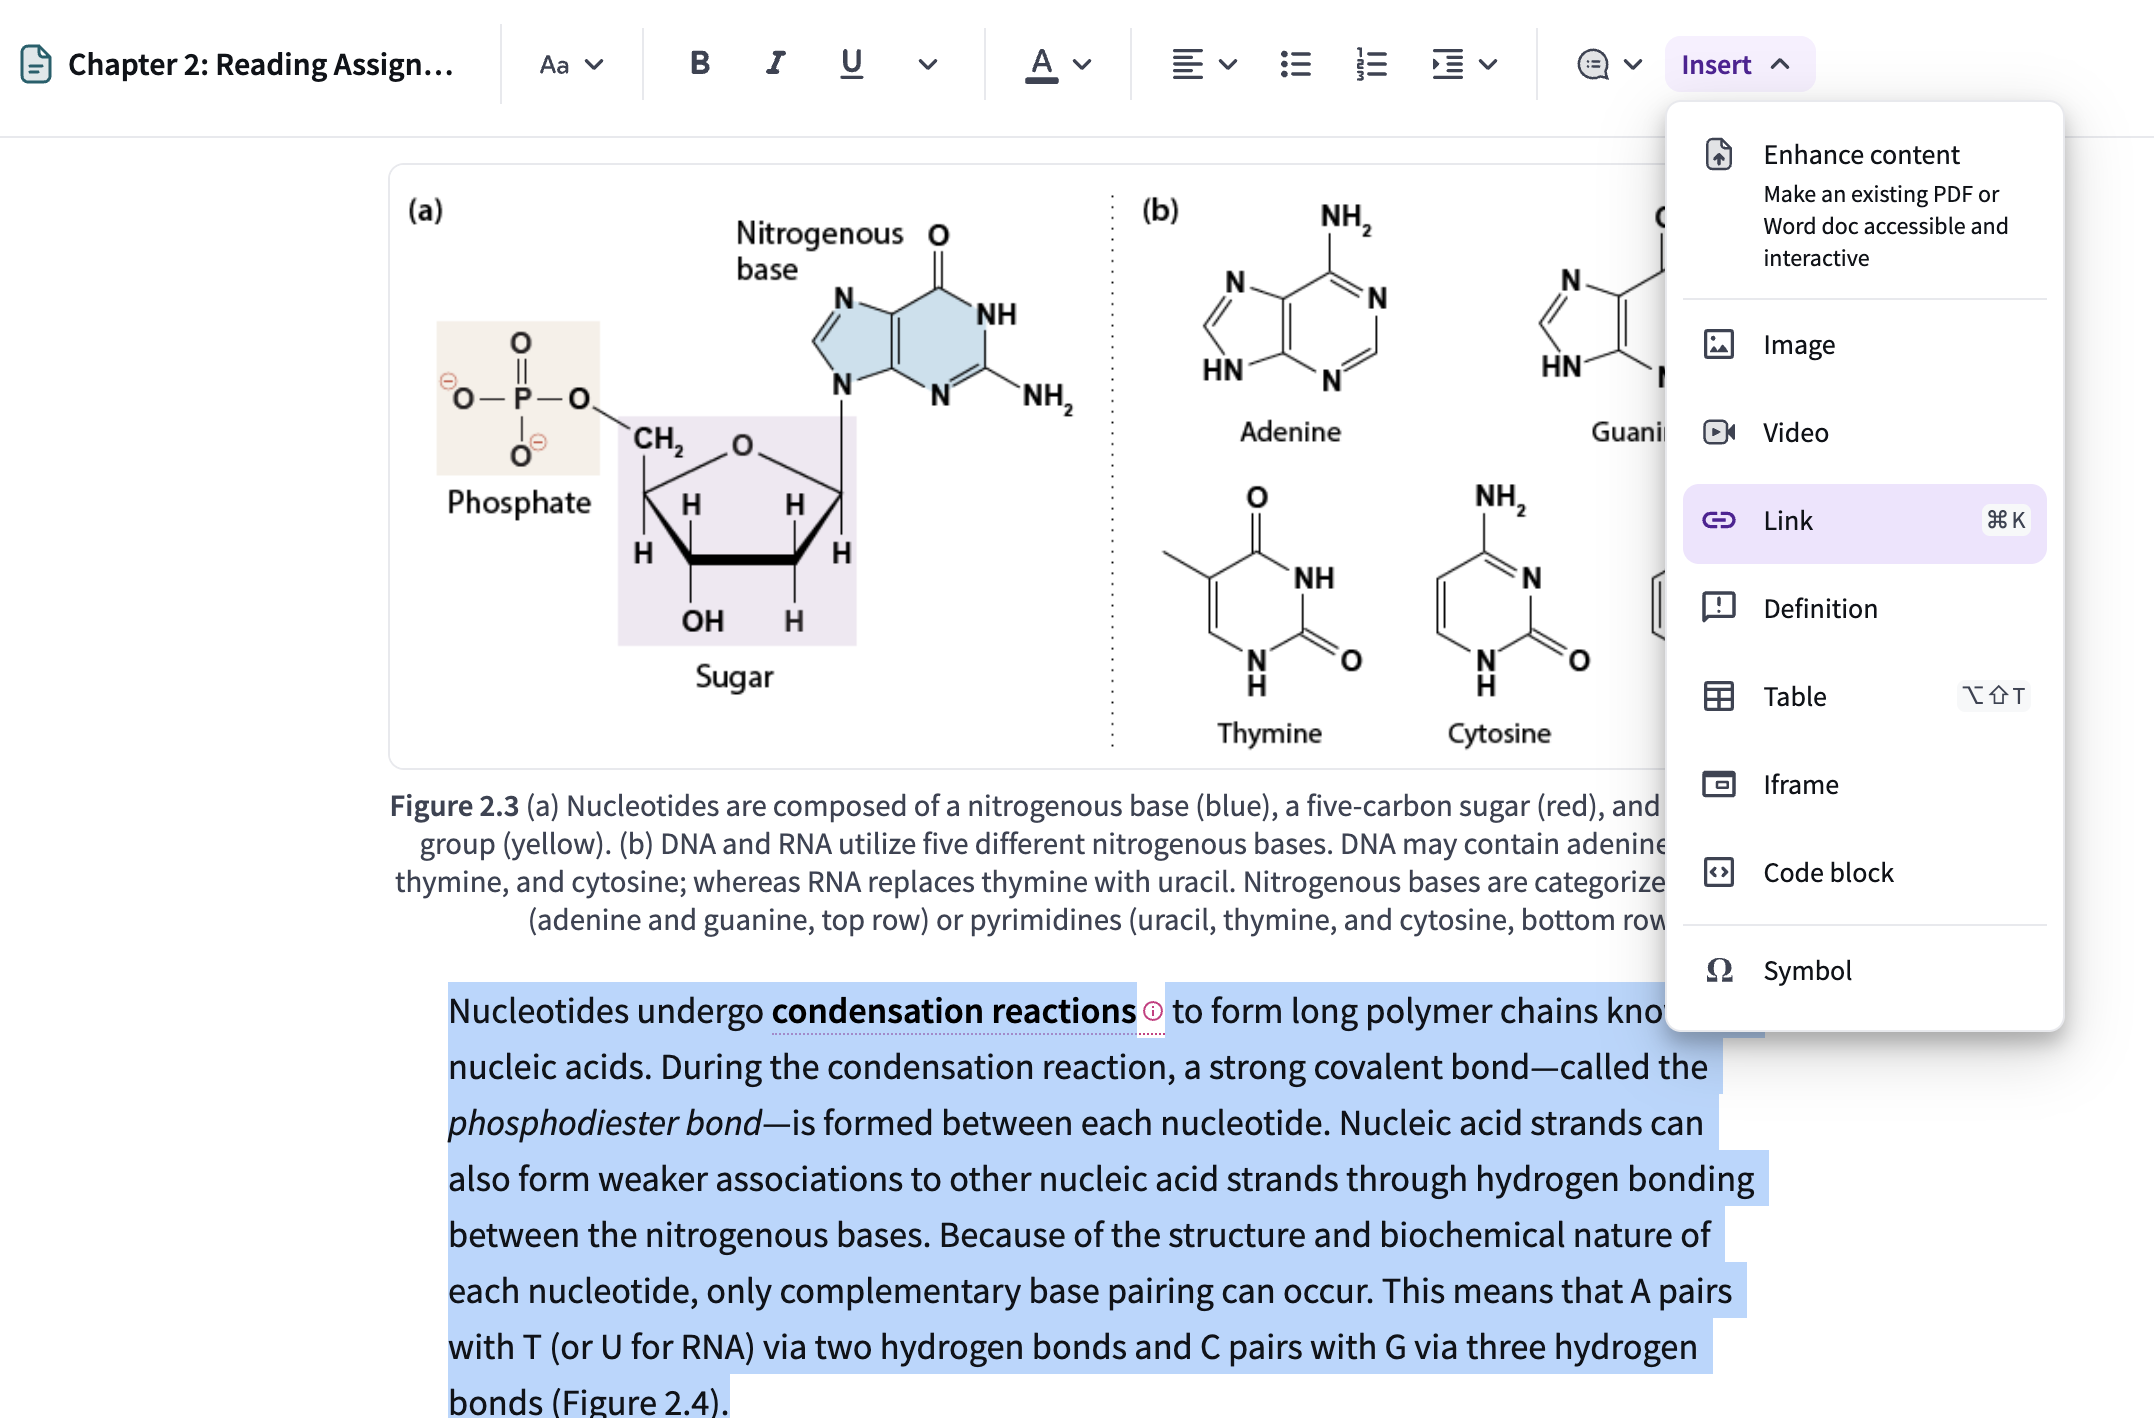
Image: Inserting a link
You can either paste a link or select an existing page or section from your course from the popup window
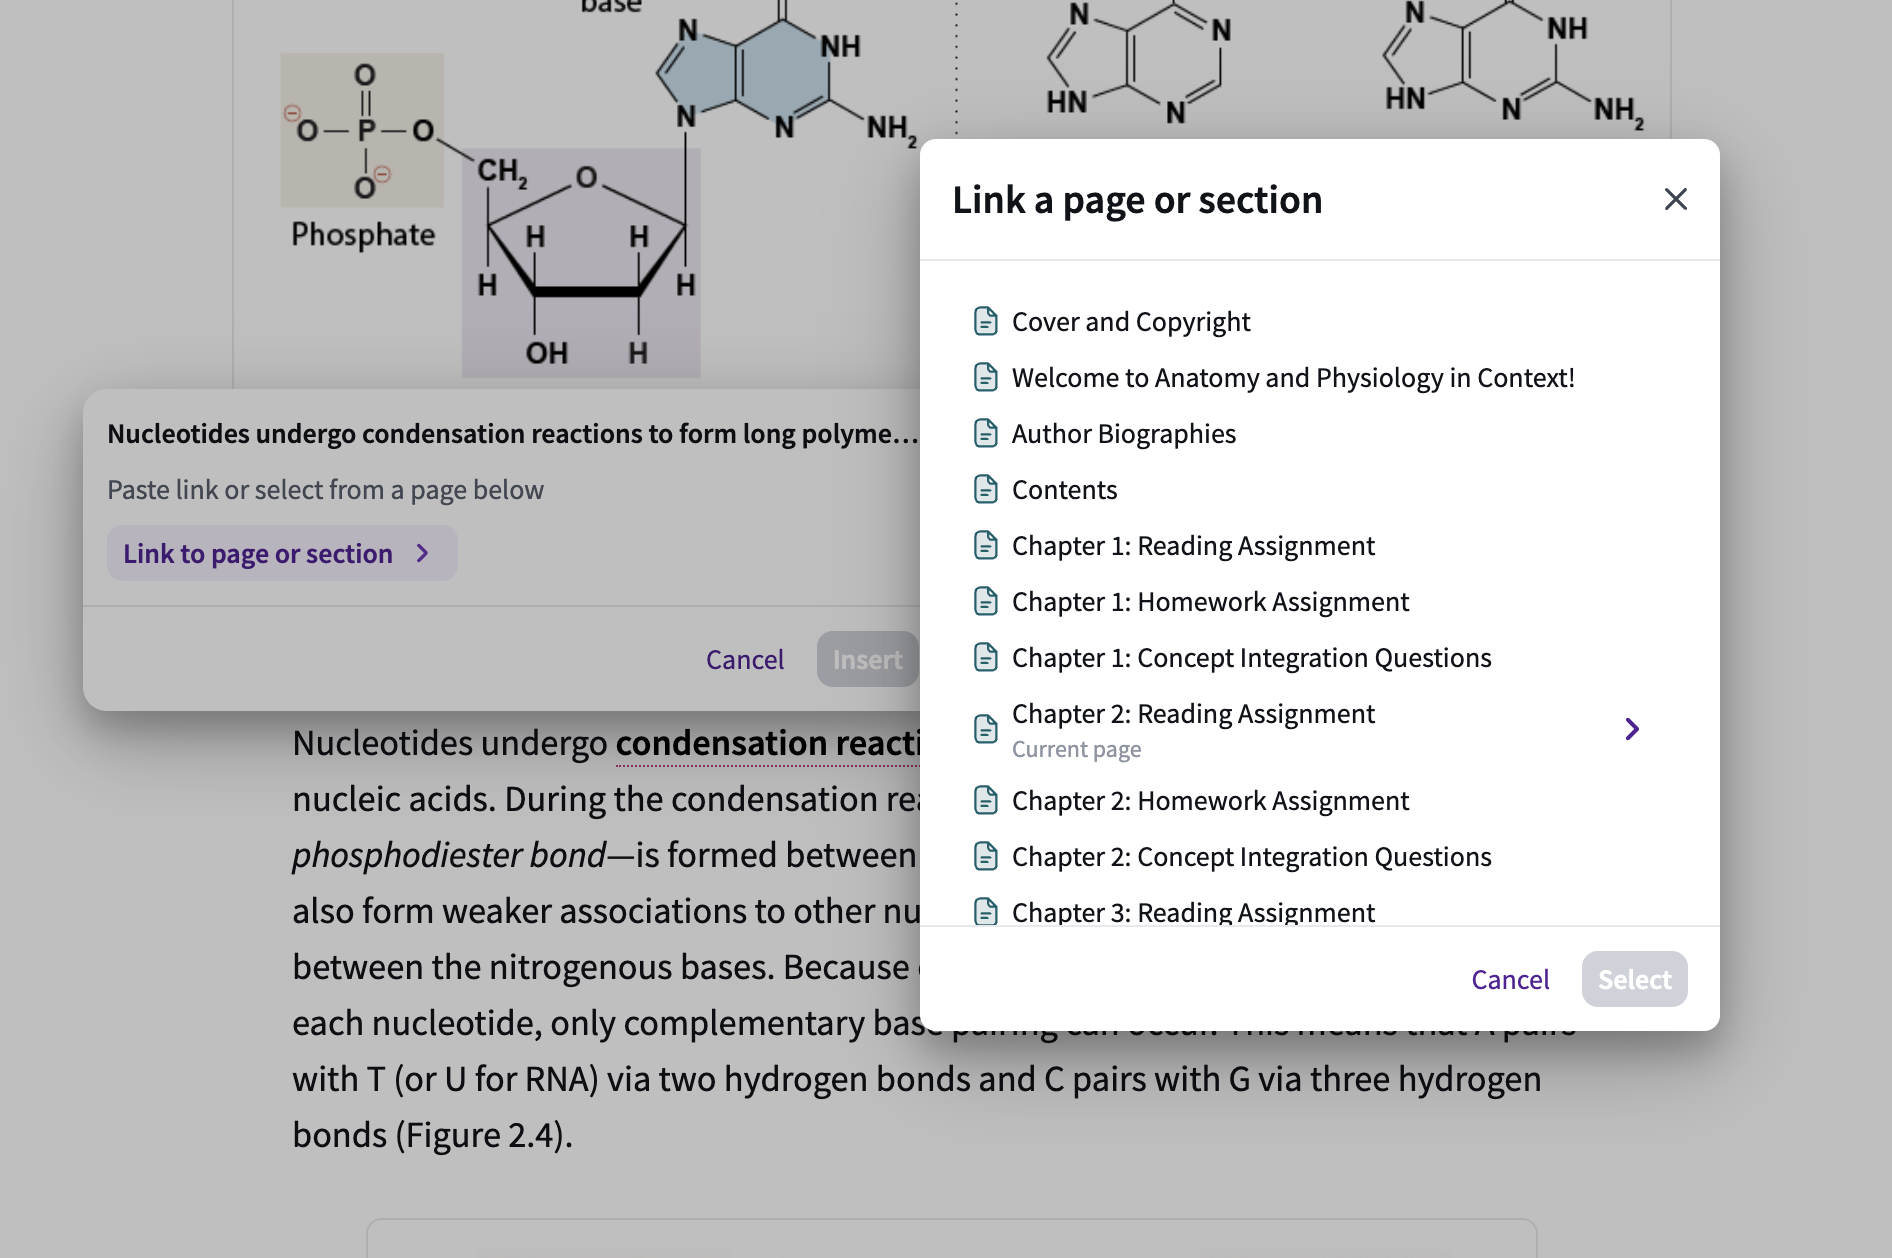
Image: Linking to an existing page or section
Important: The target Page must also be assigned in either Homework or Review mode for students to access it via the link. If the target is unassigned, students will not be able to view the content.
Student View: When students click the hyperlink, the linked Page will open in a new browser tab, allowing them to view and complete the content while keeping their original place open.
Obtaining and Sharing Page URLs
Each Top Hat Page has a unique URL that can be copied and shared externally, such as through your Learning Management System (LMS) or via email.
How to Get a Page URL
- In your Top Hat course, select the Page from the content list on the left-hand side.
- In the preview pane, locate the banner at the top of the page.
- To the right of the Page title, click the Copy URL button.
- In the pop-up dialog, click Copy to save the Page URL to your clipboard.
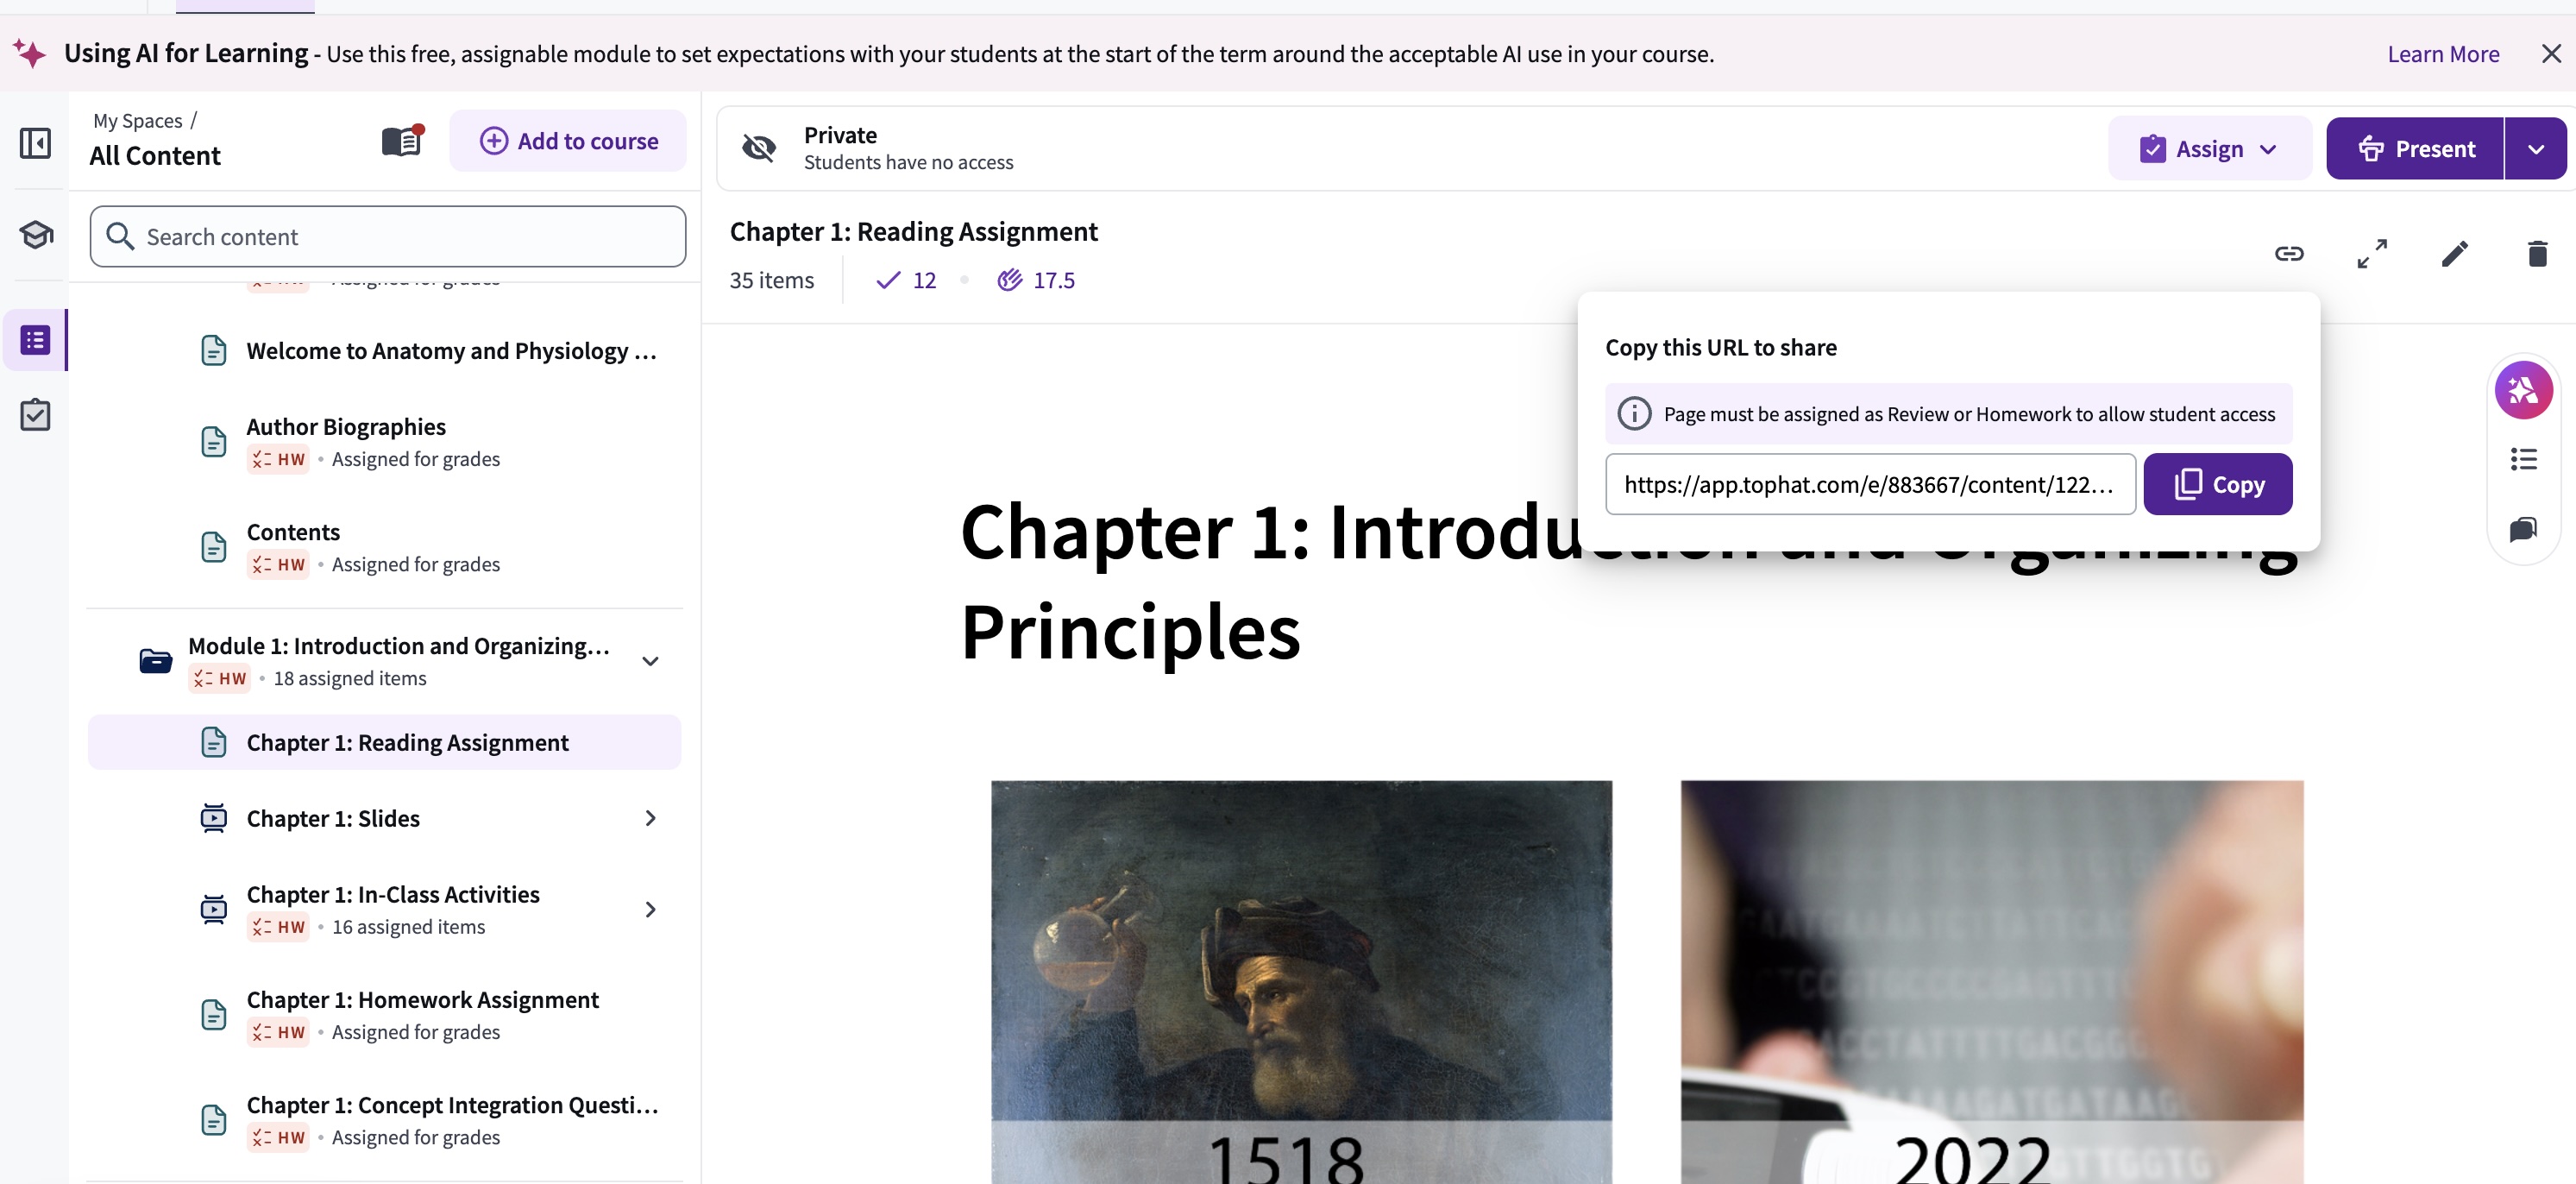
Image: Copying a Page URL
Linking to a Page from Outside Top Hat
You can paste the copied URL into external platforms like an LMS module, email, or calendar reminder. When students click the link, they will be directed straight to the specific Page.
Important: For students to access the link, the Page must be assigned in either Homework or Review mode. If it is unassigned, students will encounter an access error.
For more details on assigning content, visit:
Educator: Assigning Content (For Use Outside of Class)
Exporting Questions
To export a Question from a Top Hat Page to the content tree, locate the Page the question(s) are contained on, scroll to the question and click Export.
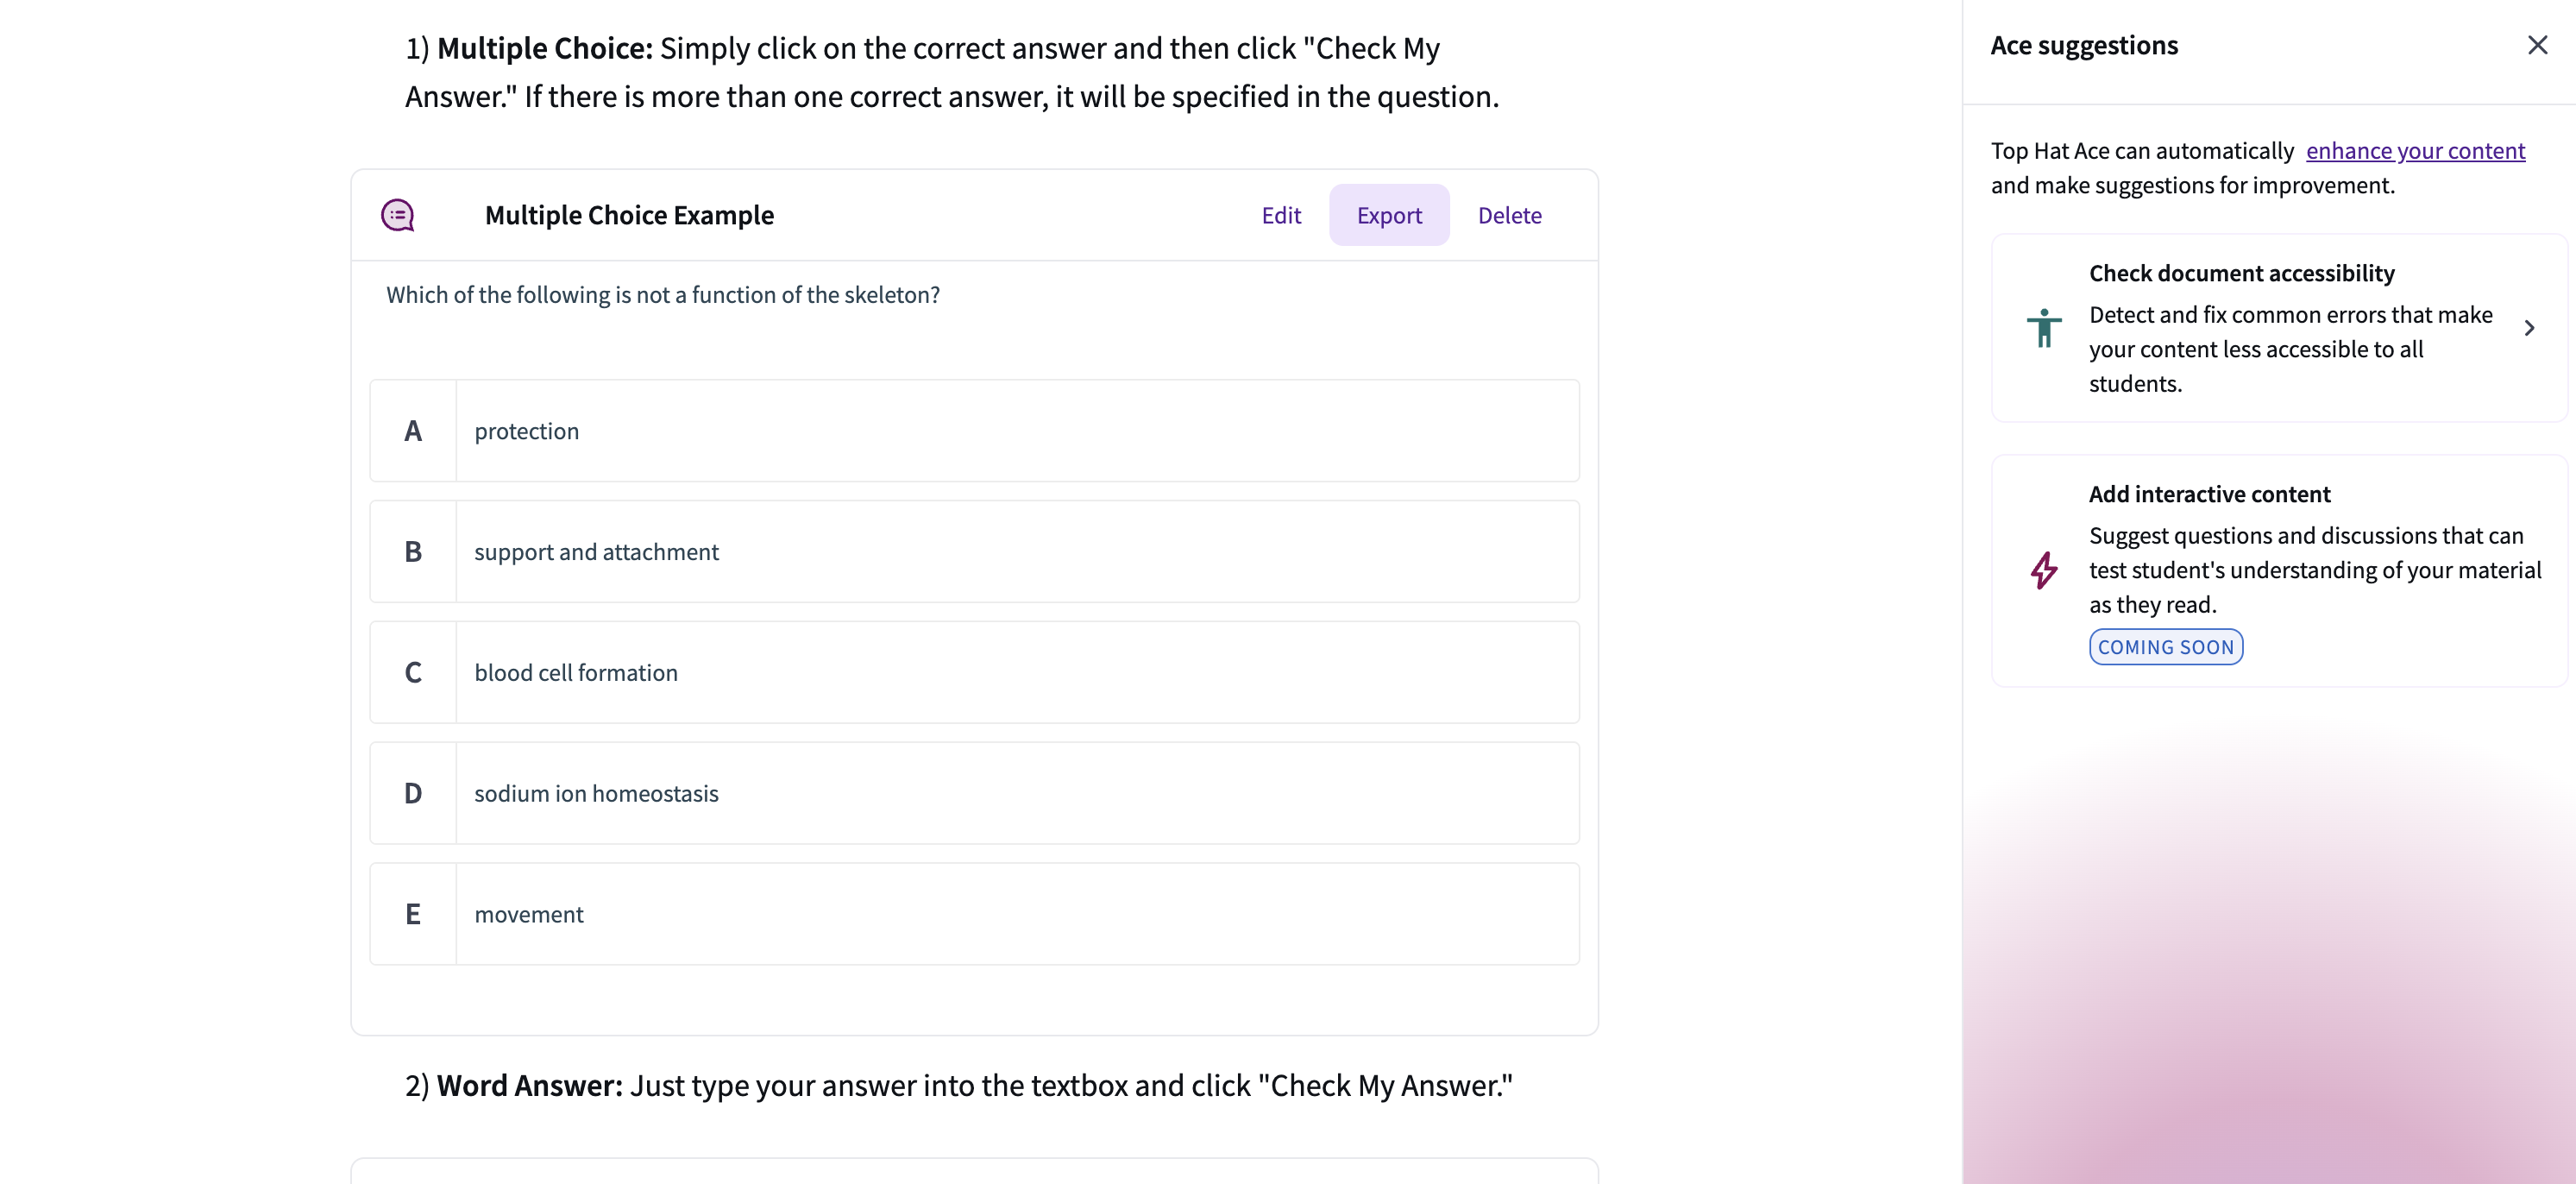
Image: Exporting a Question
Choose the location within the Content Tree where you wish the copied question to appear.
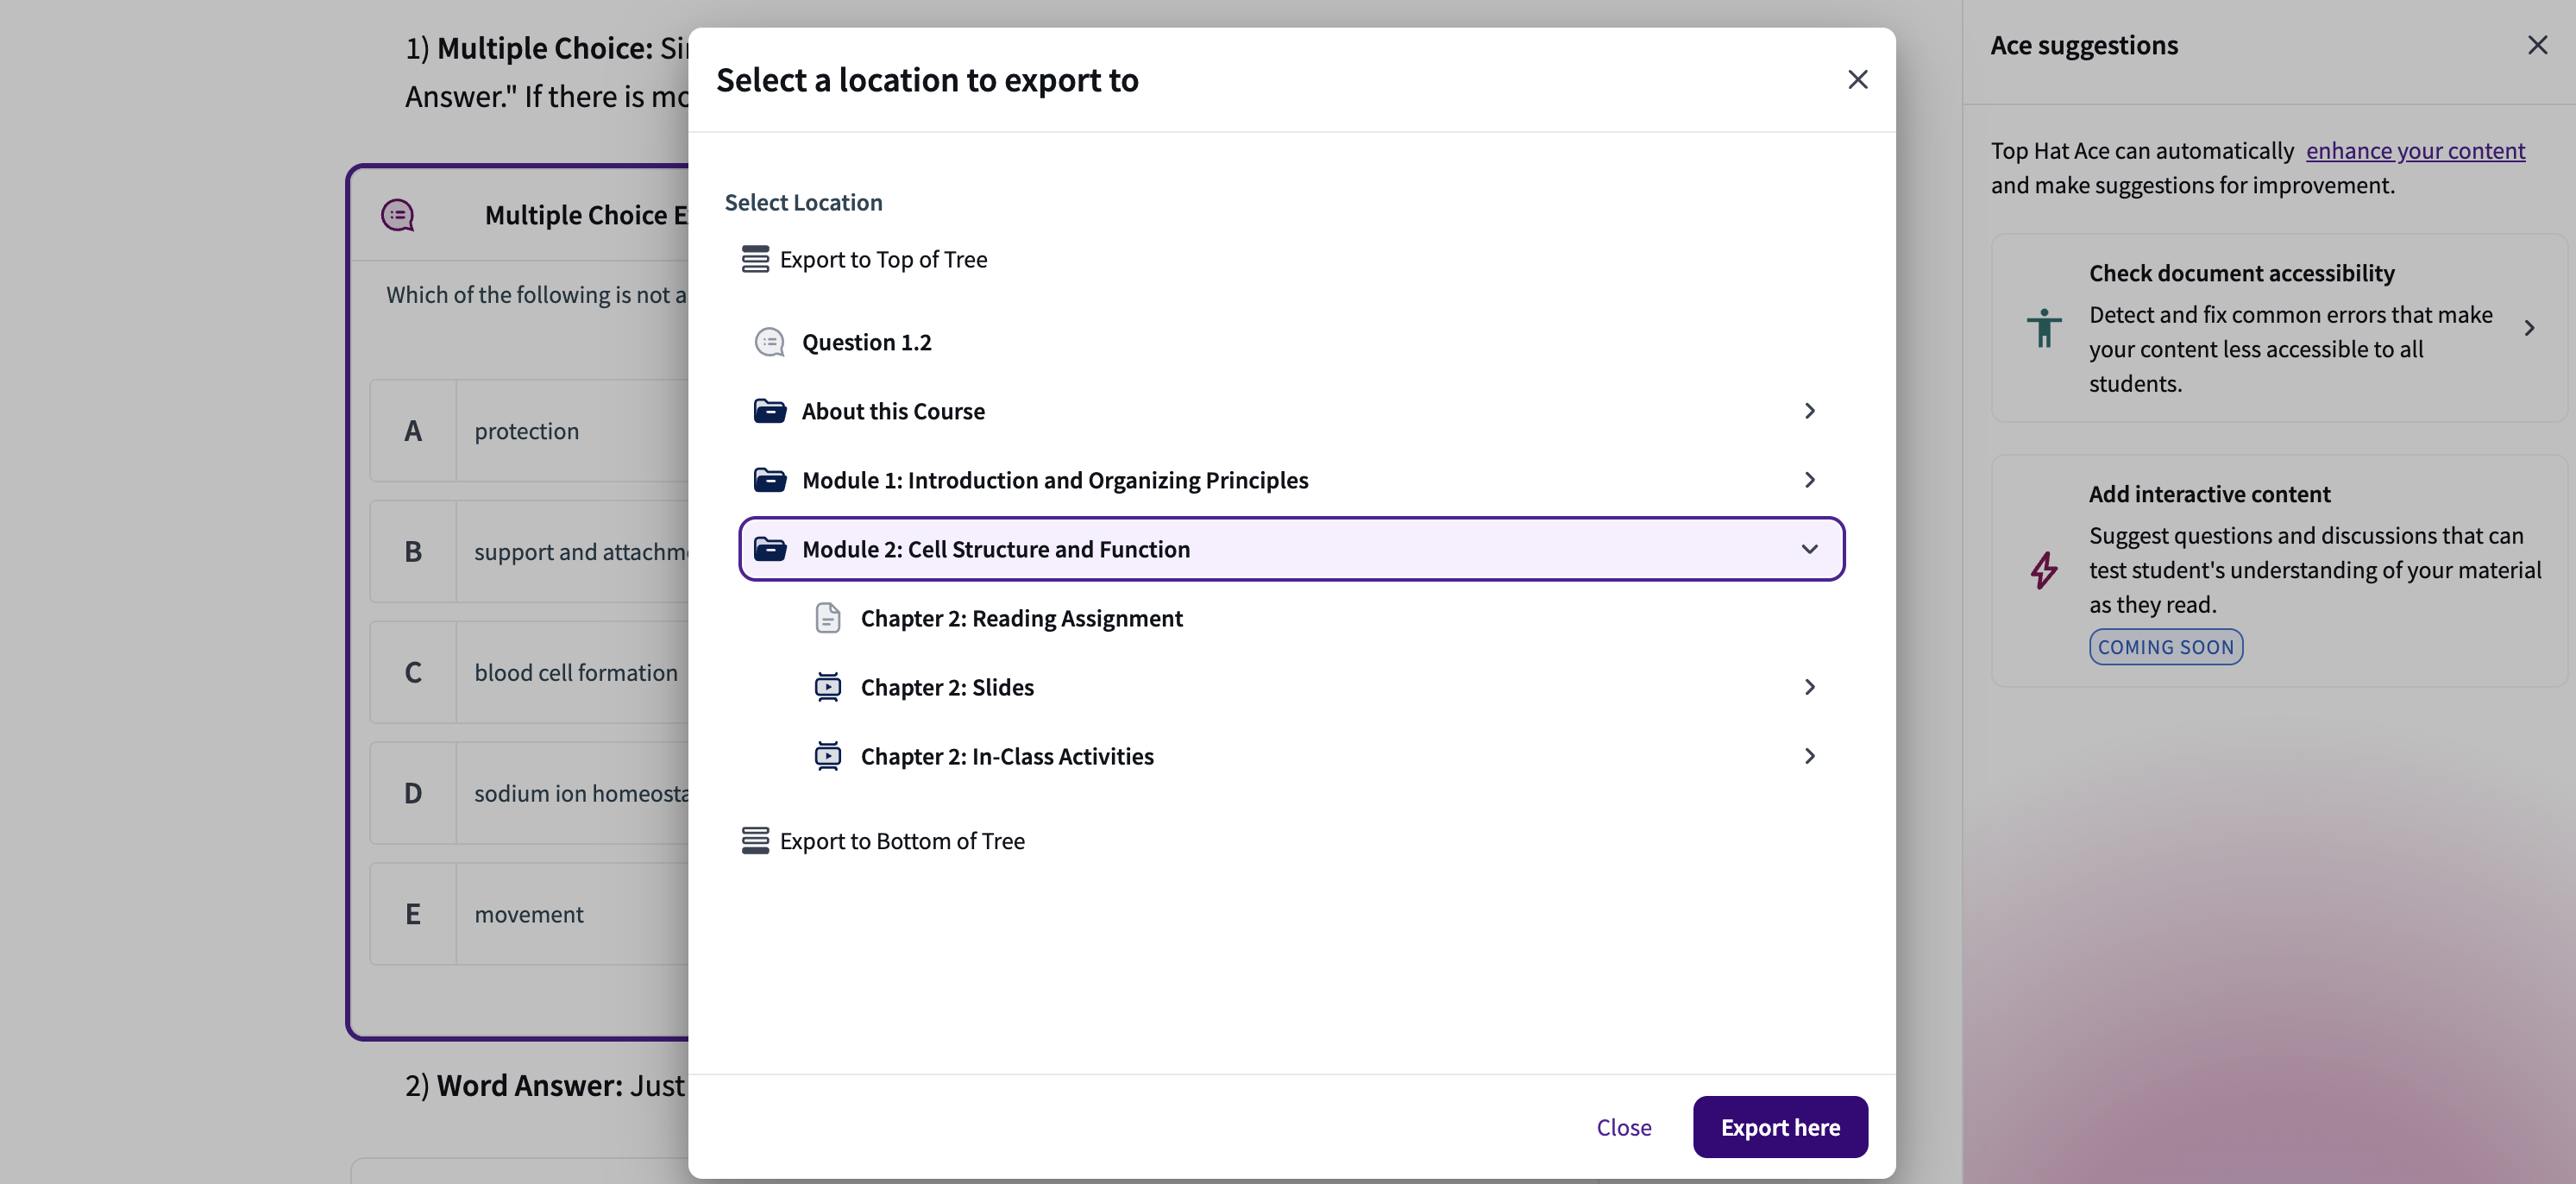
Image: Choosing a location to export a question to
The Question will now be visible in the Content Tree as a standalone item in the location you selected, independent of the Page.
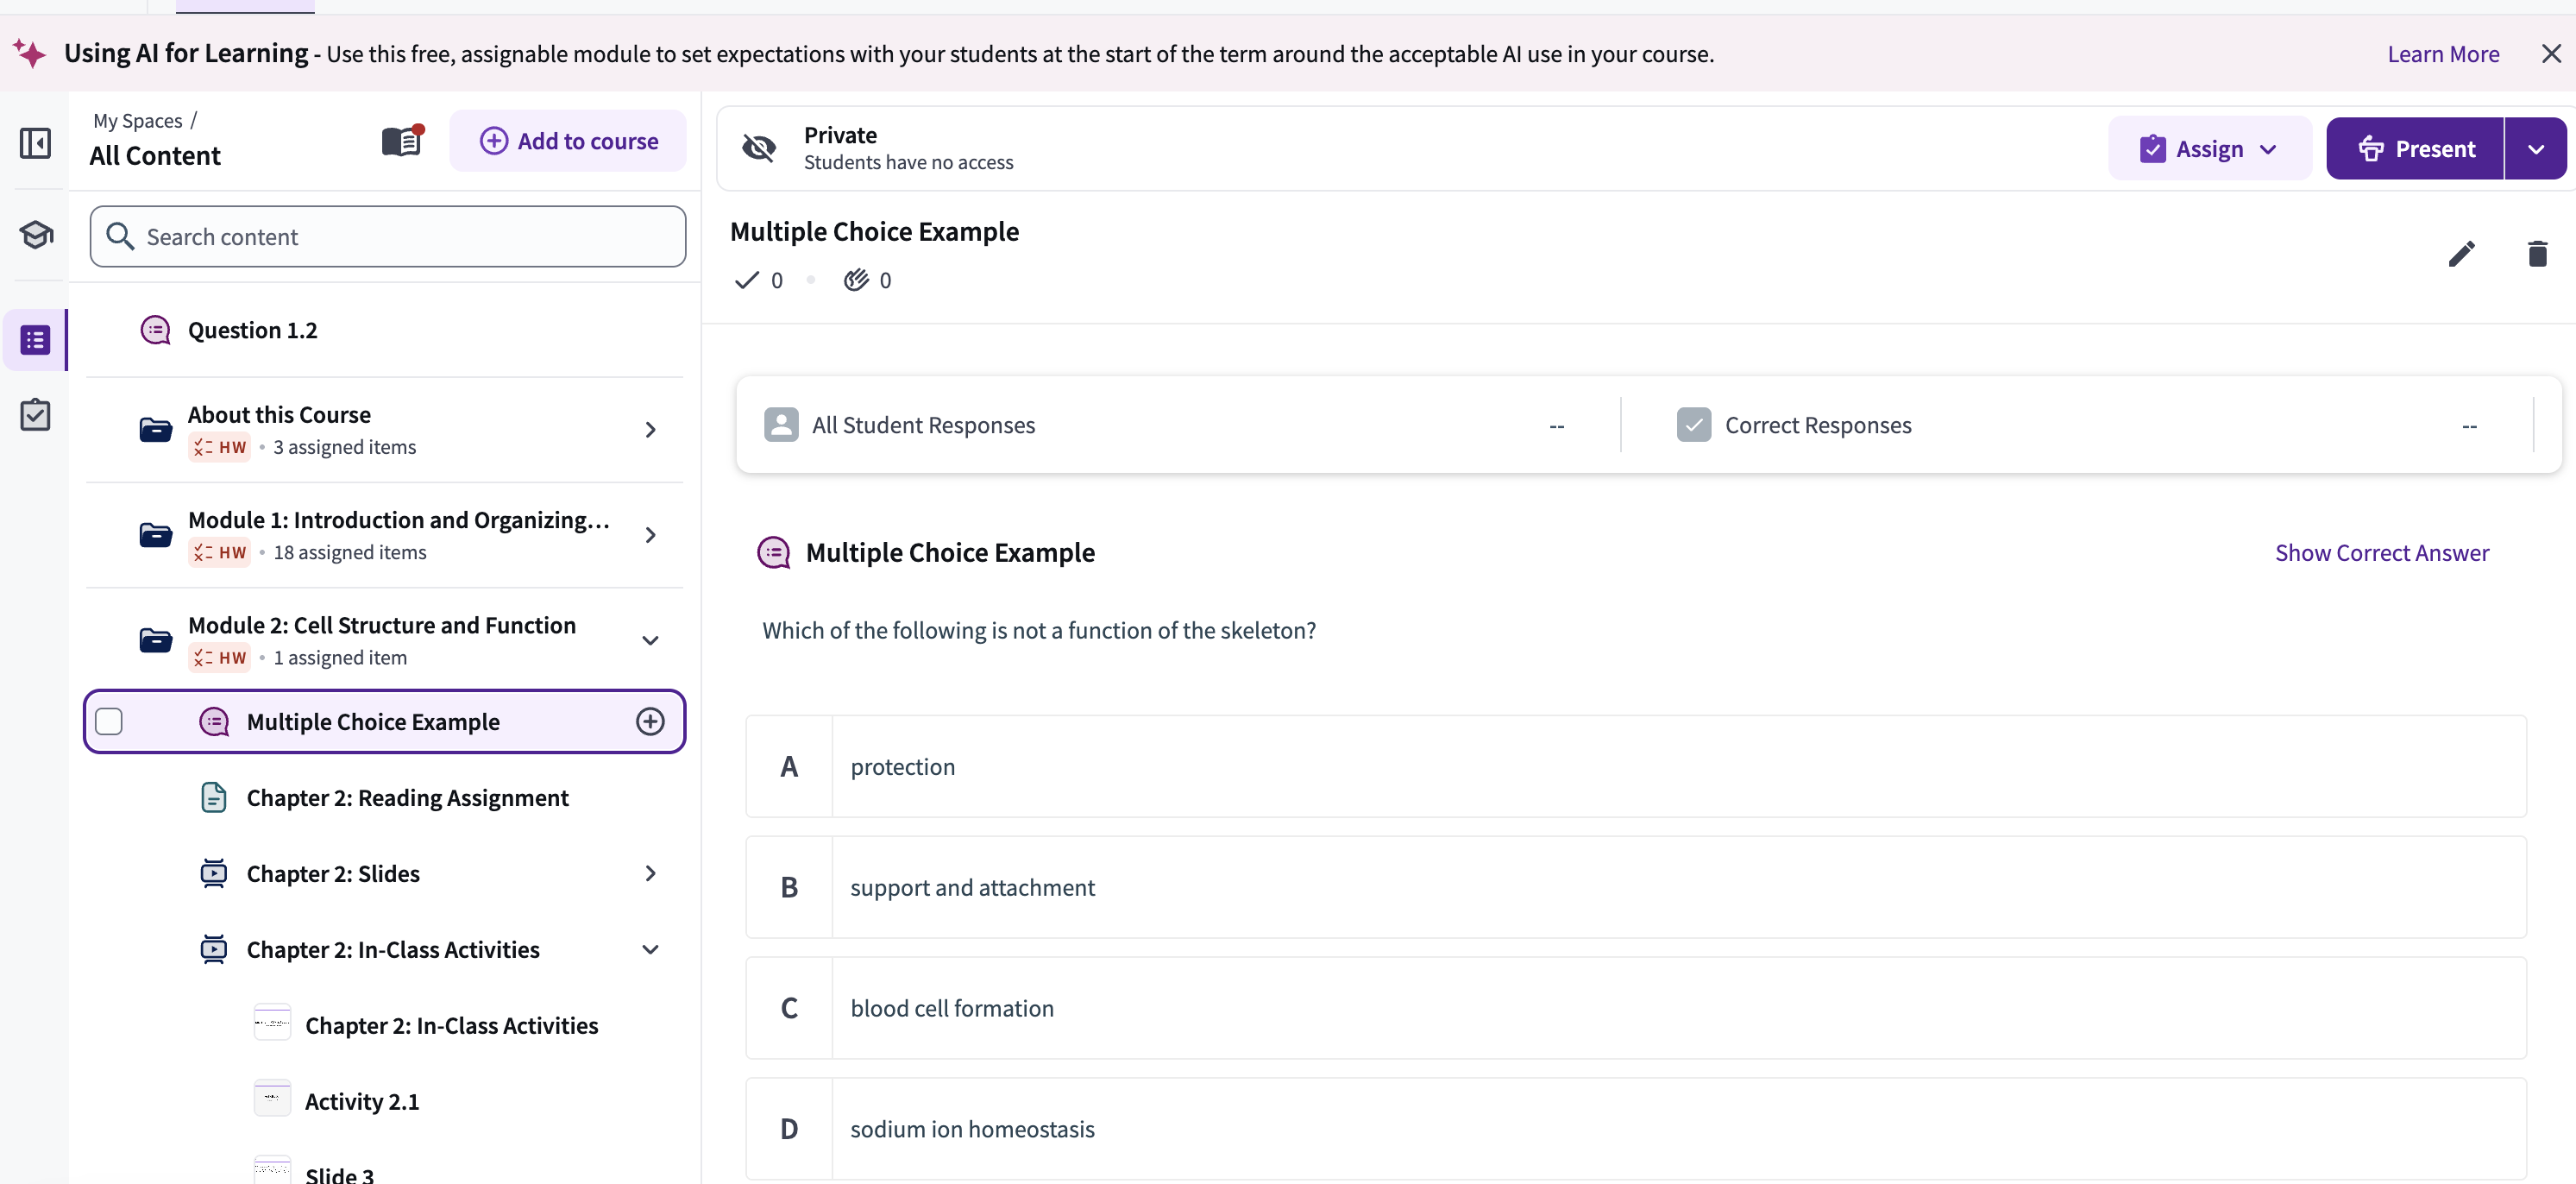
Image: Question exported into Content Tree